Global events have dramatically impacted how teachers and learners access and use content. With so much education now taking place outside the classroom, it’s more important than ever for educational publishers to build flexibility and speed into production processes.
Explore how Typefi’s proven automation solutions can empower your team to deliver high-quality print and digital educational content whenever, wherever and however it’s needed!
This presentation includes a demo of how to publish both teacher and student editions of a complex textbook in distribution-ready PDF and EPUB formats in just minutes—from a single source Microsoft Word document.
Whether you’re producing materials for schools, universities, vocational education, or professional development, whether your content is simple or highly complex, Typefi will help you maximise your reach without ever compromising quality.
Typefi has extensive experience helping educational publishers to dramatically streamline print and digital workflows. Check out our Industry Solutions pages to learn more, and don’t hesitate to drop us a line if you have questions about this webinar or if you’d like to have a chat about your publishing needs.
Transcript | Q&A | Presenters
Transcript
| 00:00 | Introduction |
| 00:32 | About Typefi |
| 00:58 | How Typefi works |
| 02:13 | Benefits of Typefi |
| 04:15 | Typefi success stories |
| 06:13 | Demo introduction |
| 07:04 | The Typefi user interface (UI) |
| 11:46 | Typefi InDesign template |
| 14:44 | Input: Structured Microsoft Word file |
| 17:11 | Publishing PDF |
| 24:44 | Publishing EPUB |
| 28:41 | Conclusion |
Introduction to Typefi
EMILY JOHNSTON: We have seen in recent months how global events have dramatically impacted education on all levels, especially how teachers and learners access and use content.
This webinar will explore how Typefi’s automation solutions empower publishers to deliver high quality print and digital educational content faster and in more formats, giving both publishers and users more options.
About Typefi (00:32)
Let’s start with a little background about Typefi.
Typefi was founded in 2001 and is headquartered in Queensland, Australia. Today, we also have offices in the US the UK, the Netherlands, and Sri Lanka, serving thousands of users in about 35 countries worldwide.
Typefi is an Adobe Technology Partner.
How Typefi works (00:58)
Let’s talk about how Typefi works.
Typefi software solutions are a single source publishing platform that allows users to take their content, whether they’re authoring in Microsoft Word, XML, EPUB, HTML, or in another way, and automate the output of more than 30 different format options for print, online or mobile distribution.
The first step of the automated workflow is for Typefi software to convert the source document into an XML format called CXML, or Content XML, which is XML based on the DocBook DTD. This is not a proprietary XML format, and full information about it can be found on the Typefi website.
Typefi then automates the transformation of the CXML into one or many output formats. There are as many as 30 different options.
For the output of PDF, specifically for print or web, Typefi is built on top of Adobe InDesign Server, and so automates the layout within that application.
Typefi has an open API for easy integration with a CMS or workflow management system of your choice.
Benefits of Typefi (02:13)
The benefits of the use of Typefi automation include a significant decrease in the production time for print and digital publications. Customers have seen time savings of up to 80%, which results in a quicker time to market for products, and greater ease in responding to changing needs of schools and educators.
Typefi customers can also automate output of multiple publication types, all from the same dataset. Using conditions, users can designate content that may be specific to a teacher or student edition of a particular publication, or to a state or a region.
With a click of a button, the Typefi software will automate the output of that publication with only the particular content needed for that version.
Typefi solutions excel at handling design complexity. Adobe InDesign is the world’s most used software for desktop publishing, and its easy-to-use interface focused on design means that Typefi users don’t need to compromise on the design of their products.
Whether publications contain images, tables, boxes, multiple columns, margin art, or other design complexities, Typefi automation can handle those requirements.
Typefi users have the ability to create multiple output formats from a single source file, giving publishers more ways to get content to users, helping schools, educators, and students with greater choices when adapting to new methods of instruction outside the classroom.
And finally, amongst the output formats that can be created using Typefi are accessible options for use by students with impairments that may limit their access to traditional formats.
For example, alternative text or alt text for images and tables that are a part of the source content can be incorporated during Typefi automation to produce outputs compliant with government accessibility requirements.
Typefi success stories (04:15)
So, let’s take a look at what these benefits have meant for some of Typefi’s customers.
The International Monetary Fund was able to dramatically reduce their production time using Typefi automation.
This was a critical change for them, since their content is constantly changing up to the point of publication. Being able to work closer to deadline and produce high quality outputs rapidly, despite last minute changes to content, is invaluable.
IGI Global has been able to achieve higher production volumes through the use of Typefi automation. They were able to nearly triple the number of books and journals that they were able to produce, all without the need to add additional staff.
Customers like Insight Guides have been able to reach a broader market and more users by using Typefi automation, to be able to produce additional digital formats for their content.
Typefi can automate content layout in multiple languages, including Cyrillic, Asian languages, and languages set right to left, like Middle Eastern languages. Customers like Pioneer have benefited from the ability to automate the publication of their content in numerous languages.
Finally, customers like Houghton Mifflin Harcourt have been able to utilise the additional time that they have to work on projects like custom publications. This initiative allowed their customers to select chapters or materials from different publications sources to create a custom book.
For example, a user may select a chapter from a math book, a chapter from science, and a chapter from history. Typefi automation combines the content, updates folios and tables of contents, creating a new product. This custom publishing avenue allows for expanded use of content and on-demand creation of custom curriculum choices.
Demo (06:13)
At this point, I’m going to transition to my colleague Damian, who will give you a demonstration of how Typefi works.
DAMIAN GIBBS: Hello, everyone. First, I’ll give an overview of the Typefi user interface and how to easily navigate around the various components.
As Typefi uses the world’s leading publication design software, Adobe InDesign, as a template for content styling and pagination, we’ll take a quick look at the Typefi plug-in for InDesign, which enables designers and publishers to use existing InDesign documents to intelligently automate page layout with Typefi.
Next, we’ll look at the input content, which in this case is a Word document, and how Typefi assists authors and editors to easily format content.
Finally, we will run through the content through a Typefi workflow and produce some common outputs such as PDFs and EPUBs.
The Typefi UI (07:04)
Typefi uses a web interface, so the only software you need to work with Typefi is a web browser. Navigation is via hyperlinked buttons and links. I’m using Typefi on my desktop, and as an administrator, I have extra buttons at the top. Normally users would only see Files and Jobs.
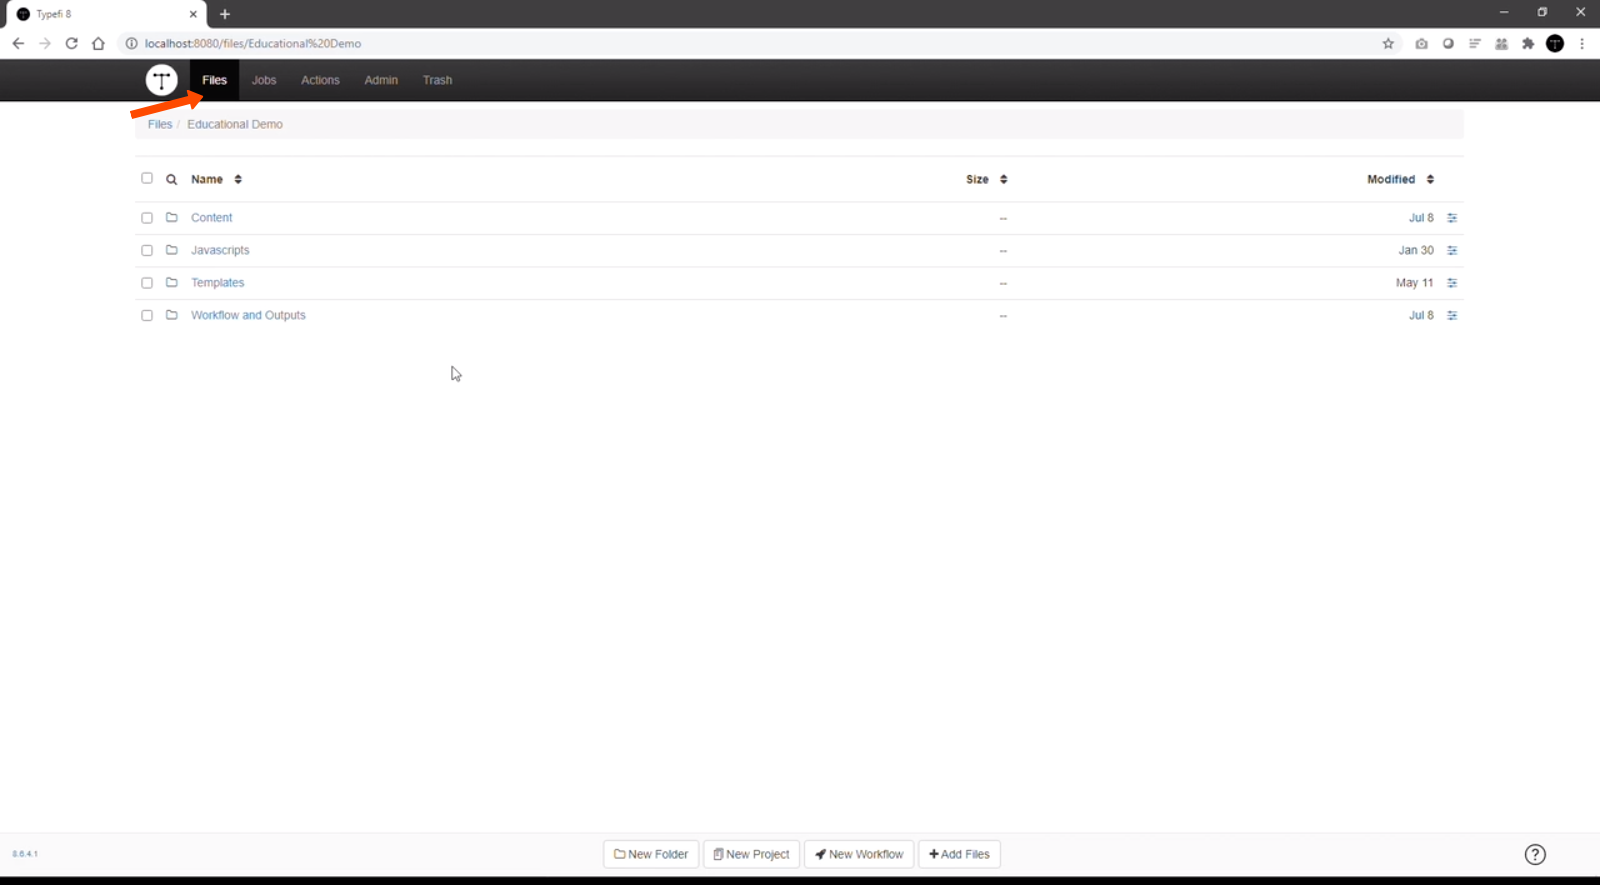
The Files button takes you to the root of your Typefi installation. Here, I have a folder for this demo, and if I click on the folder, it’ll open up. At the top you can see a breadcrumb of your current location within Typefi.
Within this folder, I have some subfolders which hold various components used in the Typefi setup. These folder names are not prescriptive, organisations can set up according to their own preferences.
The Content folder holds the input content for the demo. This is not required, but is only here purely for convenience for this demo.
As you will see shortly, Typefi will accept input directly from Word. It also has a facility for API calls from remote systems, such as a content management system.
Typefi makes use of scripts during the pagination process to enhance some of InDesign’s features or to provide customisations for customers to further automate pagination and/or outputs. These scripts are stored in the JavaScripts folder, and called by Typefi as and when they’re needed.
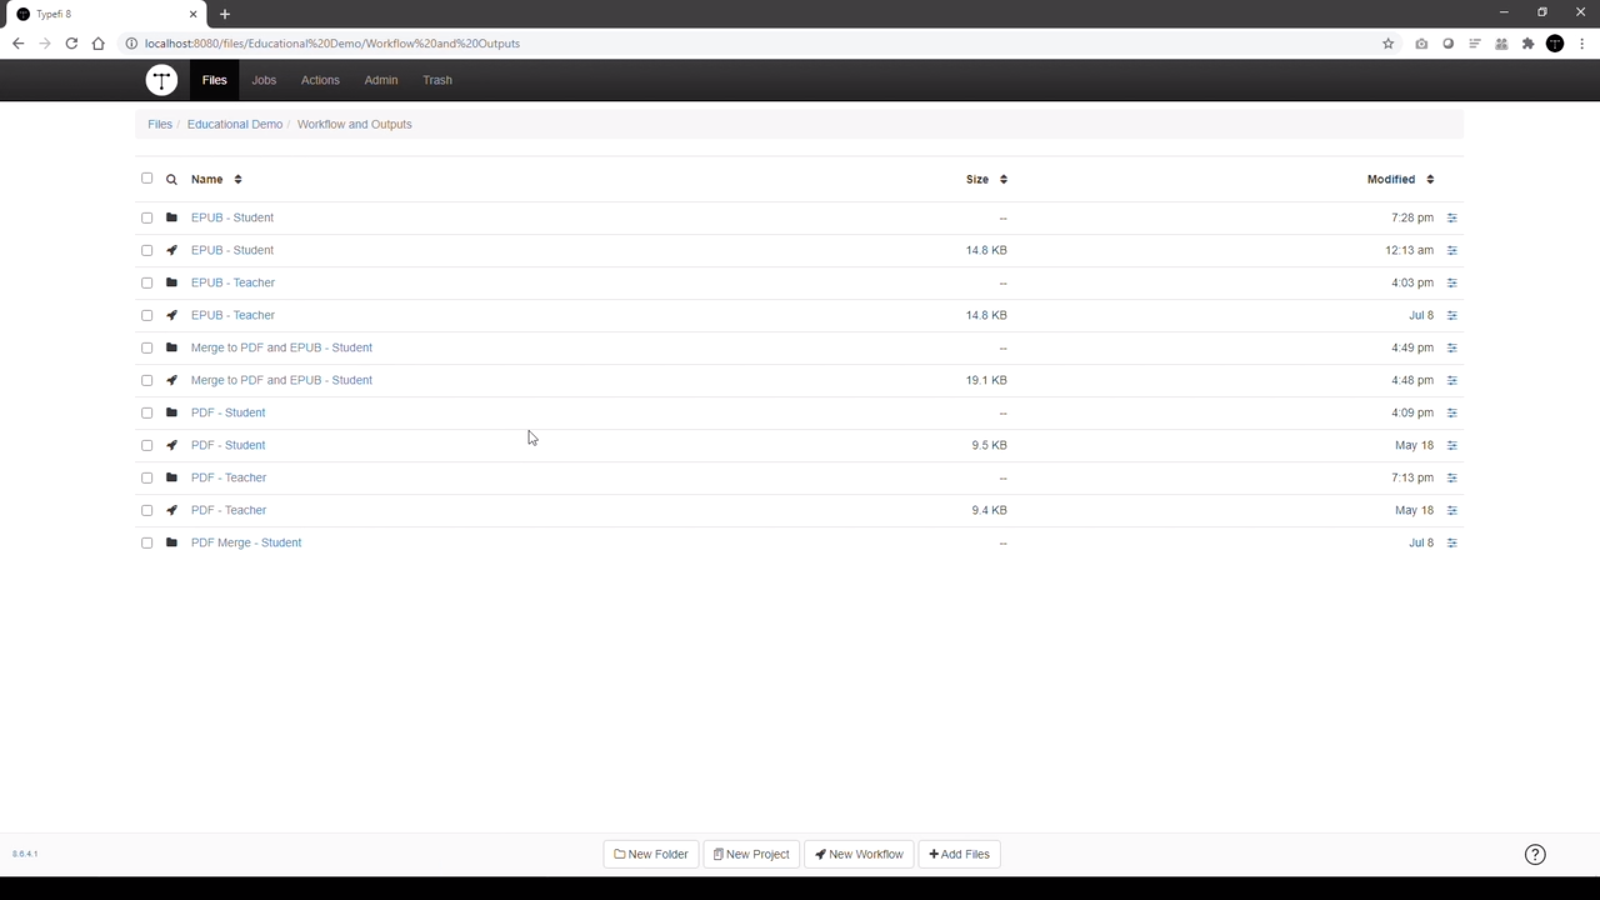
The last folder, Workflows and Outputs, contains the glue which brings the various components of the Typefi system together in what is called a workflow, and is represented by a rocket icon.
When a workflow is run, the output from the job is stored in a folder which has the same name as the workflow, but is shown with the black icon folder above, as you can see there.
Looking at the workflow, we can see that there are a number of boxes or components. Each of these boxes is what we call a Typefi action.
An action, in most cases, performs a single task with an input and an output. The output from one action, for example, over here, is passed as an input into the next action, and so on, and so on. Actions are plugged together almost like Lego blocks to build a workflow.
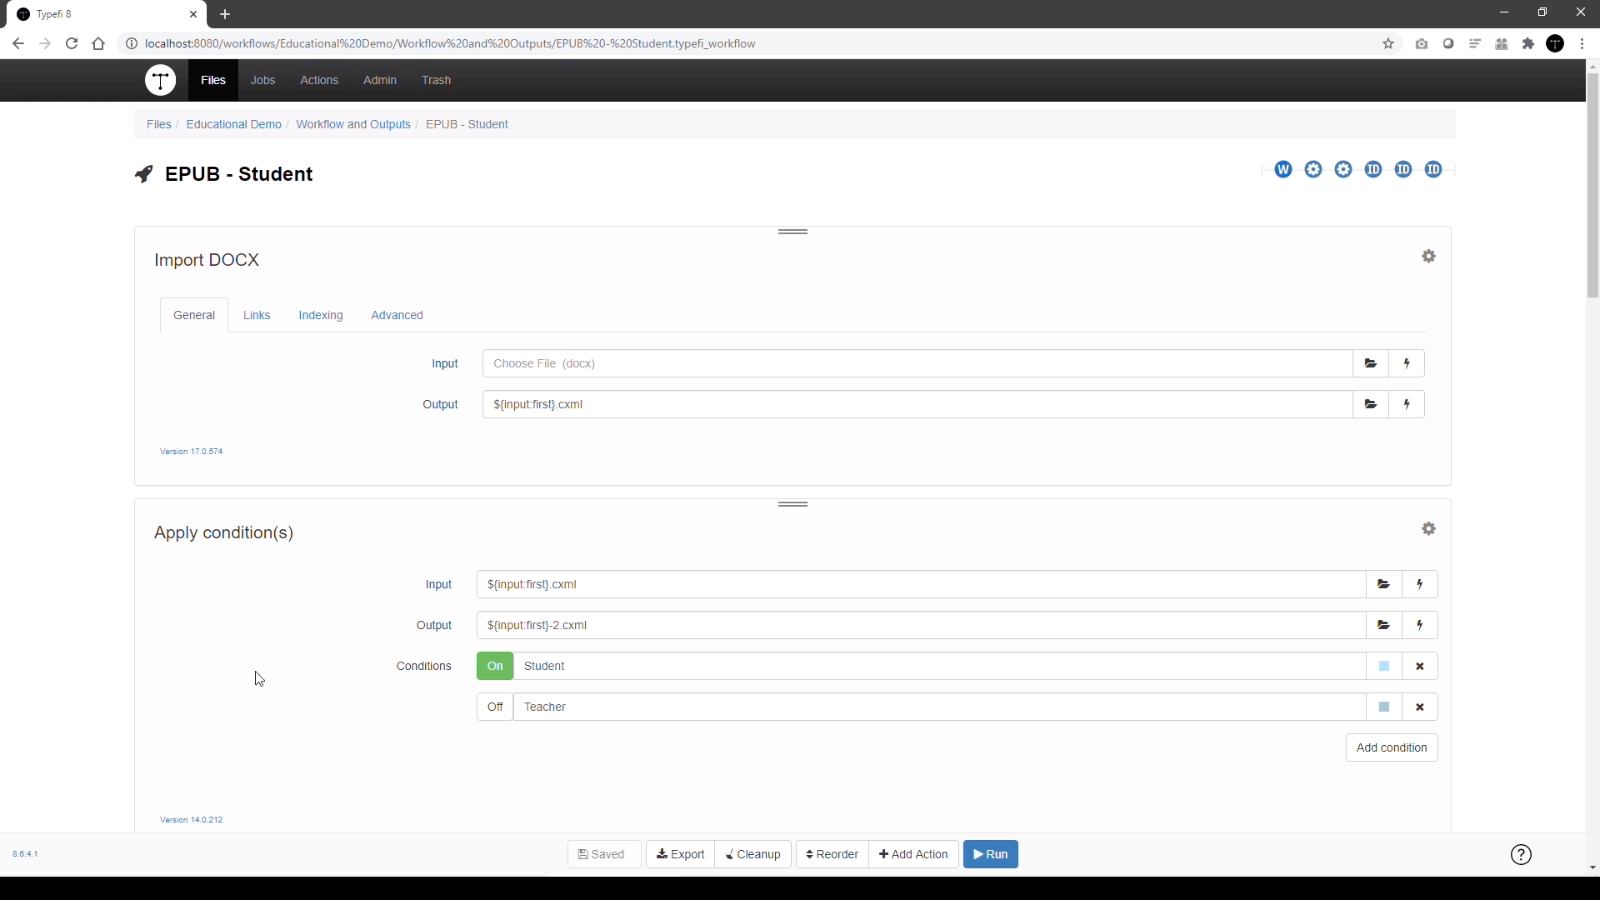
Workflows can be named. You can change the name up here however you like, but this one I’ve called EPUB – Student, as the final output will be an EPUB for students. This is because the input content has both teacher and student content, but the workflow has been configured, to only output content relative to the student.
The first action is Import DOCX. This action receives the content from the user or an application which will pass on the content, and is converted into Typefi’s Content XML format, or CXML.
The next action applies the condition of Student. In other words, remove all the content marked for the teacher. You can see here, the output from the first action is passed on as the input to the second action.
The codes you see between curly braces are variables, which allow you to dynamically name your files based on inputs or metadata.
As this job uses custom fonts, the fonts are copied using the Copy folder action, so that they are made available to InDesign for the pagination.
Next, the clean XML, or the second version of the XML, is passed on to the InDesign action or the InDesign Create document action to begin the pagination. Create InDesign document retrieves a copy of the InDesign template from the Templates folder and creates a new document with the name stipulated in the output field.
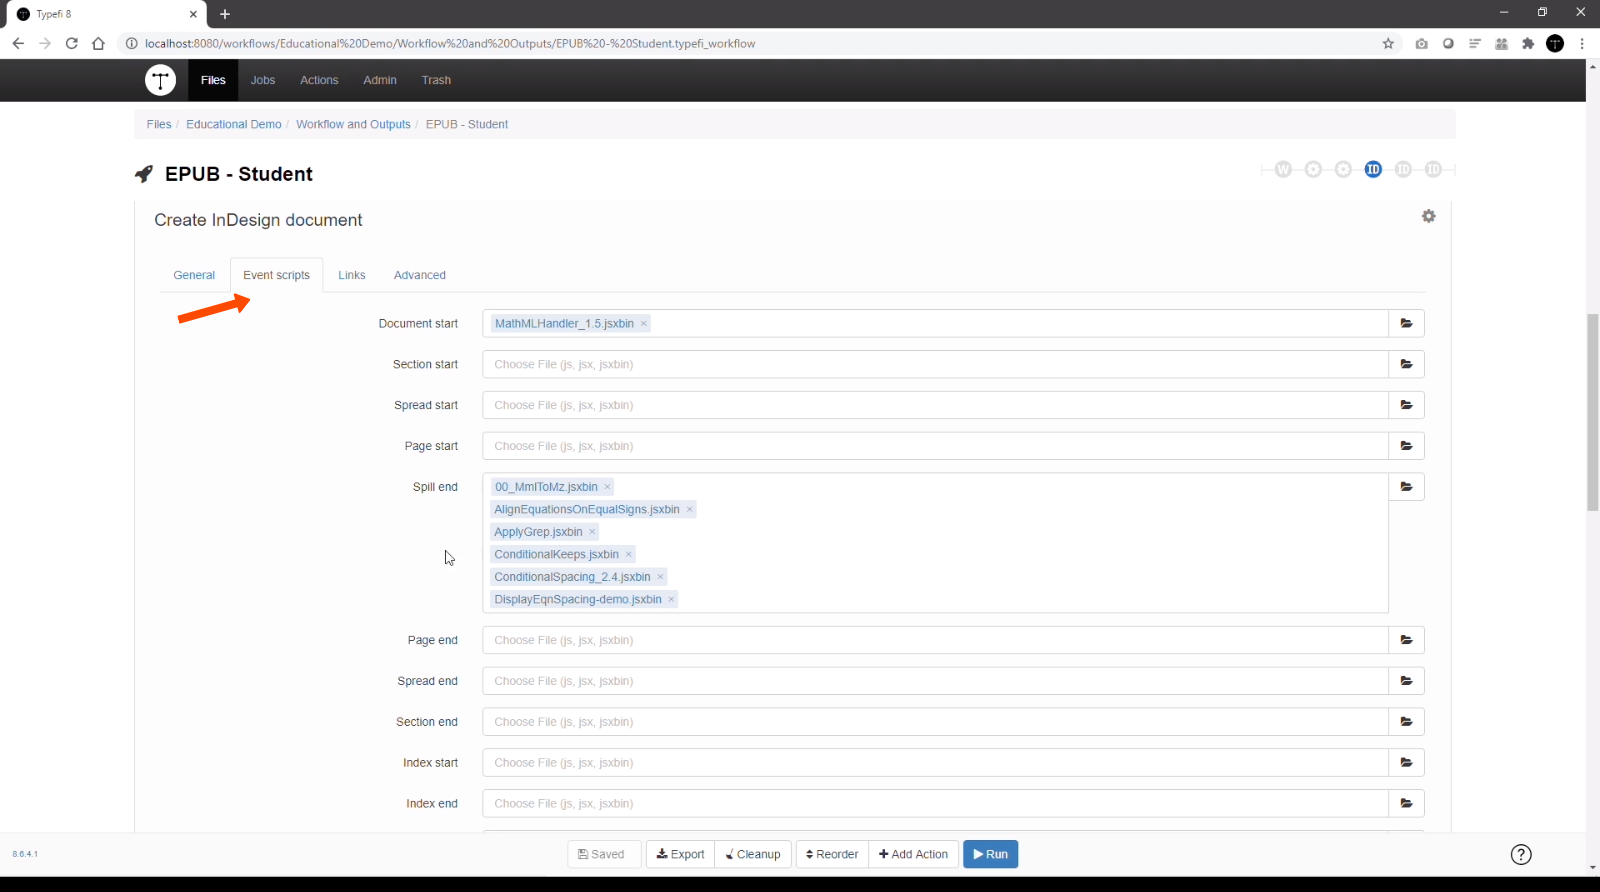
Under the Event scripts tab, we can see when and how the scripts are called for during the pagination process.
Once the InDesign document has been created, it is called by the next action, which is the Export to EPUB action. The EPUB is created using the InDesign document with the settings as you can see here.

Under the Metadata tab, we can see that some of the metadata fields used in the publication have been used to automatically populate the metadata for the EPUB.
As we move down the workflow, you might’ve noticed the icons on the top right. These represent the different actions in your workflow and are used for navigation.
As you can see, workflows are highly configurable and customisable, allowing organisations to set up input and outputs to suit their production methods.
Typefi InDesign template (11:46)
Let’s now have a look at the InDesign template.
The Typefi InDesign template is a normal InDesign document with some additional Typefi elements added. All the usual InDesign paragraph, character, object style, table and cell styles, are all used to make up the InDesign Typefi template.
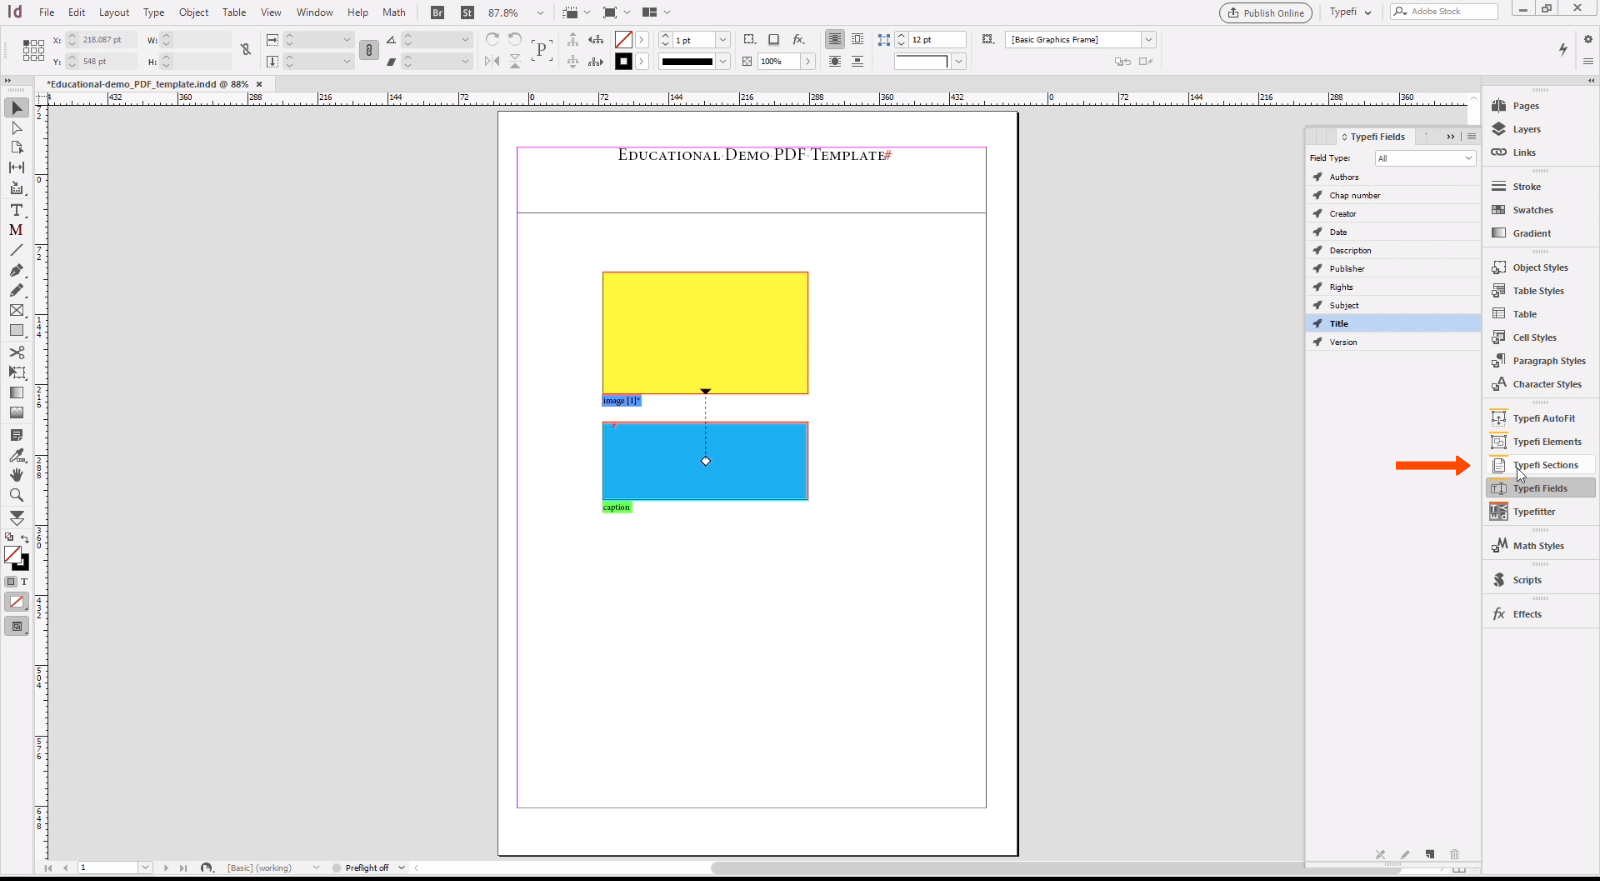
Typefi also provides a plug-in called Typefi Designer, which has a collection of additional tools to help with automation. These tools can be seen here on the right-hand side.
These tools allow the designer to set relationships between objects, for example, the yellow box and the blue box. We can move it up and down, and the blue box follows.
Rules for layout of the objects, so if we have a look at the Elements tab, we can see that we’ve got some layout rules here, and these will stipulate vertical alignment, horizontal alignment, or where on the page in relation to the anchor the object should be placed.
How objects should be resized when they’re filled with content, whether it’s an element or an image. So, for example, this box won’t expand greater than that, but it can be reduced and won’t expand further than its current width. This is managed with the AutoFit palette.
The use of master pages is also important for various layouts, and that is managed with the Section tool over here. We can see our Section tool and within the chapter, we can see that different master pages are applied in different order, along with the numbering.
And finally, the Fields palette allows data to be passed through from the source content directly through to InDesign for publishers and designers to use it, as and when they need in the pagination process.
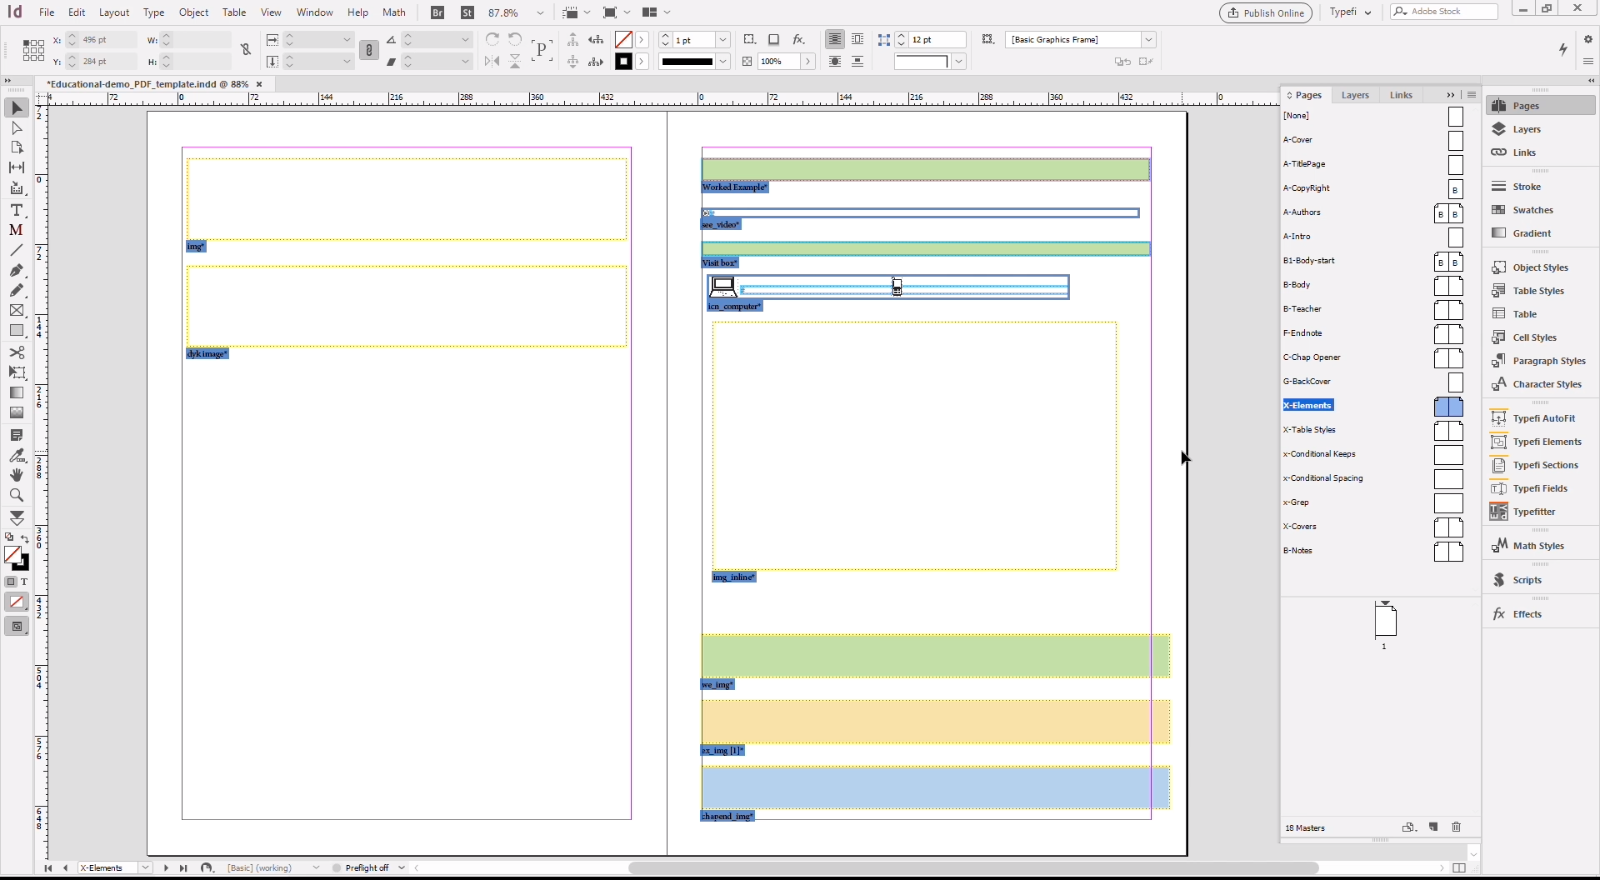
Typefi also makes use of master pages as a library to store elements that are used repeatedly throughout a publication, or throughout the pagination process. So, for example, here is a collection of boxes or frames of different styles and colours that are used within the document.
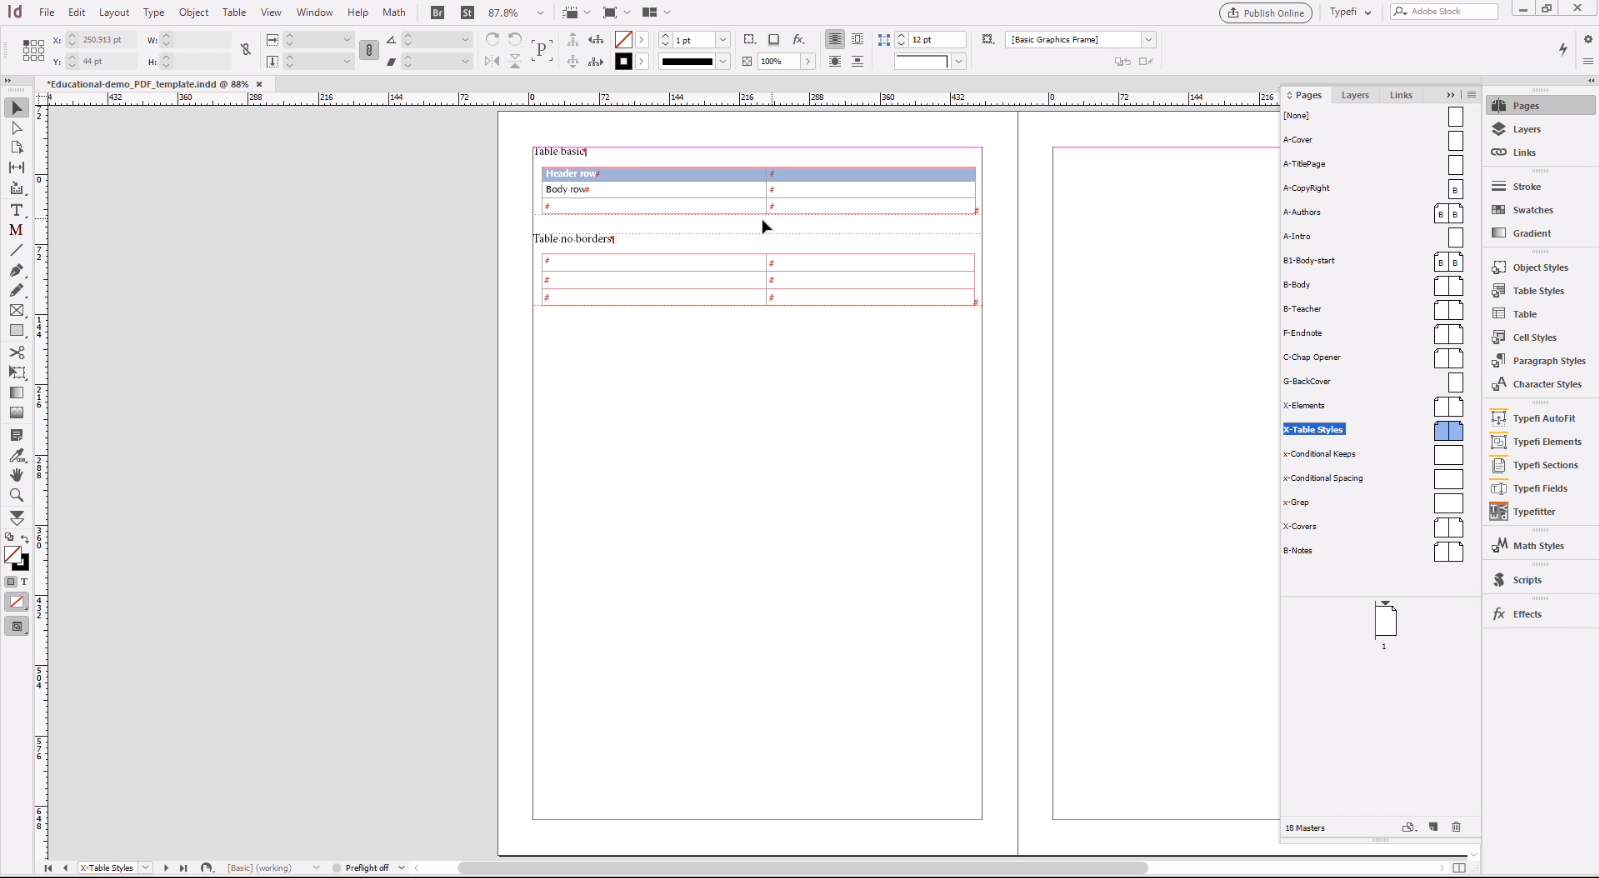
And on this next page, we have a couple of tables that have got table styles applied to them. And again, during the pagination, these styling attributes will be pulled across and format the document.
So, with these tools, creating templates from within InDesign, a familiar tool for many designers, can quickly adapt their existing publications to Typefi templates and enable their automation.
Whether the Typefi plug-in is installed or not, the InDesign templates and output files are still accessible to the designers.
Input: Structured Microsoft Word file (14:44)
Right, now that we’ve had a look at the InDesign template, let’s go have a look at our input content. I’m just going to close our InDesign document, shuffle that to the right, and open up our content.
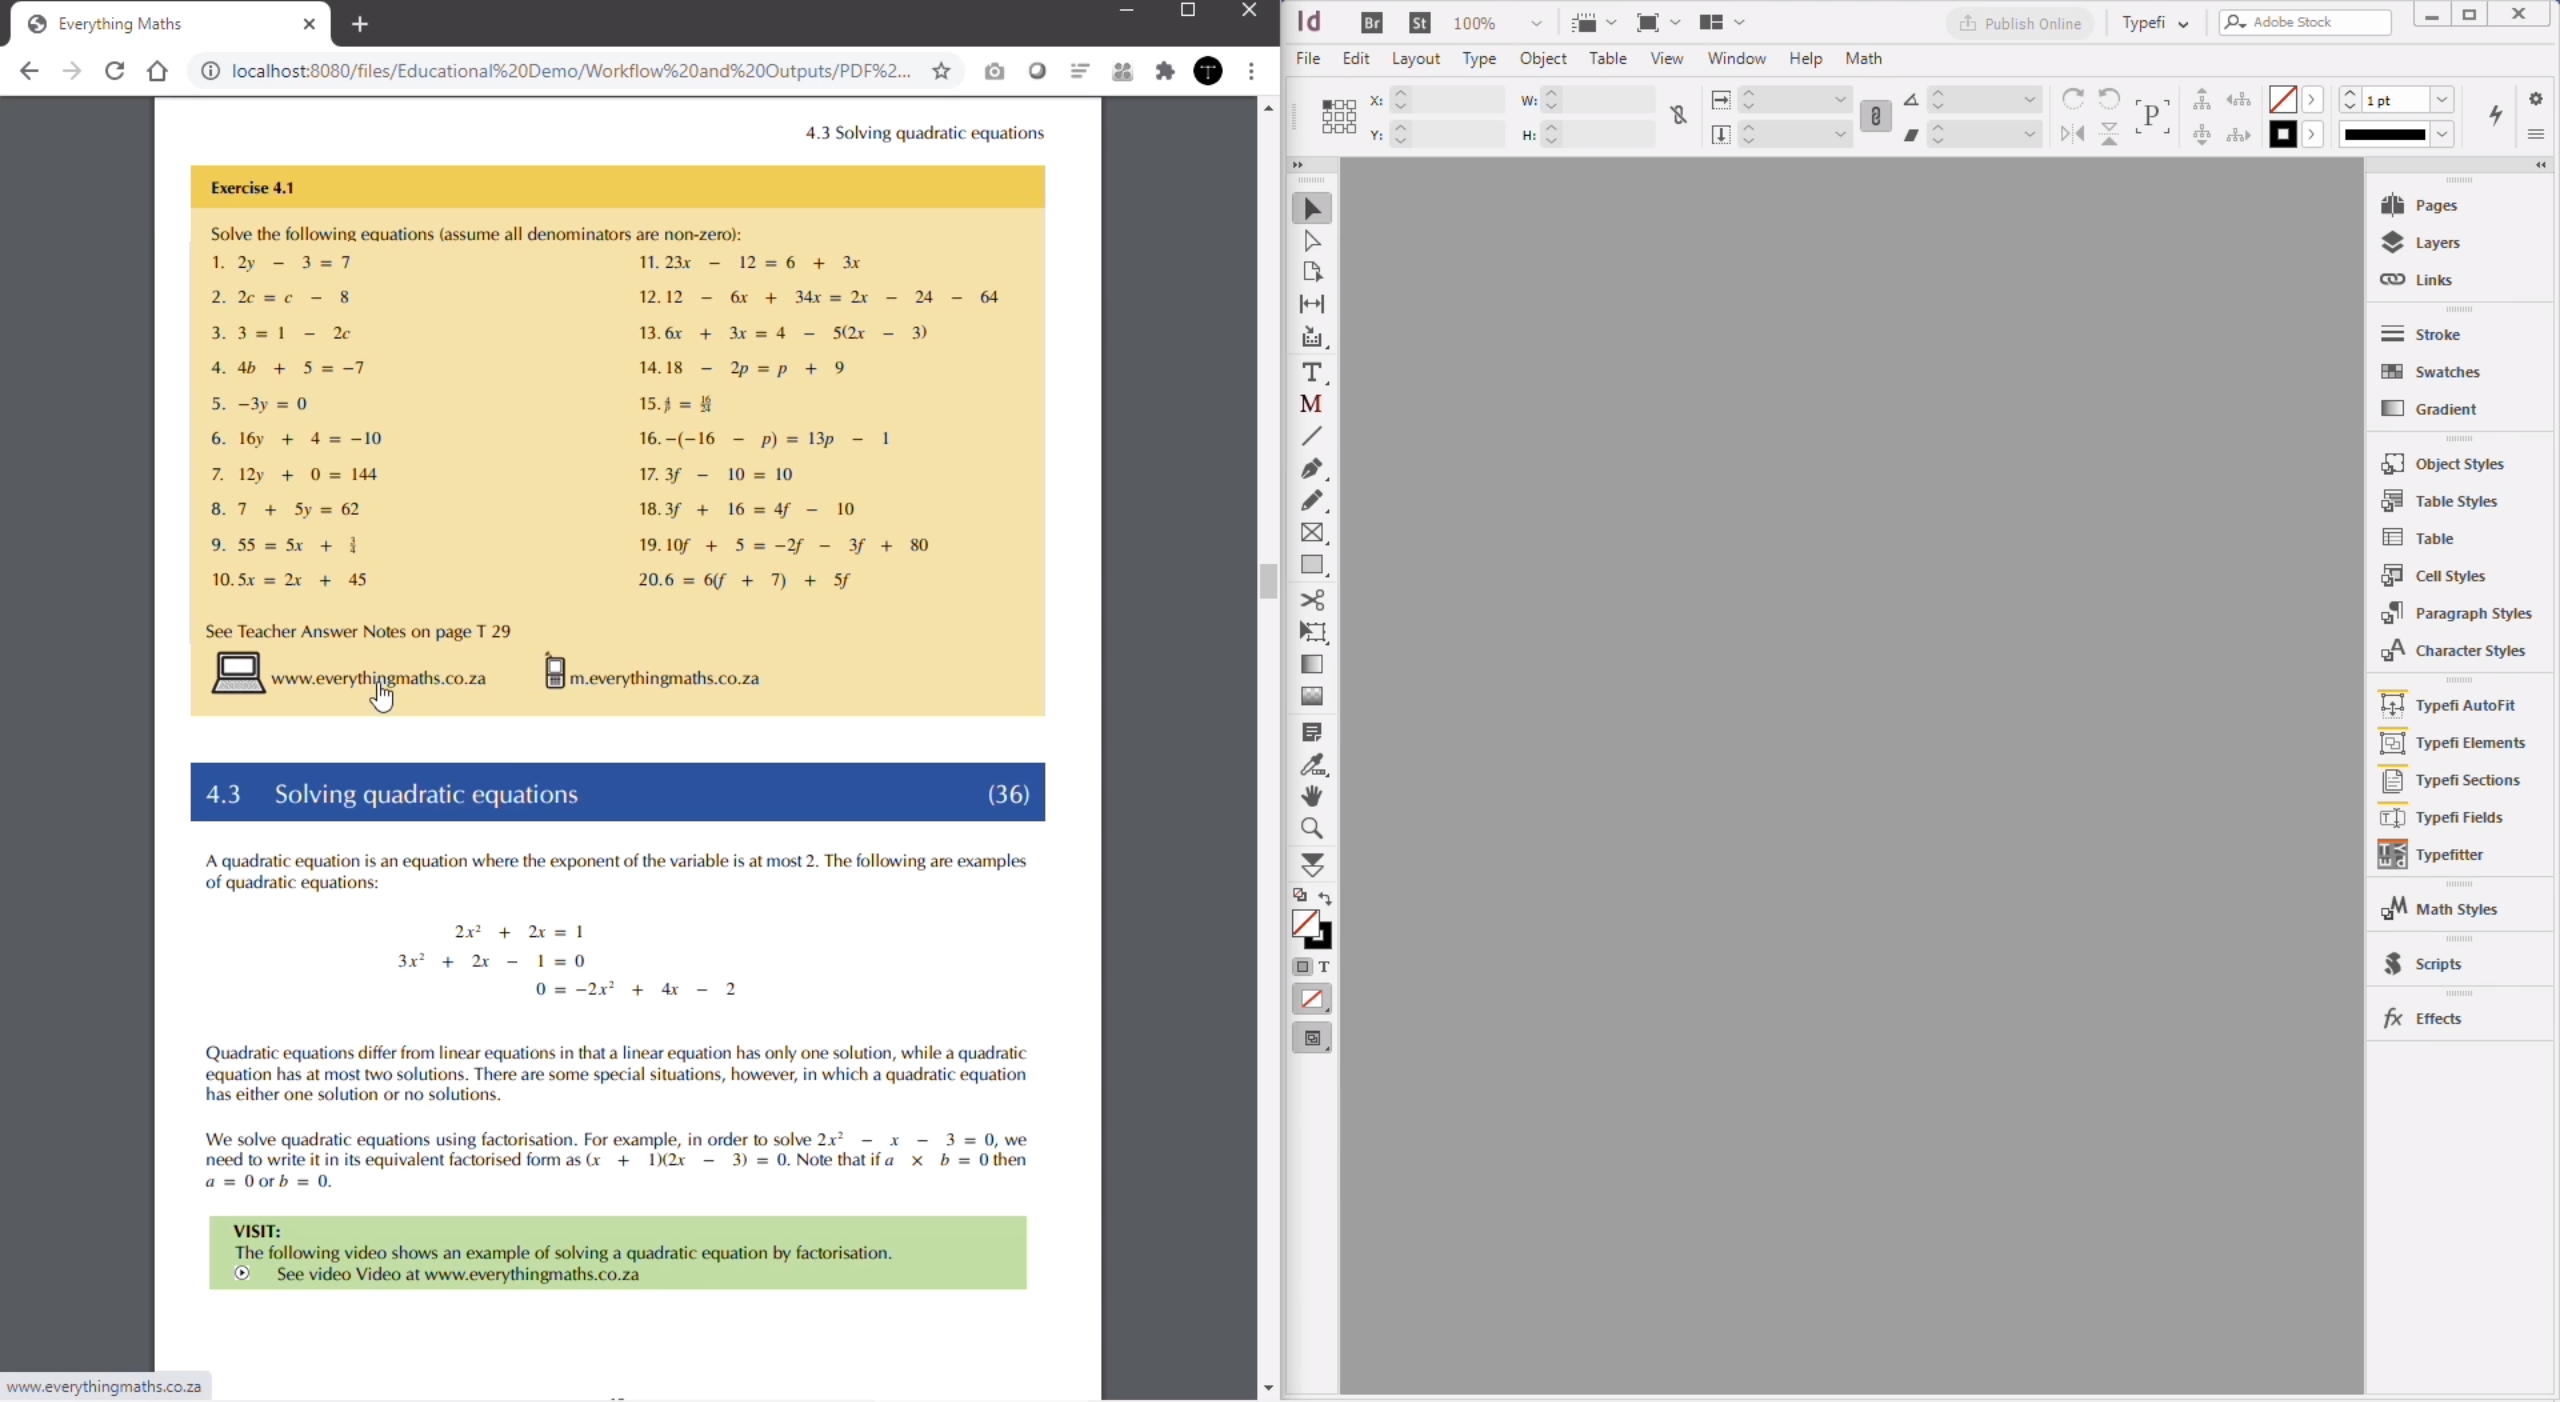
So, for this demonstration, our source content is in a Microsoft Word document. Typefi has a ribbon which is added to Word to assist authors and editors to format and provide structure to the content, in order to help automate the pagination using the InDesign template that we’ve just looked at.
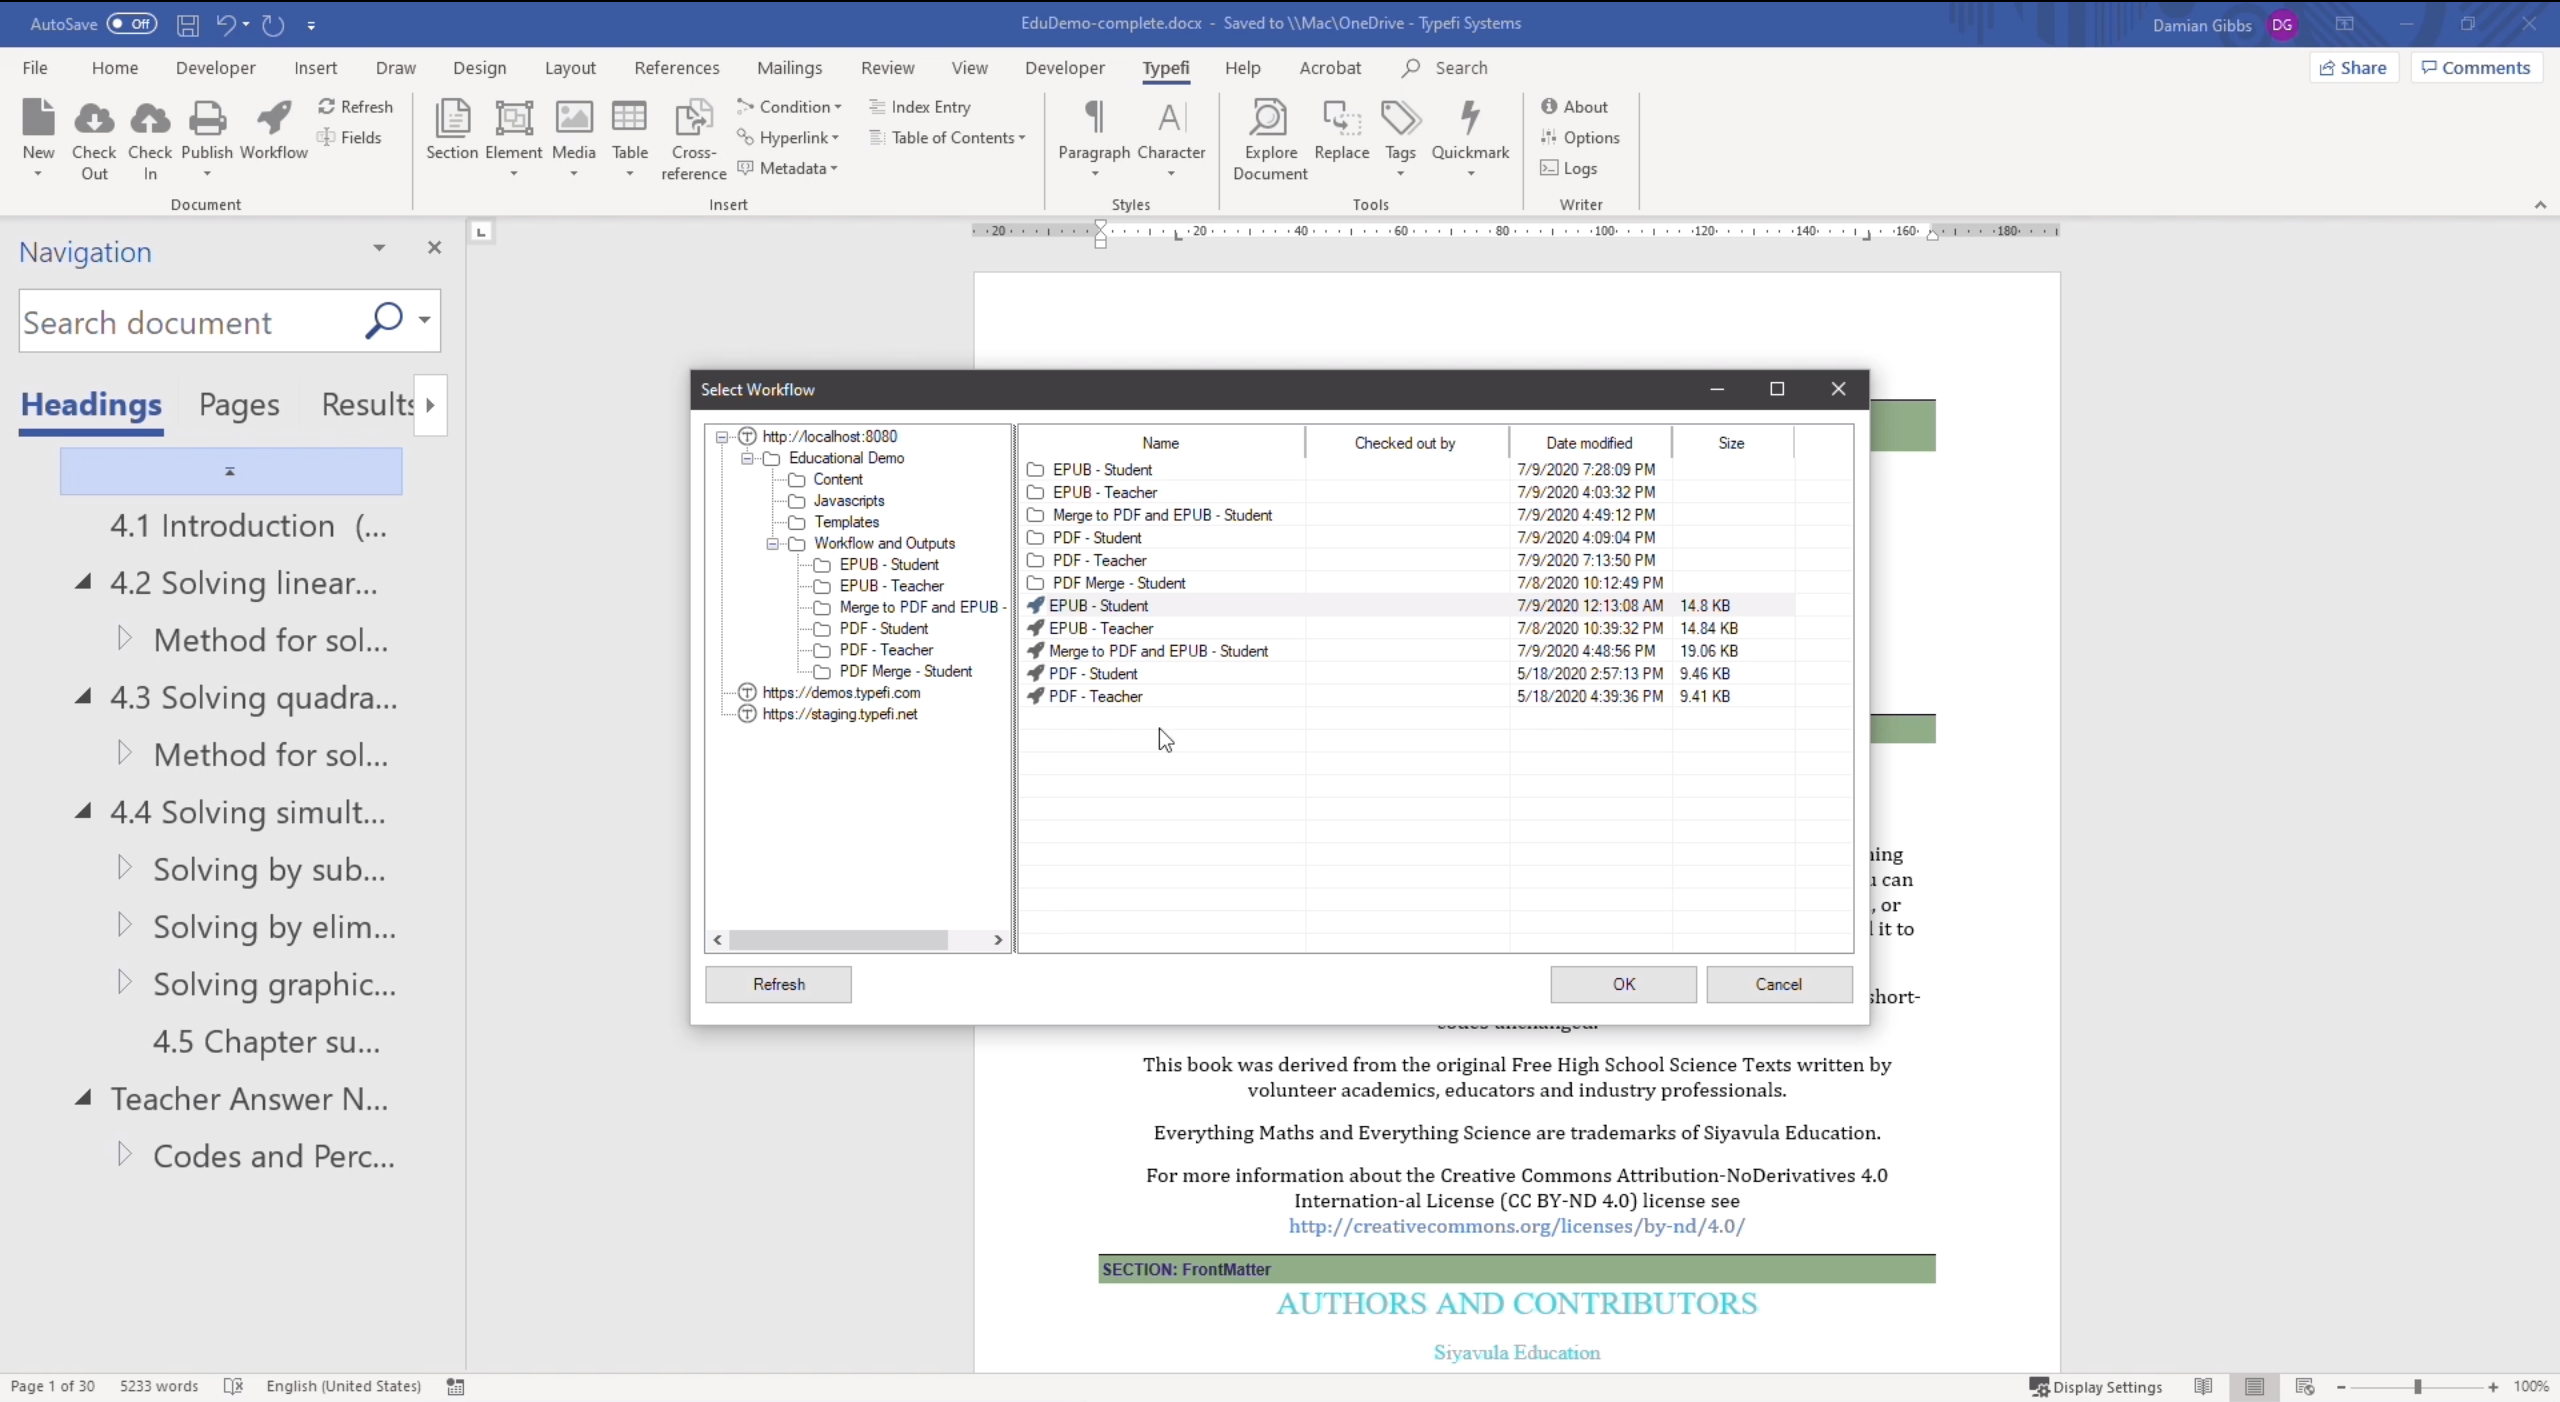
This is done by linking or attaching a document to a workflow. So, here we have the workflow icon, and if I click on that, I can then go browse onto my local server or my local host, and I will choose a workflow which I want to attach to this document.
As the workflow has the InDesign template linked, all the style information is fed from the InDesign template to this Word document. This allows the author to style the document with styles set up in the InDesign template, and therefore eliminating any guesswork.
If the template is updated with new styles, then by clicking the Refresh button, the new styles will be synchronised into the Word document from the InDesign template. These styles are shown in the various buttons available in the Typefi ribbon.
So, for example, here’s our Section button, which will show all the sections within the template that can be used. If we need to place an Element that’s available in the InDesign template, we can place it directly from here. Media is very straightforward, and also inserting a Table is very straightforward.
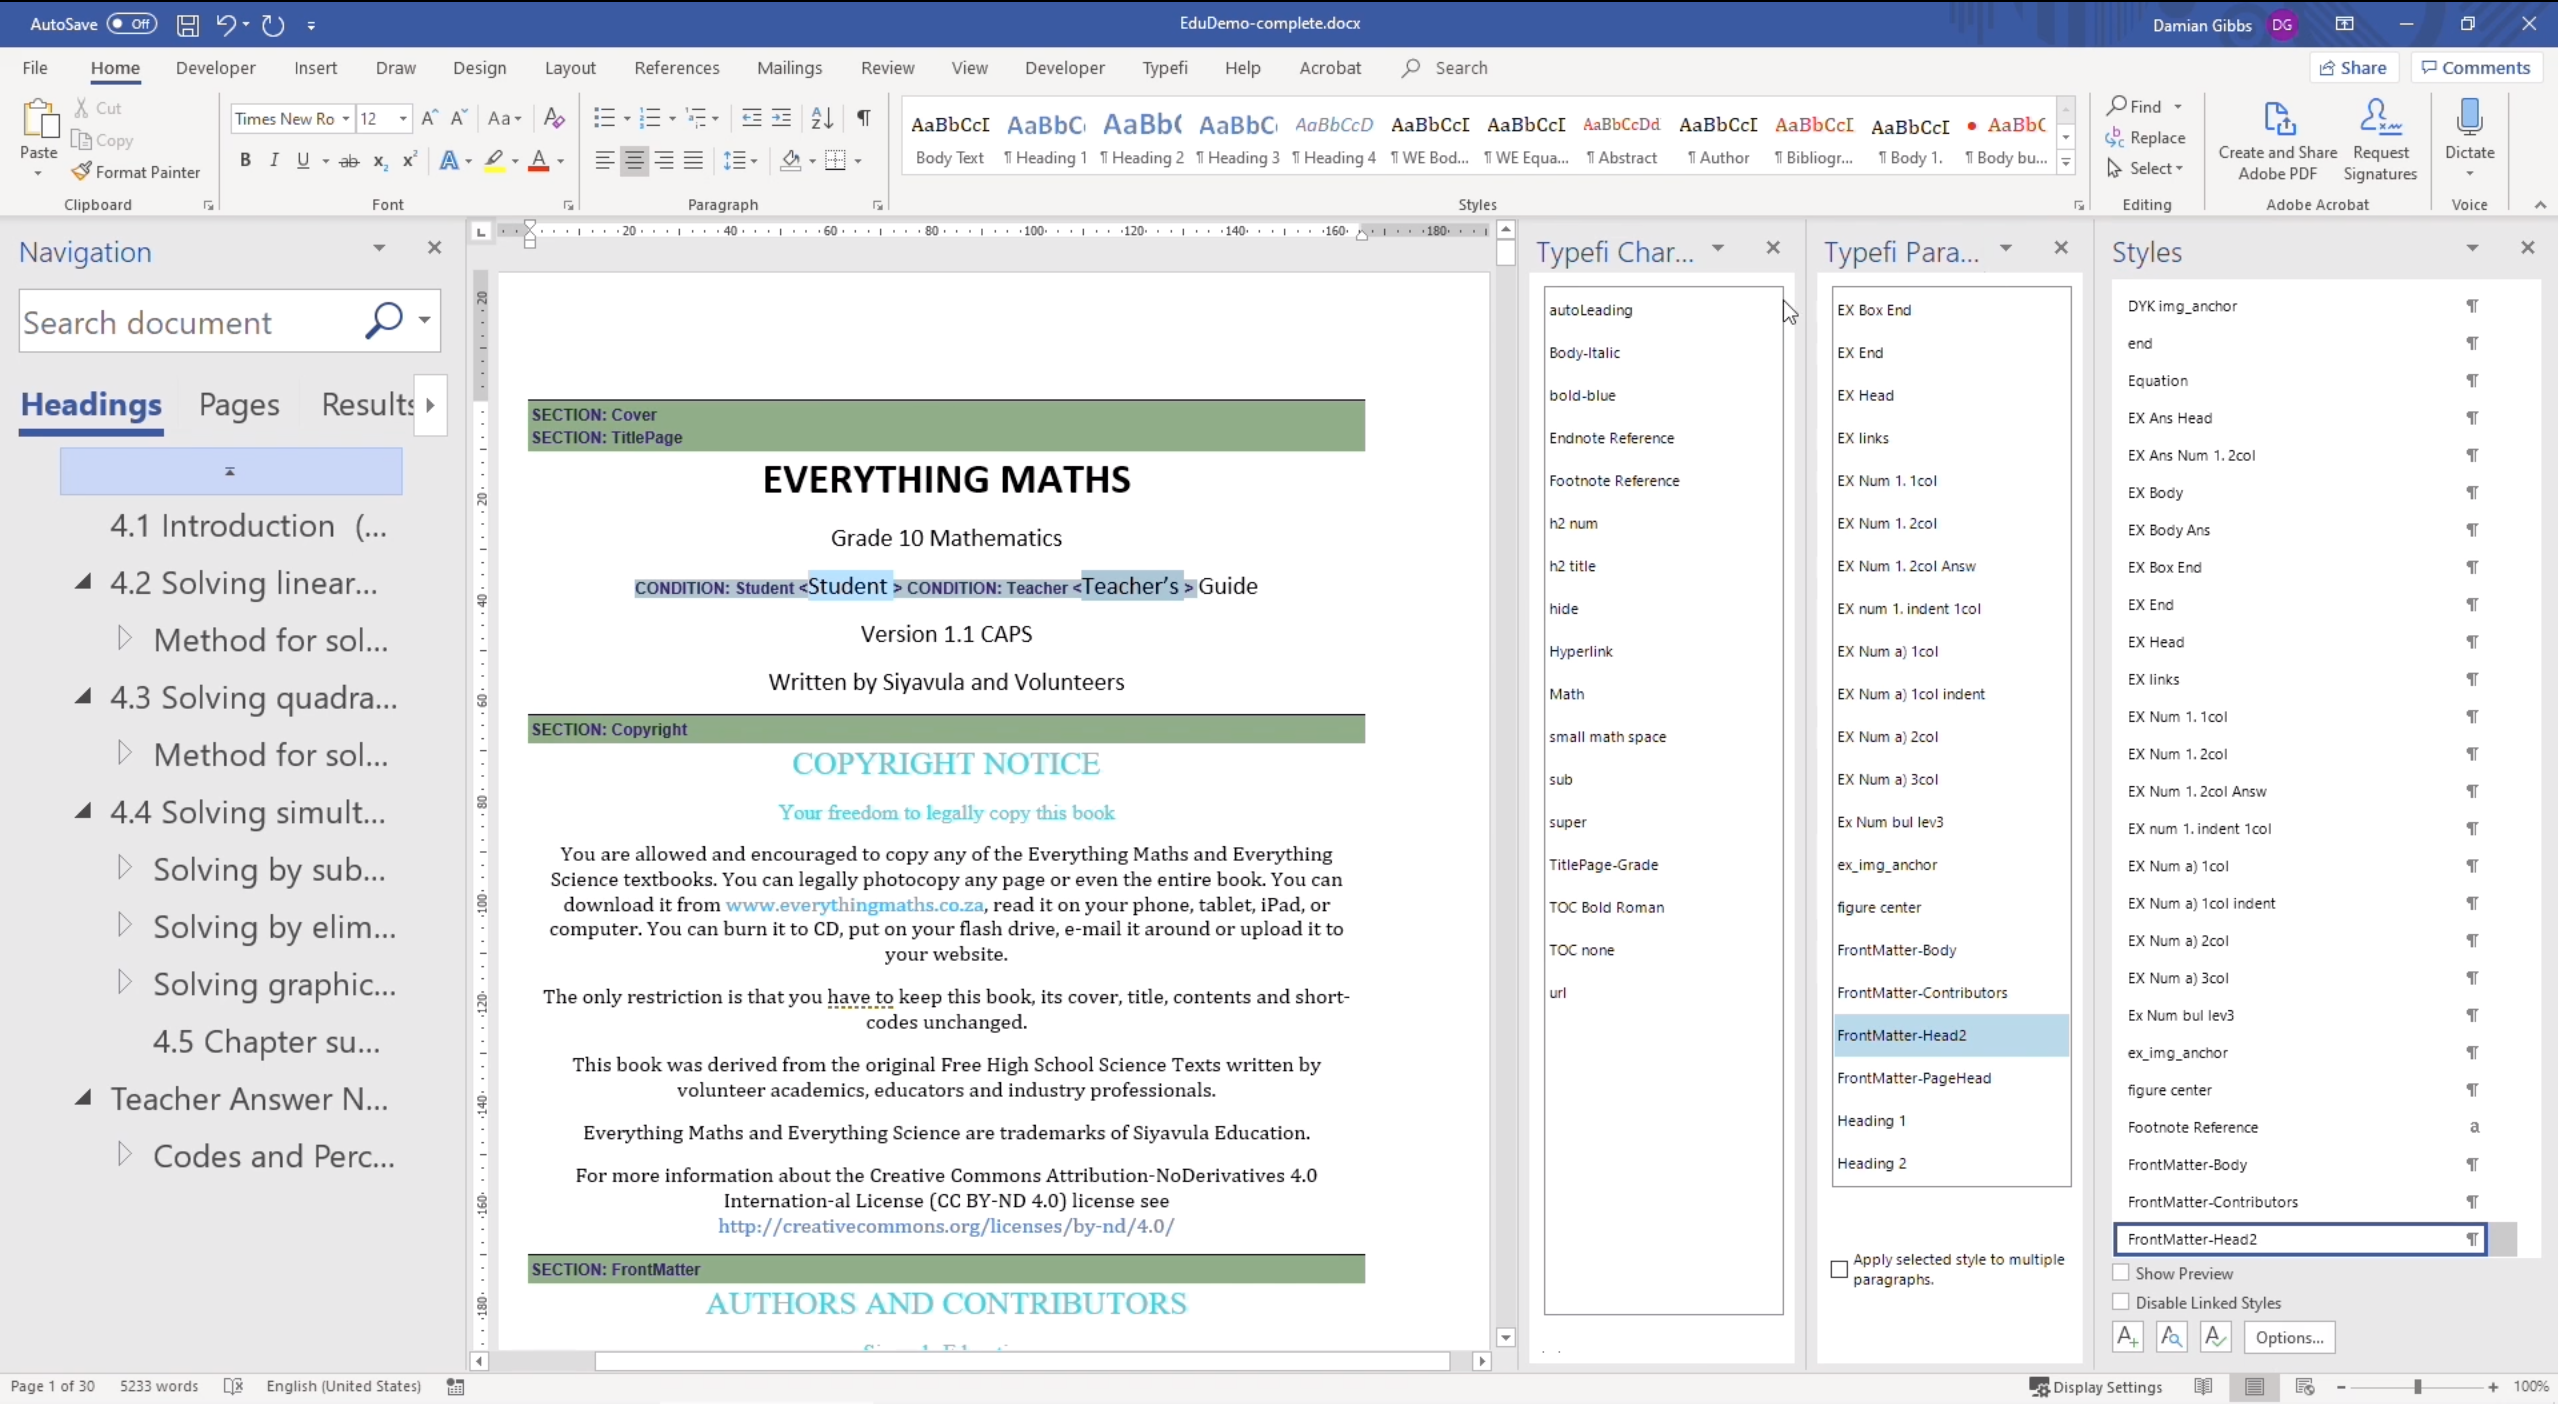
The paragraph styles and character styles are available from the Paragraph and Character palettes which you just click and pop up over here.
They work very similar, in the same manner, as the Windows Styles palette, but at the same time, the Windows Styles palette is still available if you prefer to use that.
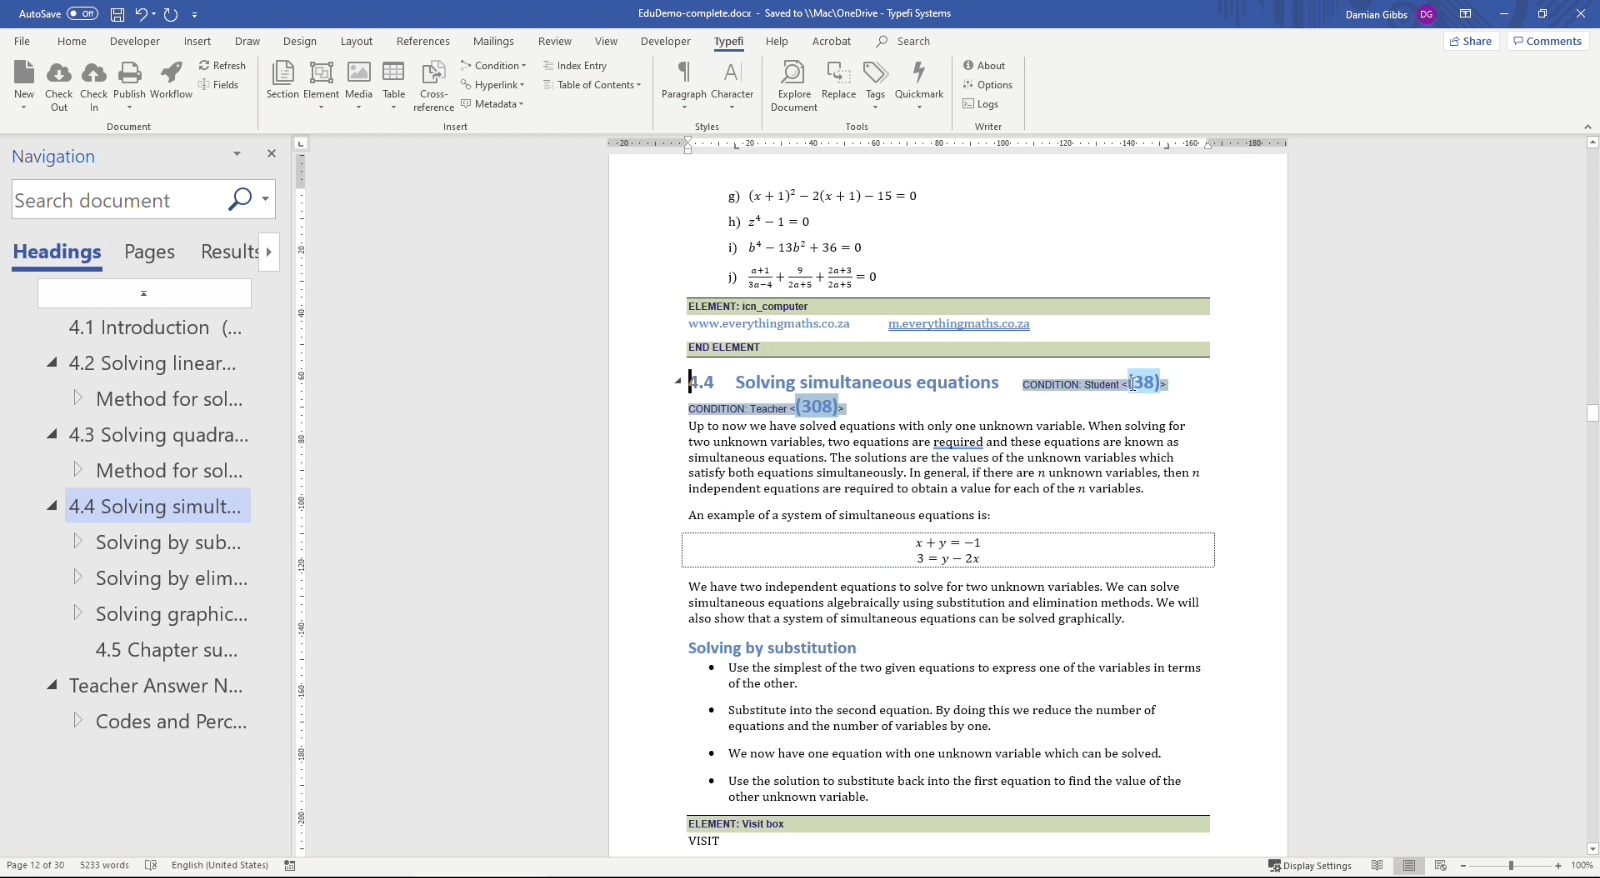
As you can see on the page, we have green items and some blue items. This is Typefi markup.
You can see that the blue markup has indicated some conditional text, so here we’ve got some conditional text for a student or a teacher. Conditional text can be set according to text items, element items, or even sections.
The equations in this document have been set using Microsoft Word’s equation editor.
Publishing PDF (17:11)
All right, so let’s go ahead now and run a job. We’ll go back to our Typefi menu. So, I’ll click on the Publish button in the top left.
I’ve chosen a PDF output. You’ll notice that we have a list of sections here. I’ll publish all the sections, but this is a feature whereby you can publish just certain sections within the content.
This is helpful if you just want to proof one section and not have to go print the whole book in order to see the content that you want to proof.
Right. When I click Publish, Typefi runs through the document and does a check, and will start spooling the content down to the server. You’ll see that the Print Manager will pop up in a second and the content will then start spooling.
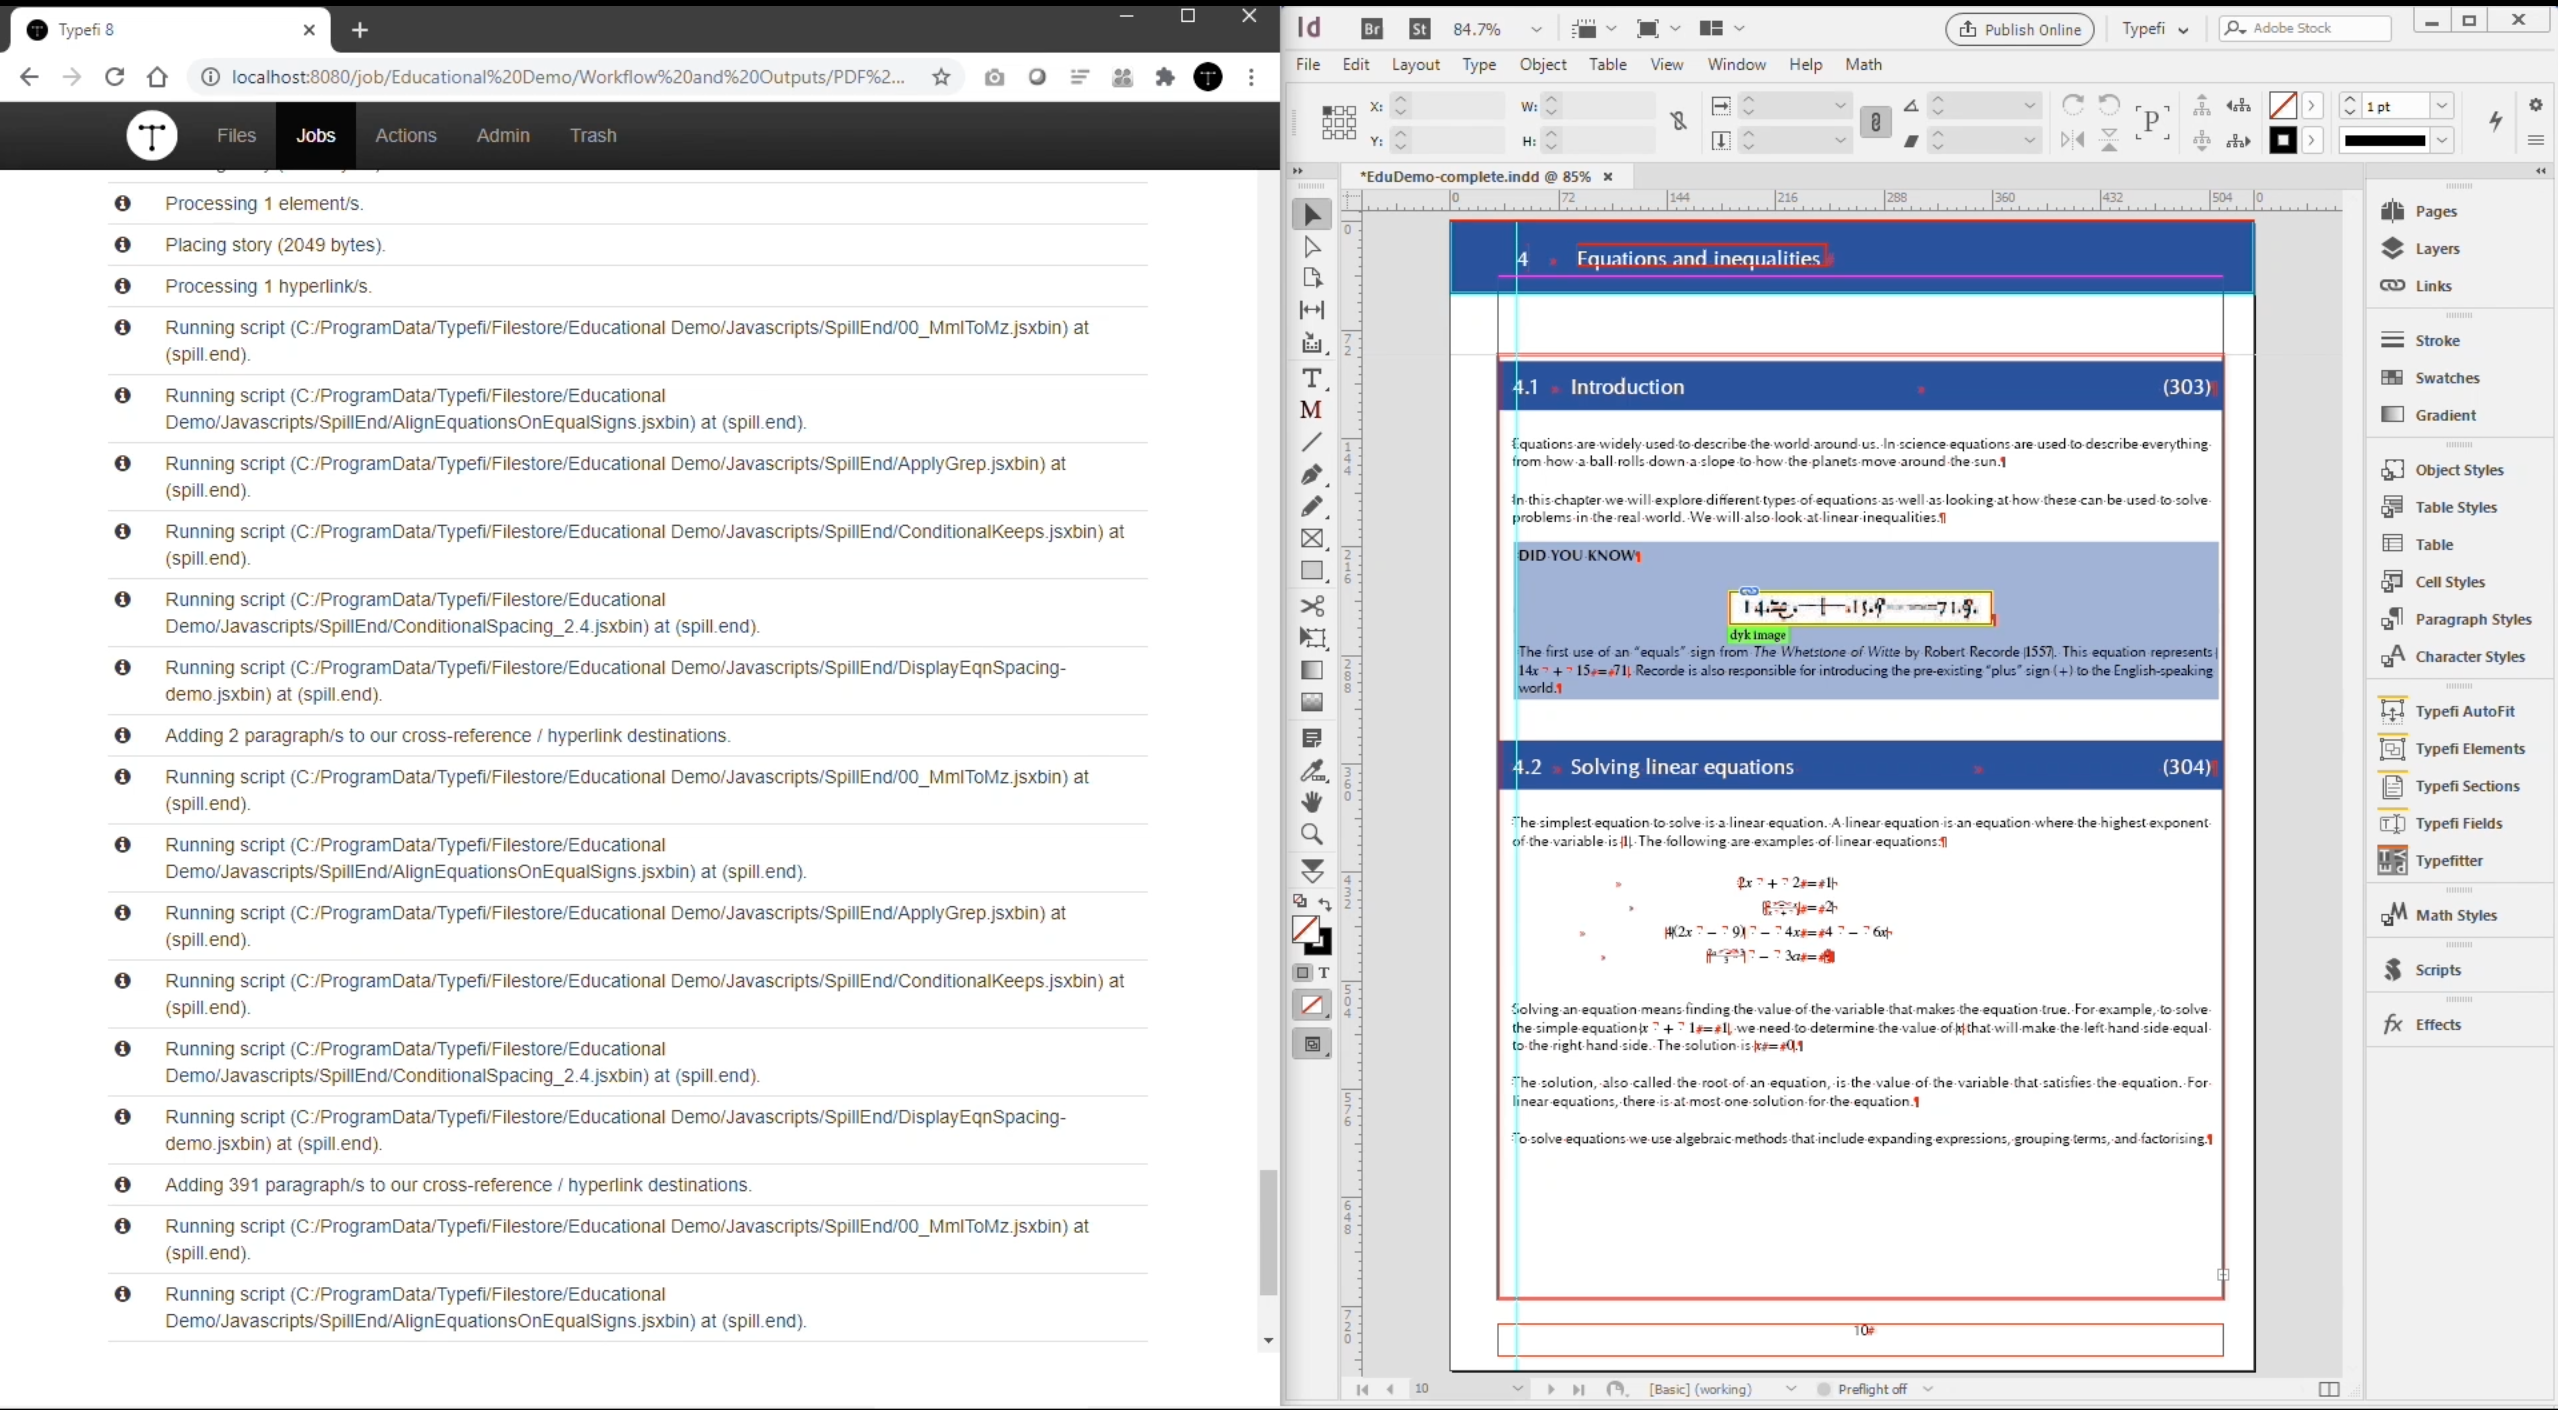
All right, here we can see that the content has been fed down to the Typefi Server and the job has begun.
The pagination process has started on the right-hand side, with InDesign having received the content and the Typefi engine starting to lay out the content.
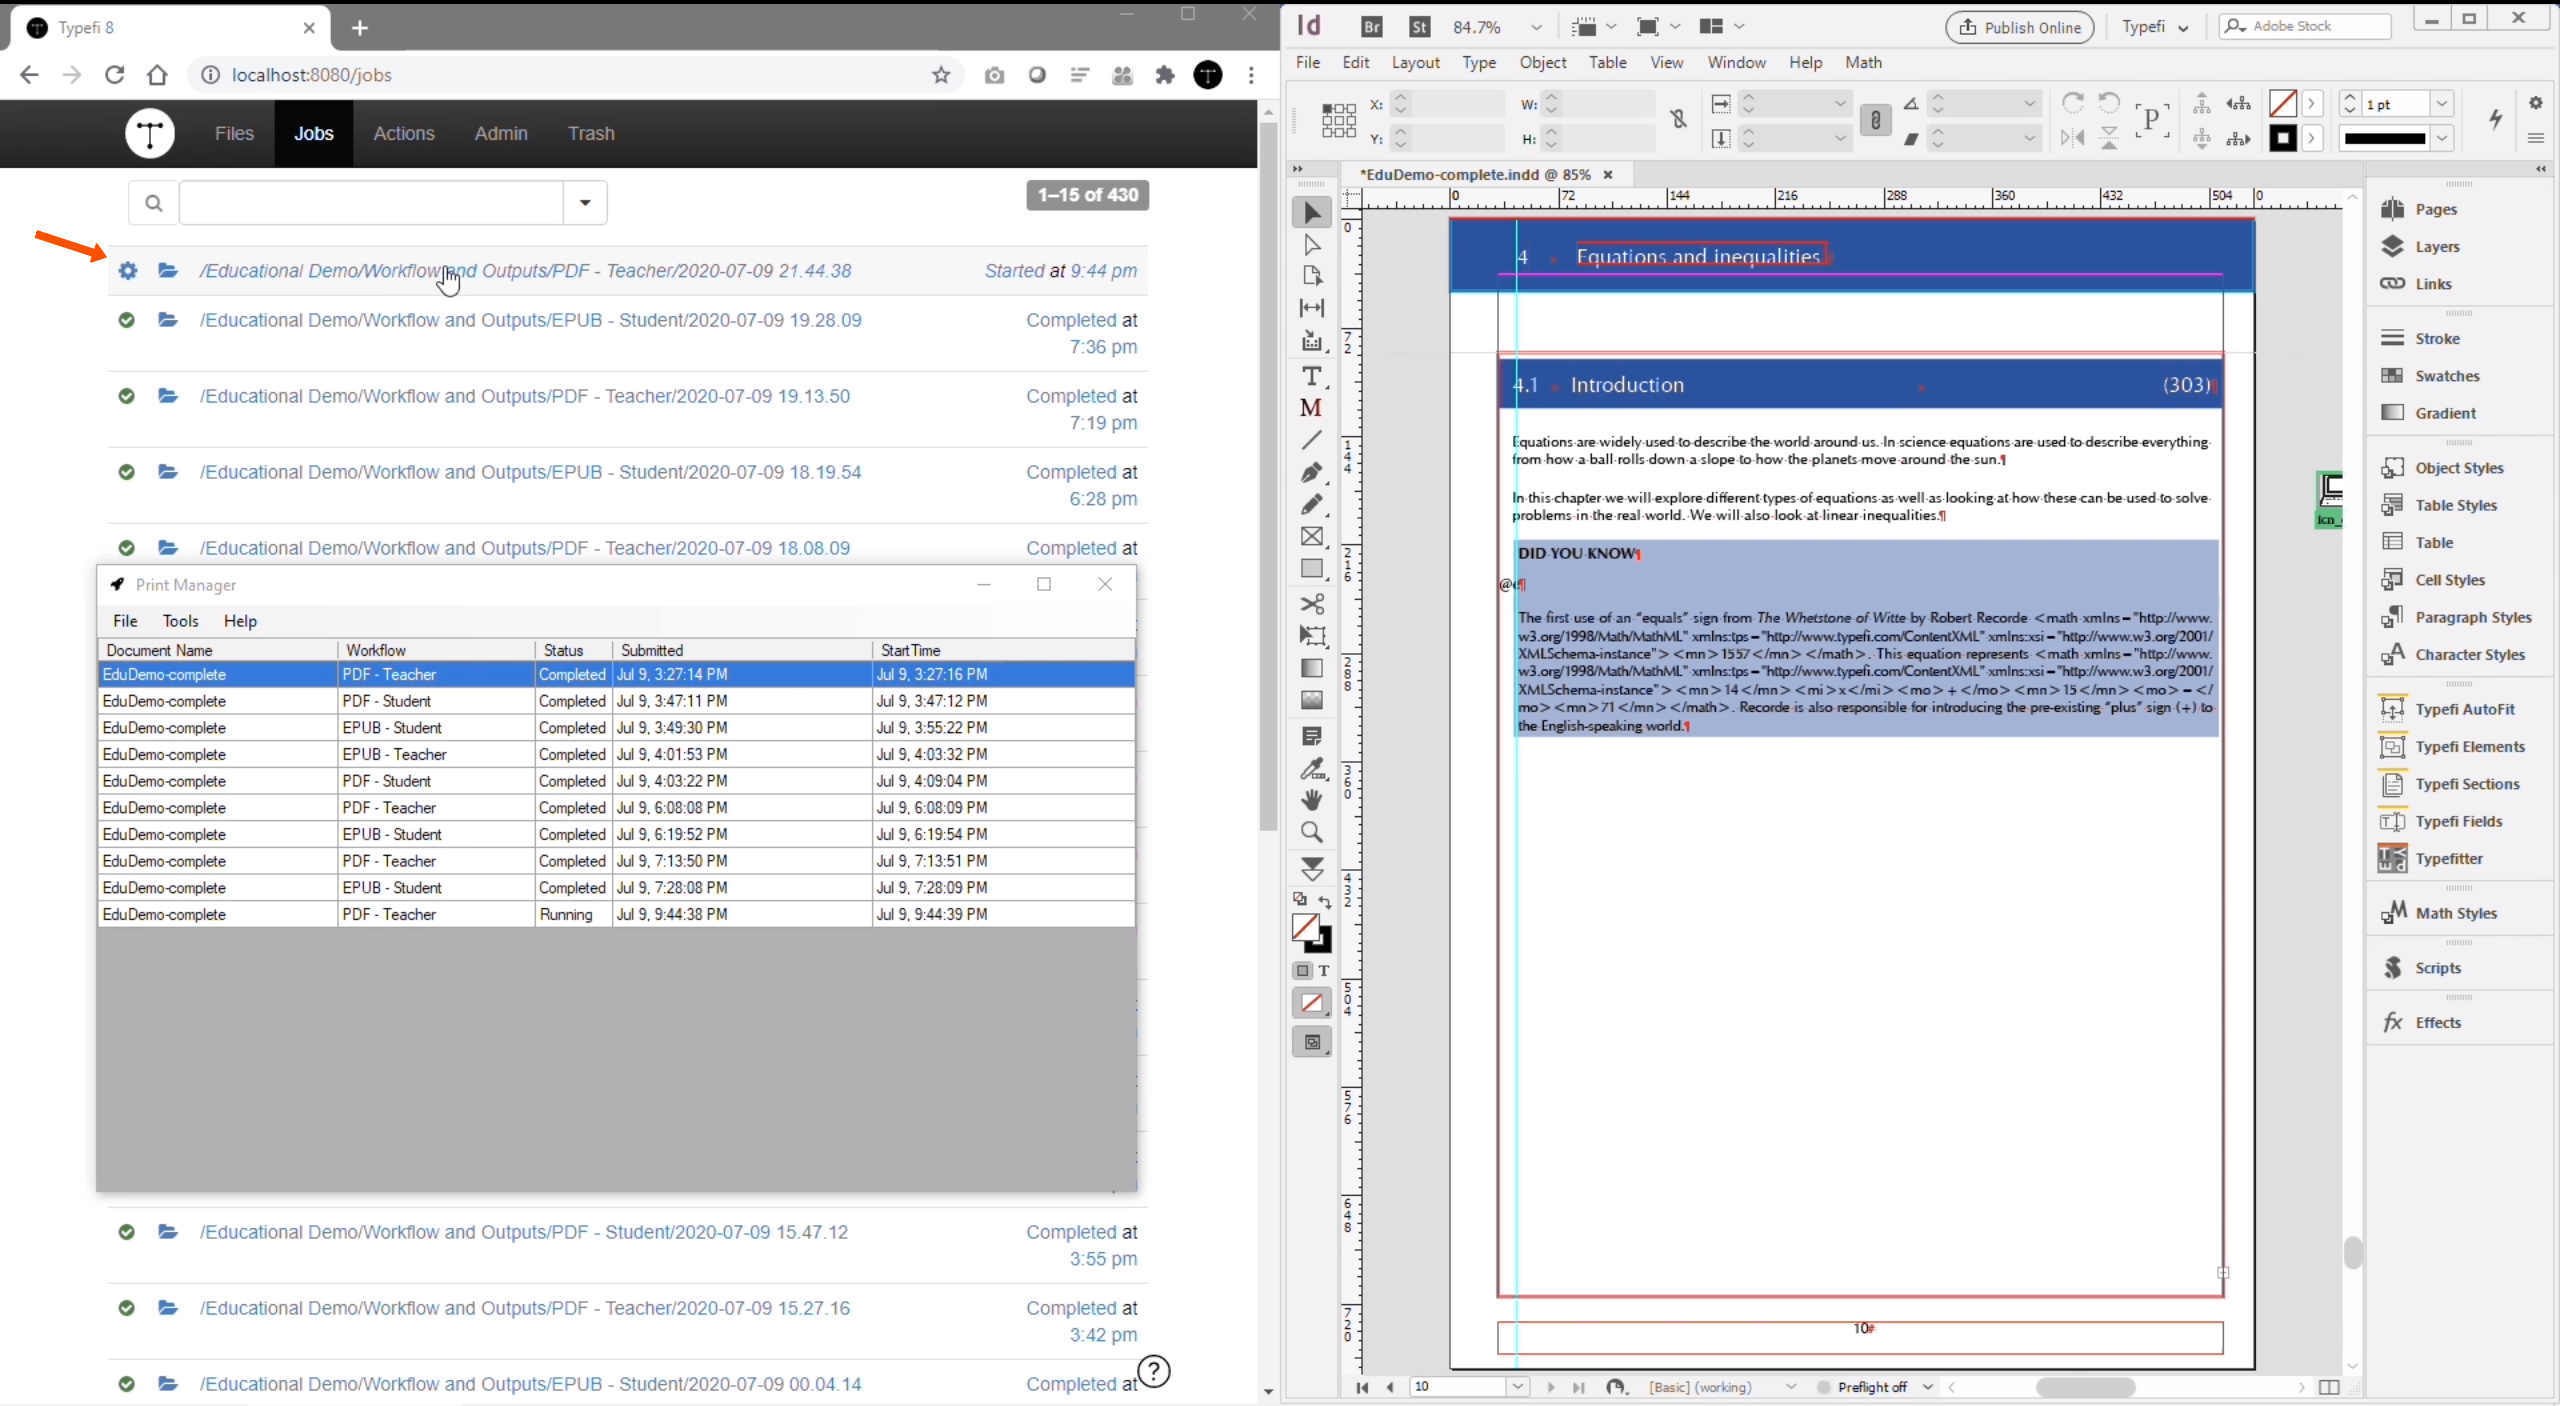
If we swap across to Typefi Server, we can see that the job is in progress because the little cog wheel is spinning, and the job is now telex.
If I click on that link, the job folder will open up and a running log is on the go, so you can see what’s happening with your job at the same time.
While a job is running, you can navigate and work around within Typefi, you don’t have to wait for the job to finish.
In fact, you could start spooling another job from Microsoft Word or any other inputs that you have, and the jobs will be queued one behind each other, or in the case of multiple instance installations of Typefi, the job will be fed to a queued server or the next available InDesign server.
All right, so the document is almost completed with its pagination. The next step in the workflow is to save the document, and then the following action is the Export to PDF action, which will then open up the InDesign document and export it to the PDF.
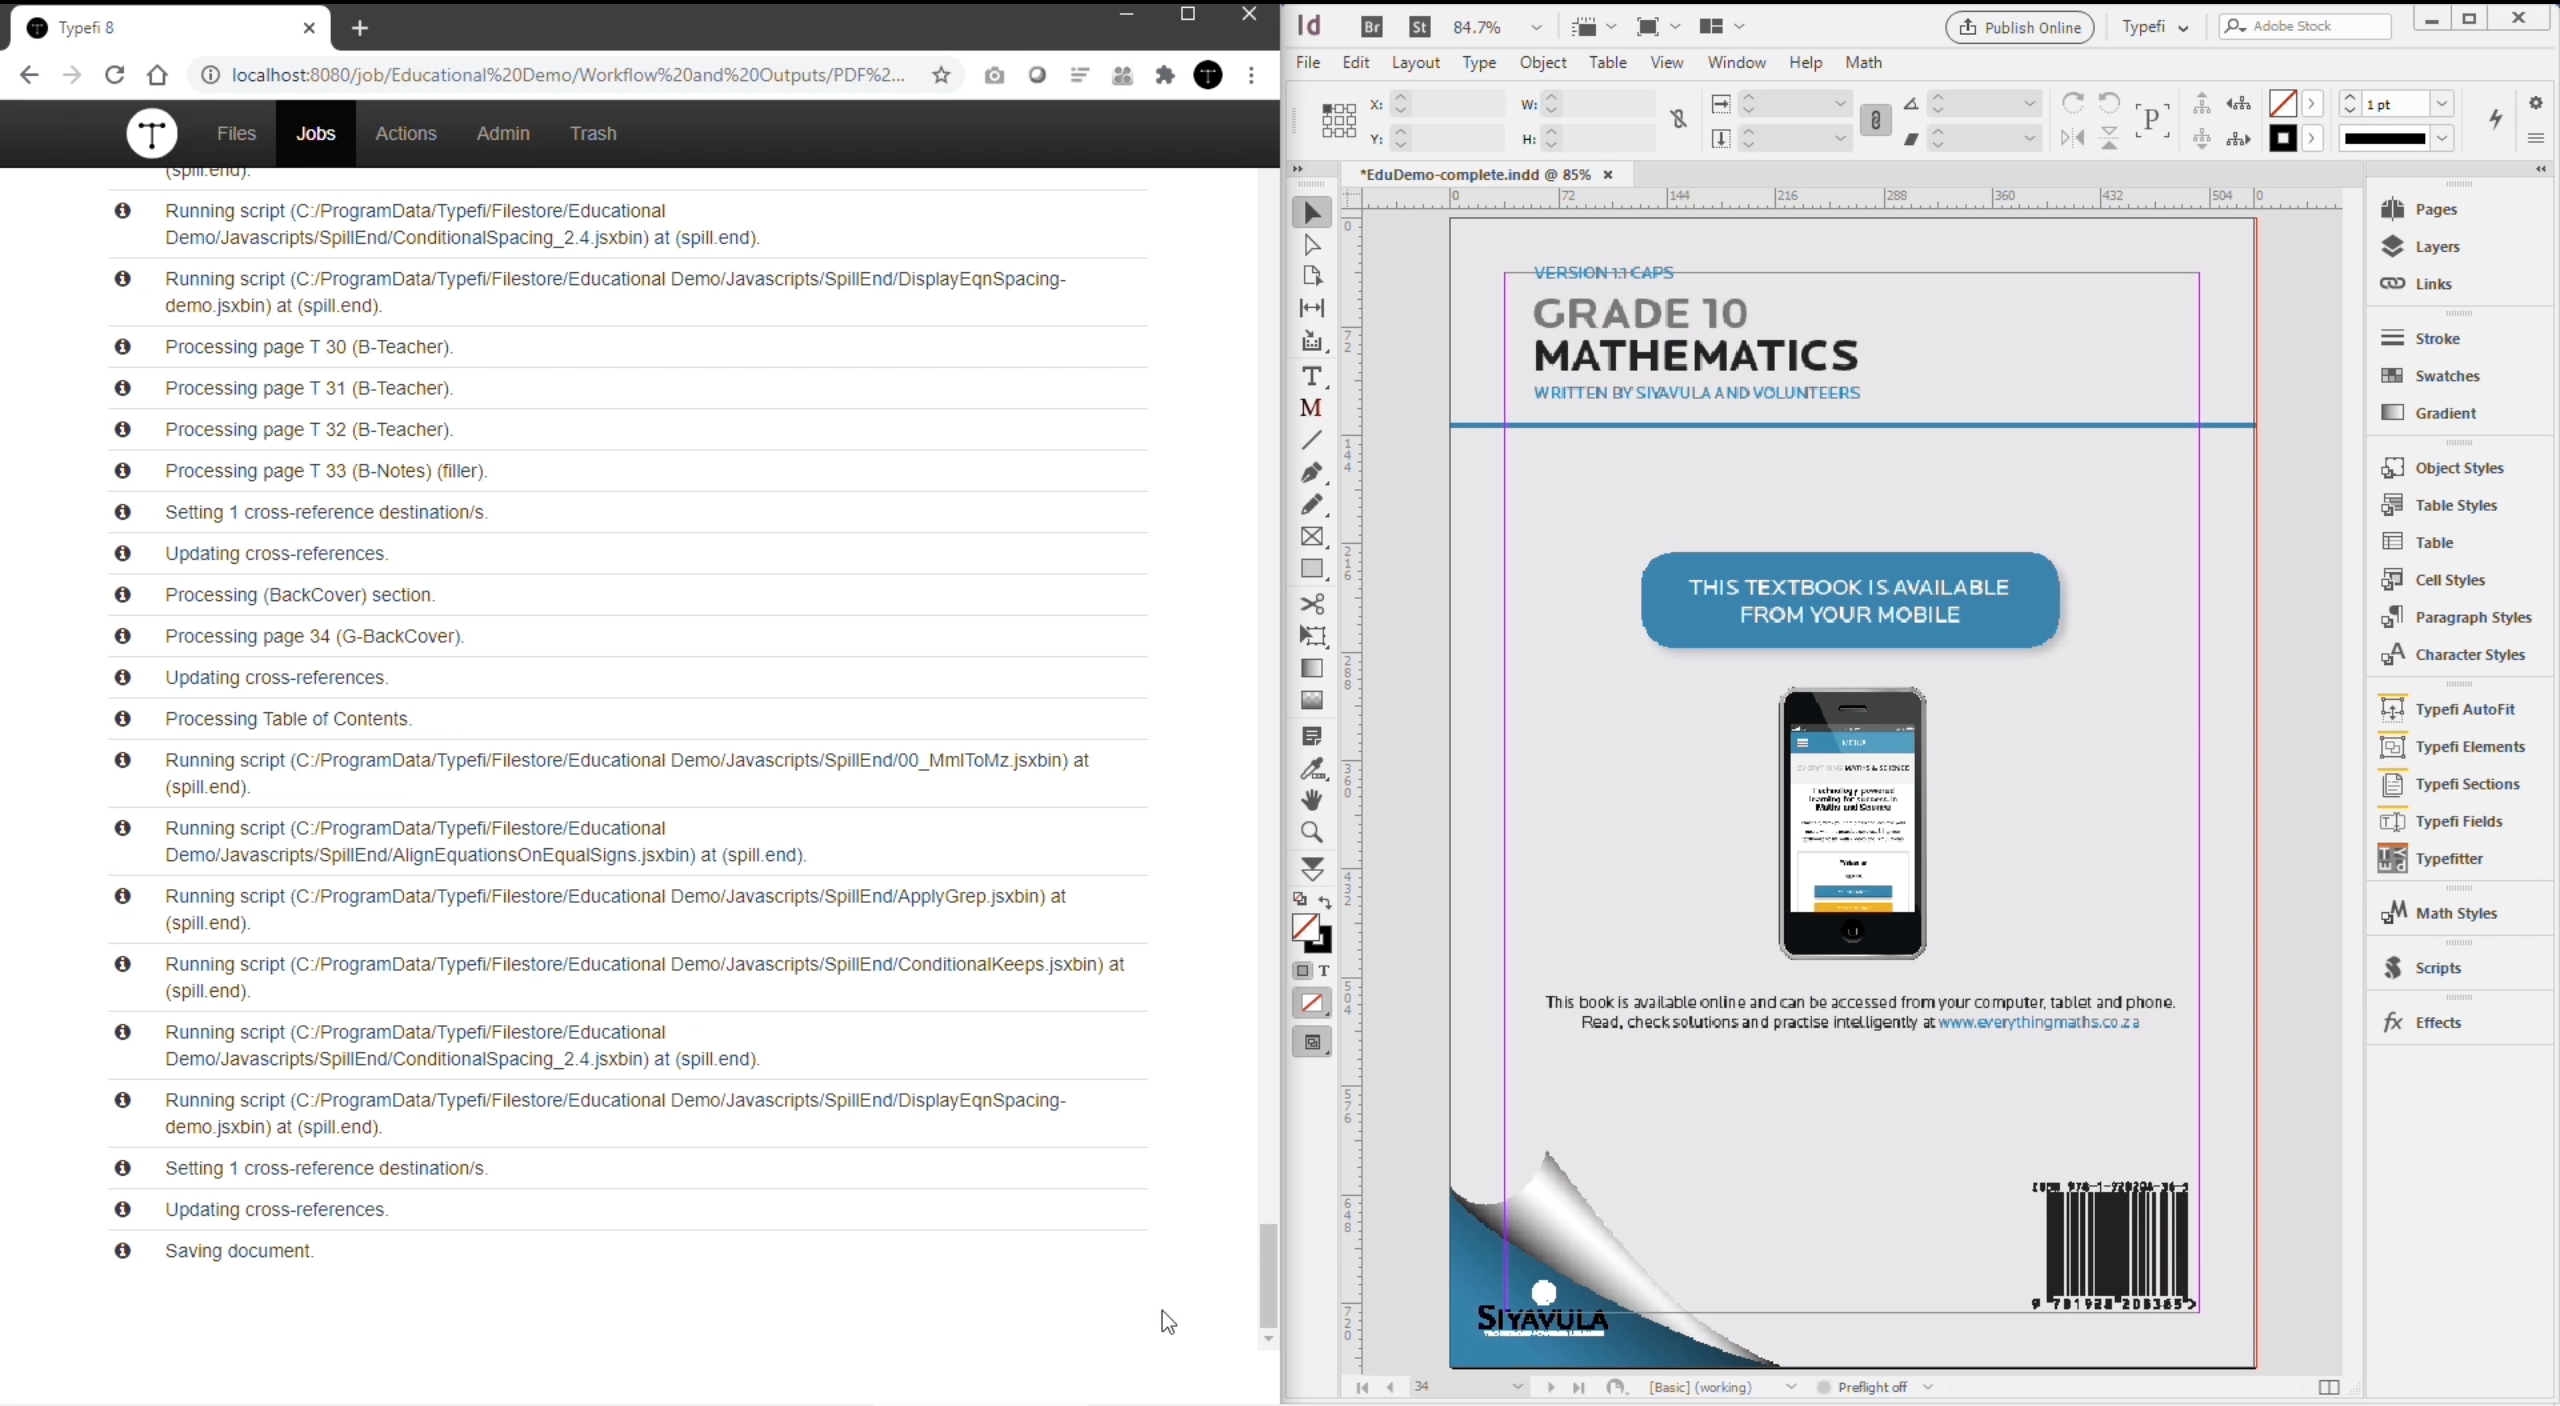
You can see the log has completed all the pagination and it is currently saving the document and there you can see that it will close the document and then open it up for the next action to complete.
All right, our job is complete. When running a job from Typefi Writer, from Microsoft Word, the PDF or the output for the workflow is automatically fed back to the user. And hence we have got our PDFs direct in Acrobat displayed on our screen.
If we go back to the completed job, you’ll see that this is the output from the job folder. It contains some metadata about the job, how long it took. And in multi-user instances, you’d also have the username next to the workflow.
You’ve got a path or a breadcrumb showing you where your job is, whereabouts in the job folder. And within here, we have all the files that are used to create the job, including the output files, which would be your web and print PDF, and including your input documents, the InDesign document that was used to create the PDFs, or intermediary XML files, and any other information that was used in the creation of the output.
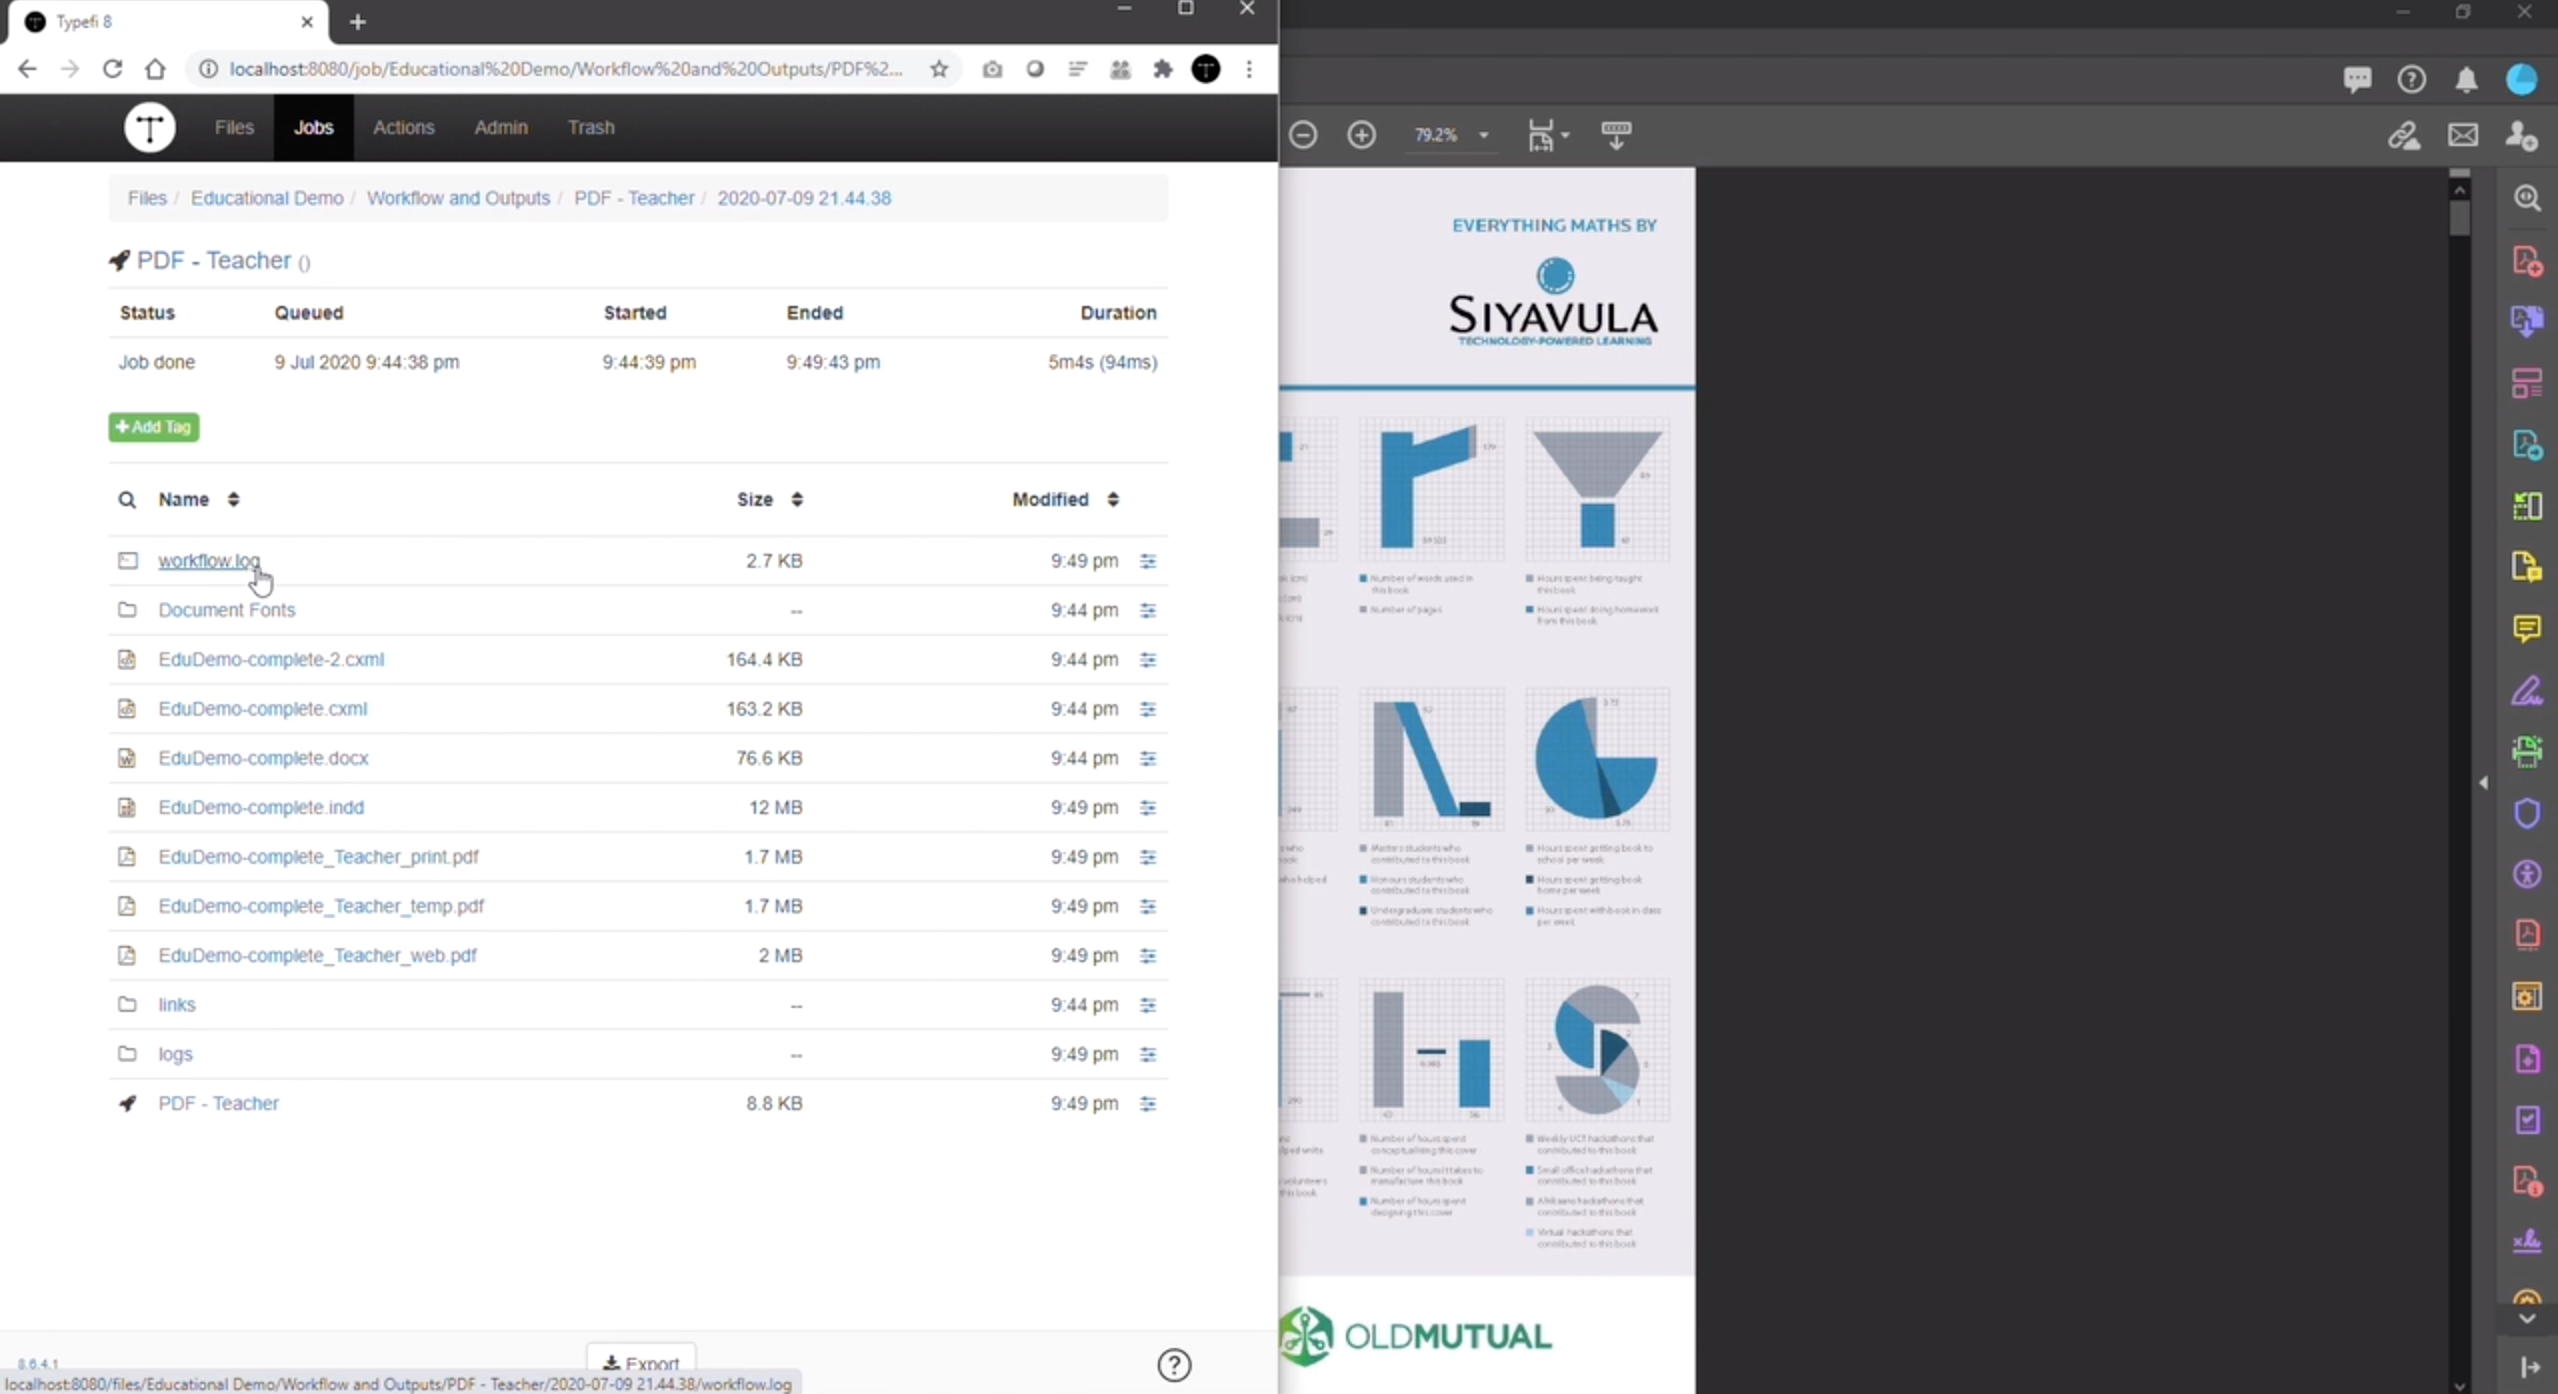
We have a logs folder and a workflow log, which gives you feedback about anything that might’ve happened during the process.
All right, we know that the PDF has been fed back to us from the Print Manager, but I’m going to close that and I’m going to download a PDF directly from the server.
I’ve downloaded the web PDF. You can see it’s displayed on the screen here.
The hyperlinks and cross-references have all been included. I can click on any of these links and it will take me to the document. There’s a bookmark, the internal table of contents is hyperlinked as well.
I can go to the Teacher Notes section at the back. If you remember, this was a document which was designed to include the teacher material, and we’ve made a special section whereby the teacher section gets special numbering, indicated by the T at the bottom.
We’ve got cross references, which are linkable within the document, so we can go back and forth, and hyperlinks are also available and working.
If we go back into our job folder, we can see that we have the web PDF, and we also have a print PDF. This print PDF has been produced without crop marks, but you can see that there’s no bookmarks or anything that’s part of the PDF which is obviously not necessary for when you’re creating a print PDF.

We’ll also have a look and notice that in the web PDF we can see that the teacher reference numbers at the top level headings are relevant to the teachers, and not the ones that were produced for the students.
So, here is our student number, which is the 38, and the teacher’s number was 308. And these would be numbers say, for example, to cross-reference to curriculum references in the national curriculum.
Through this, we can see that we can use a single source and produce multiple outputs, in this case, two different kinds of PDFs. And we can also produce multiple output content based on the requirements of the publisher.
Publishing EPUB (24:44)
All right, now that we have got our PDFs, let’s go back to our input documents, and let’s create EPUBs out of the content.
This time I’m going to go back to my Publish button and I’m going to choose a different workflow. I want to— we’ve created a PDF for the teachers. Let’s go ahead and create an EPUB for the students.
Again, I’ll click the button and I’ll say Publish. And as for the PDFs, the content will be streamed down to the Typefi Server and the process will be run again.
This time the workflow is using an optimised InDesign template, which has been specifically designed to generate a good EPUB, and the process will carry on.
Because this document is using math, math typesetting, we are using the tool called MathTools, which will generate equations using the live MathML.
So on the right-hand side, you can see that the MathML has been flowed into InDesign, a script runs, which converts that MathML into MathTools equations, and that’s how we get beautifully typeset equations, which can either then be exported as images in the EPUB, or as live text.
All right. Our workflow is almost complete.
The InDesign document is just being saved. Following that, the document is opened again by InDesign to then export to EPUB, and once again, we’ll export another EPUB. One EPUB will be with the equations as live text, and the other EPUB will be with equations as images.
All right, our workflow is finally done. And here you can see we’ve got two EPUBs, one with the images and one with MathML.
Let’s go ahead and download our one EPUB, we’ll open it up in Adobe Digital Editions. Here you can see you get your cover, and everything is complete. And we can see that these equations are live text, and get recomposed on the fly by Adobe Digital Editions.
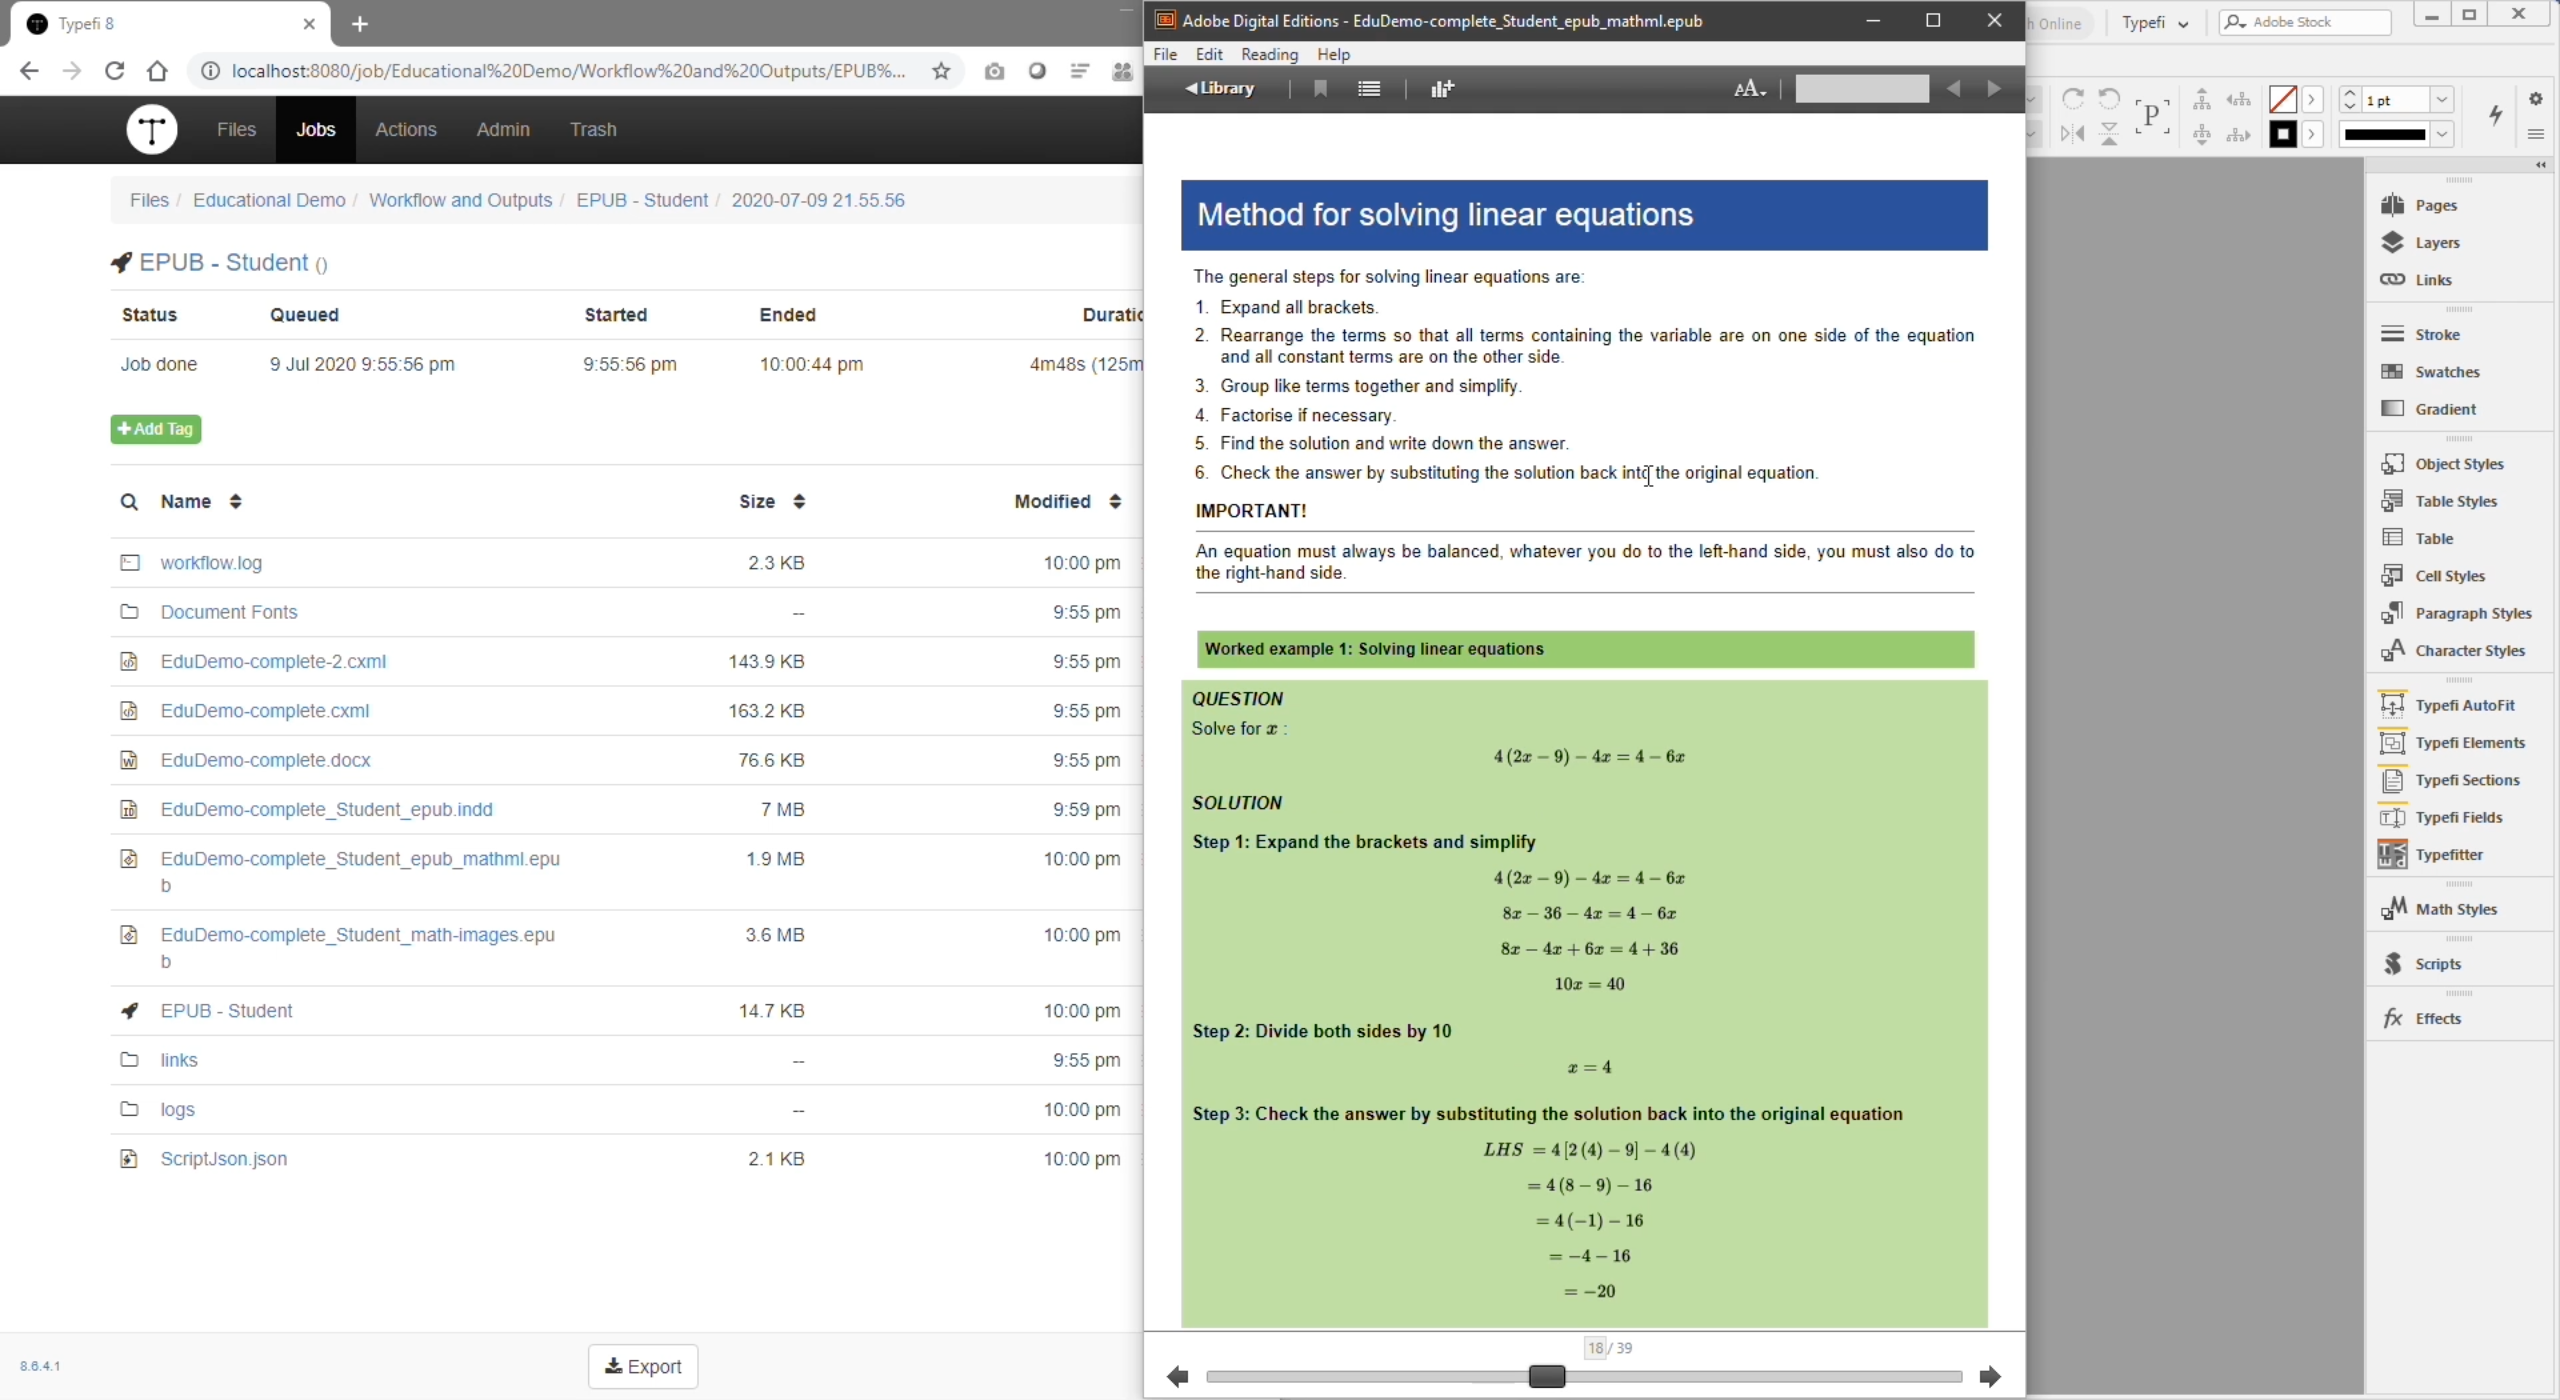
We also have an EPUB that’s with the equations as images, for those EPUB readers that do not yet support live MathML.
Demo conclusion (28:41)
These are just two examples of how organisations can use Typefi to produce various output file types, such as PDF and EPUB, and each with its own variations of the content, all from a single source.
By using industry standard software, Word and InDesign, designers, authors, and editors are able to adopt Typefi automation using familiar tools.
Understandably, preferences on how to structure workflows will vary from organisation to organisation. However, Typefi’s modular approach to automation allows organisations to comfortably integrate Typefi and DO MORE.
Q&A
Can Typefi automate an answer key or index?
Yes, as long as the source content contains the relevant information, Typefi can be used to gather and output that information.
In the case of an answer key, you may have the questions and answers together in the source file. Typefi can transform that source content so the questions appear in one part of the output, and the answers in another.
Indexing works in a similar way. InDesign supports indexing, as does Typefi CXML. If the index information is present in the source content, the combination of the info in the CXML and InDesign’s index function can be used to generate an index.
Can Typefi handle complex tables that span pages or spreads?
Yes. A table that spans multiple pages can be handled by letting it flow inline with the body text of the document. In this situation, the table would flow from page to page along with the body text.
Multi-page tables can also be placed in separate “floating” frames. During composition, if a table fills that frame, another one is added by a script, threaded to the first, and the table then continues in the next frame. This continues until all the table content is laid out.
In either situation, there are a couple of ways to add table continuation text to the table title or footer.
Spread-wide tables would work similarly to the way the floating tables mentioned above do. In this case, the text frame could span the entire spread. A script could detect the gutter and then add blank space so the content doesn’t cross the gutter.
Alternatively, the table could be split into two halves, and a left-page and right-page set of frames would be filled with table content. A script could then check to make sure that the row heights are the same on the left and right side of the table, increasing where necessary.
How does Typefi determine the placement of figures and tables?
Inline tables and figures flow with the body text, so they appear wherever they appear in the source content.
Floating tables and figures are separate frames whose placement depends on layout settings specified in the InDesign template, using the Typefi Designer plug-in.
You can specify whether the item can be placed on a left, right, or both pages, whether it should align to the top, middle, bottom, left, centre, or right, as well as align with the page edge, margin, text frame edge, or column edge.
You can specify multiple options for each object and then set a priority for each option. As the pages are being composed, Typefi tries all the options and compiles a score for each layout. Whichever layout satisfies the most layout options for all the objects on the page wins.
How does a workflow work if content is authored in EPUB or HTML as the input for Typefi’s automation/creation of a PDF?
For InDesign and PDF output, if the source content is EPUB or HTML, it would first be converted to Typefi’s CXML format. After that step, the composition of the output document is the same as any other job.
Since EPUB and HTML are both structured, it would be relatively easy to convert the source to CXML. It’s important that the source markup contains enough information about the content to be able to successfully map the source to the desired formatting in the output.
For example, if everything in the HTML is a <p> tag with no class attributes, it would be difficult to tell the difference between a title, a list item, and a paragraph.
Can Typefi be integrated with a CMS and, if so, are there any that Typefi knows are not compatible?
Typefi has an open API to allow for integration with the CMS or process management system of your choice. Our customers use a variety of CMSs, and so far we have never encountered a system that could not be integrated with Typefi.
Professional development provider The Institutes shared how Typefi integrates with their content management system in this case study.
Your webinar presenters

Emily Johnston
Director of Business Development | Typefi
After graduating from the University of Wisconsin with a Juris Doctorate (JD), Emily’s first job was as a project manager at Apex CoVantage, a publishing services company, where she coordinated production of publications for the American Bar Association. She continued to work in publishing services for 15 years before joining Typefi, and has an in-depth understanding of the challenges that publishers face every day.
Emily works closely with a variety of publishers and organisations in North and South America and Asia to understand their unique needs and recommend solutions that will optimise publishing workflows at all stages of the production process.

Damian Gibbs
Solutions Consultant | Typefi
Damian started out as an apprentice typesetter over 20 years ago at a leading South African educational publisher, and from the start was curious about opportunities that digital technologies bring to publishing. He transitioned to general market publishing and eventually became a service provider to local and offshore publishers covering a diverse range of publishing markets, all requiring varying workflows and output requirements.
Damian has extensive experience working with publishers to use evolving technologies and innovative digital publishing products to improve workflows, and to transition from pure print to digital outputs such as web, e-books, and CMS publishing.