Since 2005, Typefi’s AutoFit plug-in for InDesign has helped users design complex and responsive layouts more quickly and with less work.
AutoFit makes it easy to enable Balance Columns to make text even at the bottom of multi-column text frames, and gives you the constraints that Adobe forgot—maximum height and maximum width—so your auto-sizing text frames don’t get lost off the page.
While the free version of AutoFit is not scriptable, AutoFit can be scripted when included as part of a full Typefi installation. You can also purchase AutoFit Pro or AutoFit Server to enable scripting outside of Typefi workflows.
In this, the final webinar in our DO MORE with Scripting series, Peter Kahrel offers an overview of AutoFit scripting, and provides a demonstration of how to fix a commonly encountered scenario—when an overset inline image causes a large gap at the bottom of a frame.
Overview
Good day, and welcome to this webinar on scripting Typefi AutoFit.
Please note that the free AutoFit plug-in can’t be scripted. AutoFit can only be scripted when you buy the Pro or Server edition, or when it is included as part of a full Typefi installation.
An introduction to Typefi AutoFit (0:22)
AutoFit has two main components: parent-child relationships, and auto-sizing.

The first component, which allows you to manage relationships between page items, is accessed via the Typefi AutoFit icon in the Tools panel (which, in turn, is accessed via InDesign’s Window menu).
These relationships are fully scriptable; however, we don’t do this often as relationships are typically handled in the template, so we won’t address this aspect of AutoFit in this webinar.
The second component is auto-sizing via the Typefi AutoFit panel, which you find in the Typefi section in the Window menu.
This panel is used to manage individual page items rather than relationships between page items. However, you can use the Clear All or Remove Relationships options in the panel menu to clear relationships from a selected page item.
You’ll notice that the Typefi AutoFit panel partly replicates the Auto-Size section of InDesign’s Text Frame Options dialogue.
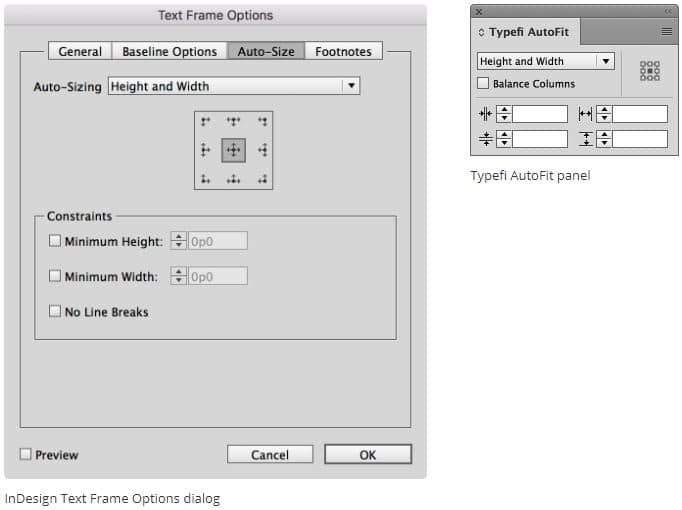
The reason for this overlap is that, while Typefi has always had AutoFit (since 2005), InDesign’s Auto-Size dialogue was added to InDesign only in CS6 (in 2012).
One reason we kept the Typefi AutoFit panel with its own functionality here is that—inexplicably really—in InDesign it’s not possible to set the maximum height and the maximum width of frames, which isn’t very useful in automated text production like Typefi’s system.
AutoFit also provides quick access to Balance Columns, to make text even at the bottom of multi-column text frames.
For more information on AutoFit functionality, see the Typefi AutoFit User Guide.
Returning a page item’s dimensions with AutoFit (5:15)
AutoFit can return or set a page item’s dimensions even if that frame is an inline in overset text.
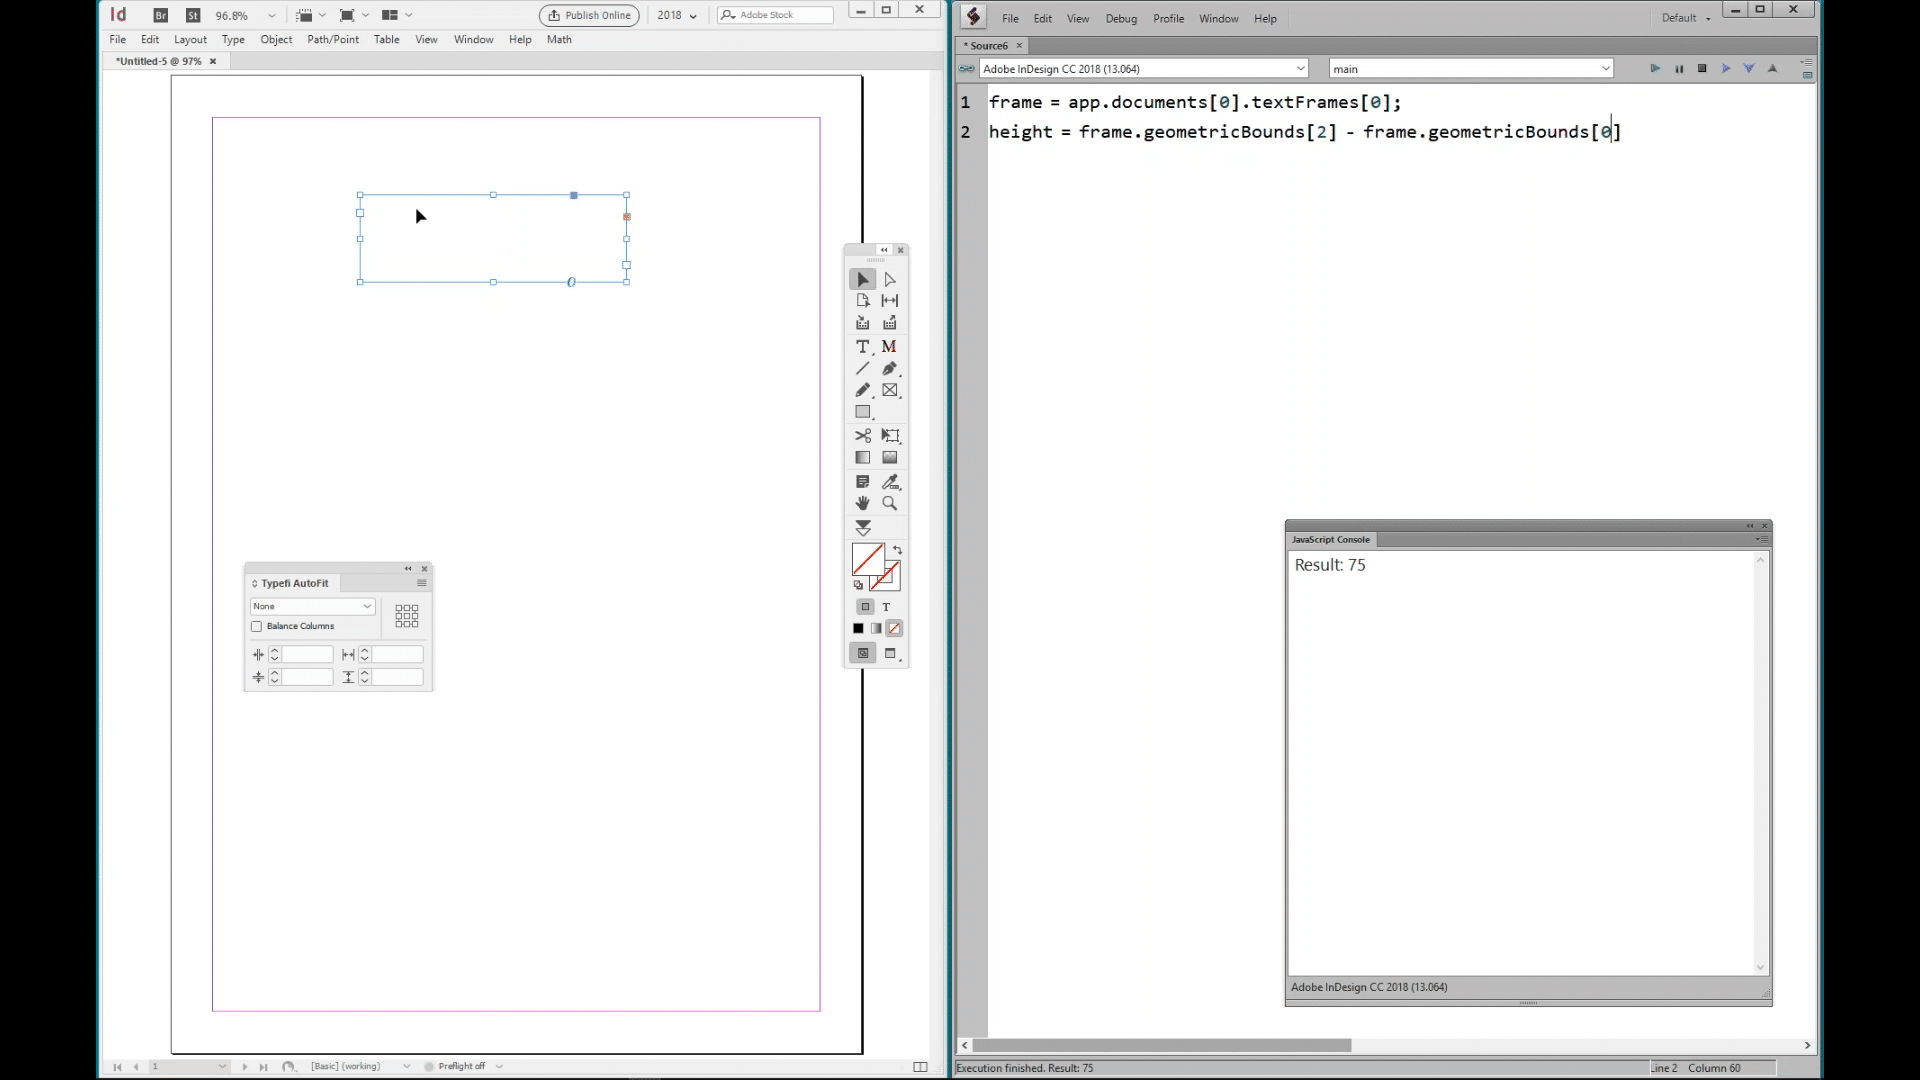
Normally, to get an item’s size, you’d use InDesign’s geometricBounds property.
frame = app.documents[0].textFrames[0];
height = frame.geometricBounds[2] - frame.geometricBounds[0];
The height is the bottom of the frame [2] minus the the top of the frame [0].
However, this method won’t work when a frame is an inline in overset text.
If you try to get the the inline frame’s size using the following code, geometricBounds throws an error:
frame = app.documents[0].textFrames[0];
inline = frame.parentStory.textFrames[0];
height = inline.geometricBounds[2] - inline.geometricBounds[0];
In the first webinar, when we discussed script events, we mentioned that at spill.end most stories are overset, and that therefore at spill.end you can’t use any properties or functions that need geometry, such as geometricBounds, baseline, and so forth.
However, Autofit can be used both to return a page item’s size and to set it, even when it’s an inline in overset text. Returning a frame’s size is straightforward:
frame.autofitSettings.width();
frame.autofitSettings.height();
And our inline in overset text:
frame = app.documents[0].textFrames[0];
inline = frame.parentStory.textFrames[0];
inline.autofitSettings.height()
Note that the returned value is always in points. You can convert those points values to your preferred unit of measurement using JavaScript’s UnitValue function. For example, to convert 10 points to millimetres, do this:
UnitValue (10, 'pt').as('mm')To return a frame’s width in millimetres, you would therefore do this:
UnitValue (frame.autofitSettings.width(), 'pt').as ('mm')Using AutoFit to return correct dimensions on rotated frames (12:54)
Another useful feature of AutoFit is that autofitSettings.height() and autofitSettings.width() are neutral with respect to the frame’s rotation angle. Rotated frames occur often, especially to accommodate wide tables.
When you use geometricBounds you must always check whether a frame is rotated.
As before, you calculate the height of an unrotated frame with:
height = frame.geometricBounds[2] - frame.geometricBounds[0]When we rotate the frame by 90 degrees, that line then returns the frame’s width, which is not correct.
Therefore, to use geometricBounds to determine a frame’s height or width you must always test the rotation angle:
if (frame.rotationAngle == 0) {
     frame.geometricBounds[2] - frame.geometricBounds[0];
} else {
     frame.geometricBounds[3] - frame.geometricBounds[1];
}
And when a frame’s rotation angle is not 0 or 90, but, say, 30 degrees, you can’t use geometricBounds at all.
In contrast, autofitSettings.height() and autofitSettings.width() always return the correct values, whether the frame is rotated or not.
Changing a frame’s dimensions with AutoFit (14:51)
There are several ways in which you can use Autofit to change a frame’s dimensions. The easiest is to set the frame’s minimum and/or maximum values.
To set one dimension of a frame—say, its height—you can set the frame’s minimum and maximum height to the same value:
frame = app.documents[0].textFrames[0];
lim = frame.autofitSettings.limits
lim.minimumHeight = lim.maximumHeight = 80;
To set both width and height you could add minimumWidth and maximumWidth to this code, but you end up with a lot of code and it can become tedious, so it’s easier to use the set() function instead.
For example, this resizes a frame to 40 points by 80 points:
frame = app.documents[0].textFrames[0];
frame.autofitSettings.limits.set (40, 40, 80, 80);
Note that this is not an array of values but four separate parameters, and they are ordered minimum width, maximum width, minimum height, and maximum height.
When you set a frame’s size this way and the frame is not an inline, it’s always a good idea to set the reference point. For example, to resize a frame from the top-left, use this:
frame = app.documents[0].textFrames[0];
frame.autofitSettings.anchorPoint = AutofitReferencePoint.TOP_LEFT_ANCHOR
frame.autofitSettings.limits.set (40, 40, 80, 80);
Scenario: Inline image causes a gap at the bottom of a frame (20:47)
We’ll conclude this session with a scenario that we regularly encounter: an overset inline image causes a big gap at the bottom of a frame. How do you fit the overset image back into the frame?

Let’s try reducing the size of the inline image so that it comes back onto the page.
Without AutoFit, you can’t determine the height of the inline frame, so it’s impossible to check whether it can be reduced to fit the page. So, you have two not-very-attractive options:
- Scale the image down in small steps until the image fits; or
- Enlarge the story’s frame until the image appears, measure it, resize it, then restore the story’s frame.
The second option works better, but it is labour-intensive.
With AutoFit, however, you can get the size of the overset inline, and the space available in the frame, and then set the height of the frame. This is much quicker.
frame = app.documents[0].textFrames[0];
available = frame.geometricBounds[2] - frame.lines[-1].baseline;

g = frame.parentStory.rectangles[0];
g.autofitSettings.limits.maximumHeight = available-3;
The reason we have to subtract three from the available height is that, in this situation, InDesign adds three to the baseline. This rather annoying feature was introduced in CC, and it’s still with us.
Finally, we should add the following line—which is pure InDesign—to fit the inline image to the resized inline frame.
g.fit (FitOptions.PROPORTIONALLY);Conclusion (26:11)
This concludes the session on scripting Typefi’s AutoFit feature, which demonstrates how useful AutoFit is, and how a relatively small and simple arsenal of script properties can be very helpful. Thank you.
About Peter Kahrel
Peter was born in Amsterdam, the Netherlands. He trained as a linguist at the University of Amsterdam and has an MA and a PhD, specialising in syntax, semantics, and typology. He has lived in the UK since 1994, working as a typesetter, editor, copy-editor, and indexer (and sometimes as a designer too) for publishers in the UK, the Netherlands, and Germany, preparing for the press both books and journals. He combined this with teaching at the Linguistics Department at Lancaster University.
Peter has been programming InDesign with JavaScript since 2003, mainly to cut out the tedium that faces every typesetter and indexer but in equal measure because it’s good fun. Peter has worked as a script developer at Typefi since 2010, and is highly regarded in the global InDesign scripting community.
Check out Peter’s website—which includes a bunch of free scripts—at CreativePro.