In a Typefi workflow, if you want some text to automatically appear in a certain format in InDesign, you can apply that formatting as a local override or with a character style in your Word document, or encode it in an XML file.
This method of text formatting can’t be used in Typefi fields, because the composition engine doesn’t see that content. Typefi field content can contain only plain text: no formatting is possible.
However, this limitation can be overcome by including some rudimentary, HTML-like text tags in the field content and one or more GREP styles in the InDesign paragraph styles applied to the fields.
Let’s illustrate this with adding some formatting to instances of a Typefi field.
Say we use Typefi section fields to populate running headers, and we want to be able to apply italics to words in a title. Suppose we have a running header ‘The future of Homo sapiens’, and we want it to appear as ‘The future of Homo sapiens‘.
Add text tags to source content
The first step is to use some text tags in the field content in the source document: The future of <i>Homo sapiens</i>
The format of the tags doesn’t matter: it could be %0 and %1 or any other consistent and transparent scheme. The text tags are plain text and will therefore end up just like that in the InDesign document.
Apply character styles in InDesign
When the document is paginated, we need to do two things:
- Apply italics to the text in between the text tags; and
- Get rid of the tags.
We’ll do that with two character styles in InDesign, which are applied by GREP styles defined in the paragraph style used for the running headers.
Apply italics
The character style to apply italics is straightforward. Create a new style, call it (for example) ‘Italics’, and set its font style to italic.
Hide the tags
The style to get rid of the tags is perhaps less straightforward. You can’t delete text with a GREP style, but what we can do is make text invisible, or hide it.
In InDesign, we can do that by using a very old trick that dates back to the days of early WordPerfect and Wordstar—set the text to the smallest possible type size and further reduce its width by scaling it down.
A ‘hiding’ character style can be created in InDesign as follows:
- Create a new character style and call it (for example) ‘hide’.
- Set its size to 0.1 points and its horizontal scale to 1%—these are the smallest possible values in InDesign.
This makes the text to which it is applied invisible and virtually zero-width.
In our example of ‘The future of <i>Homo sapiens</i>’, when we compare the tagged title formatted with a GREP style and the same title without tags (and italic applied manually) the difference in width of the whole title is 0.002 points (or 0.0007 mm; type set in 10 pts). So it still has some width but it’s negligible.
It’s common practice also to set the hiding character style’s colour to None—just in case.
Define GREP styles in InDesign
With these two character styles in place, we define two GREP styles in the paragraph style used for our running header style.
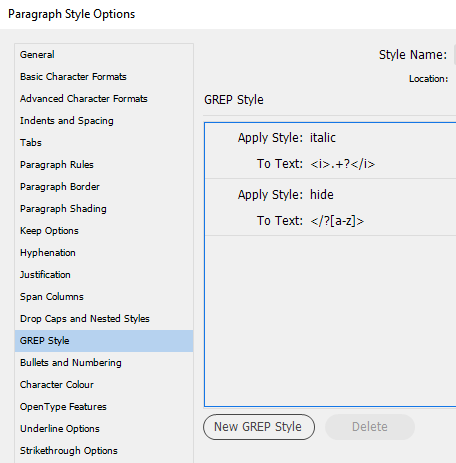
In the paragraph style’s Paragraph Style Options dialogue, go to the GREP Style tab, and click New GREP Style.
Select the italic style in the Apply Style dropdown.
Then, in the To Text field, enter the regular expression <i>.+?</i>, which matches an <i> tag up to and including the next </i> tag.
Note: .+? stands for any character (.), a series of (+), shortest match (?). The latter is necessary to handle correctly running headers with more than one set of italic tags.
Now add a second GREP style to hide the tags.
Apply the ‘hide’ character style to the regular expression </?[a-z]>, which stands for ‘</? and > with any lower-case letter in between’.
Note: The question mark following the slash stands for ‘maybe’, so that </? matches both < and </. [a-z] stands for ‘all letters from a to z’. We use this rather than </?i> so that we can hide other text tags as well.
You can see the styles in action when you open the Story Editor (Edit > Edit in Story Editor, or use the keyboard shortcut Ctrl + Y). The text tags are there in the title, but they’ve been rendered invisible by the hiding character style.

It works for other unformattable text as well!
This trick works very well and can be used to format other text strings that cannot normally be formatted, such as InDesign text variables and index topic names.

About Peter Kahrel
Peter Kahrel was born in Amsterdam, the Netherlands. He trained as a linguist at the University of Amsterdam and has an MA and a PhD, specialising in syntax, semantics, and typology. He has lived in the UK since 1994, working as a typesetter, editor, copy-editor, and indexer (and sometimes as a designer too) for publishers in the UK, the Netherlands, and Germany, preparing for the press both books and journals. He combined this with teaching at the Linguistics Department at Lancaster University.
Peter has been programming InDesign with JavaScript since 2003, mainly to cut out the tedium that faces every typesetter and indexer but in equal measure because it’s good fun. Peter has worked as a script developer at Typefi since 2010, and is highly regarded in the global InDesign scripting community.
Check out Peter’s website—which includes a bunch of free scripts—at CreativePro.