In this presentation from the 2018 Typefi User Conference, Senior Solutions Consultant Guy van der Kolk outlines a range of tools and options available for ensuring the integrity of your content, including:
- CXML validation;
- Ensuring that Typefi project fields are filled in;
- Scanning for invalid styles before printing;
- Using XSLT to ensure conformity (and save time and effort); and
- Setting your InDesign output to open at the correct page.
You’ll also get a sneak peek of some exciting (and very useful) new validation actions that are on the way, including Schematron and URL checker.
Transcript

GUY VAN DER KOLK: All right, so DO MORE with validation. My name is Guy, I’m one of the Senior Solutions Consultants out of Holland, and it’s so nice to be here with most of our customers.
The previous session was Eric talking about workflows and what you can do with workflows, and I must admit I even learned some things there, it’s like “Oh, didn’t think you could do that.”
So that’s great, and that’s also the idea for my session, is you know, validation and conformity.
Before I go into demonstrating stuff, because we just saw that every time we switch PowerPoint we have to change the screens, I’m gonna shoot through my PowerPoint and talk about some stuff and then go right into the demo.
Validation
Let’s talk about what validation is. Everybody can read, but I’m going to speak it as well for the audio: “The action of checking or proving the validity or accuracy of something.”
Such a wonderful description. So, validation is important in the sense that you want to make sure that your content is valid.
If you’re doing XML, then you want to make sure that your content is valid. If you’re producing an accessible PDF, then at the end of the production of that accessible PDF, you want to validate it to make sure that it’s actually accessible and that it’s following the rules, right?
So, validation is important, and it’s an important part of what I’m talking about today.
Document Type Definition (DTD)
Validation depends on Document Type Definition, so a DTD, and a DTD defines the structure of an XML file. It’s usually an external file that is called out in the XML, and it’s used for the validation, like I said earlier.
It’s usually also a public document, so the DTD for the 3.1 current version of our CXML is available online and you can go in and read it if you like reading your DTDs in the morning for breakfast, it’s what we all do.
So, the DTD tells what is and is not possible in the XML and what you are and aren’t allowed to do. And I’ll show you how that works in a moment.
About half of you use XML as an input format, so you are very familiar with the concept of validation, because you do it constantly—at least I hope you do—before you put your stuff through an automated system.
The other half of you uses Typefi Writer, so you are less familiar with validation because we do it for you on the background, isn’t that great?
eXtensible Stylesheet Language Transformations (XSLT)
Another thing that we’re talking about is XSLT. Because we’re not only talking about validation, we’re not only talking about the act of making sure that your XML is valid, we’re also talking about conformity. How can we help you make sure that your content follows certain rules?
So, XSLT is an important part of that. In a moment in my demonstration you’ll see how XSLT is used.
XSLT, if you want to impress people then you can actually see what it means, but it’s a language that allows you to transform one kind of XML into another.
It’s what happens when we take JATS and transform it into CXML, Content XML, but it can also be used to transform Content XML into something else, like HTML, like Eric showed in the previous demo, or it can be used to modify stuff in the CXML itself.
One of the things that it could be used for is like at ITU, we take the URLs. When you’re producing a print document, you want the URLs to obviously be the full www.typefi.com/article slash blah de blah.
But if you’re producing an accessible PDF with clickable hyperlinks, then maybe you just want www.typefi.com as underlined, and then when you click on it, it takes you to the rest of the website. So CXML allows you to do that kind of modification on a case by case basis. XSLT is an important part of some of the stuff that we’ll be talking about.
Conformity
Conformity: “Compliance with standards, rules, or laws.”
If you’re producing accessible content, one of the rules that you need to conform to is you must have headings that follow a certain structure.
You must have a Heading 1 following a Heading 2 following a Heading 3—you cannot jump from Heading 1 straight to Heading 3 because you like the way Heading 3 looks more than a Heading 2.
So, conformity is ensuring that the rules are followed. But this is also the kind of conformity like your internal conformity, your style guides, your whatever you have, so ensuring conformity.
Schematron
Schematron gets me, it’s like coffee in the morning.
There is a challenge with DTDs. DTDs are rule-based, so you can say, “OK, this must follow that, or you can only have so much of this.” And I’ll show you how that works in a moment.
But it doesn’t really allow you to say, “OK, when there’s a multiple of this, like in the case of heading structures, then please give a warning.”
Schematron does allow you to do that, and one of the big advantages about Schematron is that actually, you are in control of the messages that you want the document to give, so you can make human readable errors instead of what XML DTD validation sometimes give as errors.
So, these are just a couple of terms that I want you to be aware of, and now let’s get out of PowerPoint and actually do some cool stuff.
Demonstration
That is working, all right. I think that’s a good compromise for being able to see the screen and not have to squint everywhere.
Validating CXML
Let’s take a brief moment. I have a CXML file open, and I’m going to show you what the DTD allows you to do, or doesn’t allow you to do, and what you can do to validate your CXML. The process is roughly the same, in this case I’m using Oxygen XML Editor.
I must admit, I don’t spend a lot of time hand-editing my XML or my CXML files—most of the time, it’s when you guys give me stuff and I have to troubleshoot why it’s not working—but a DTD controls what you are allowed to do.
So if I start typing here, and I’m already making a mistake in my first four letters, that’s why validation exists, I get a list here.
<tps: and a pop-up menu opens.]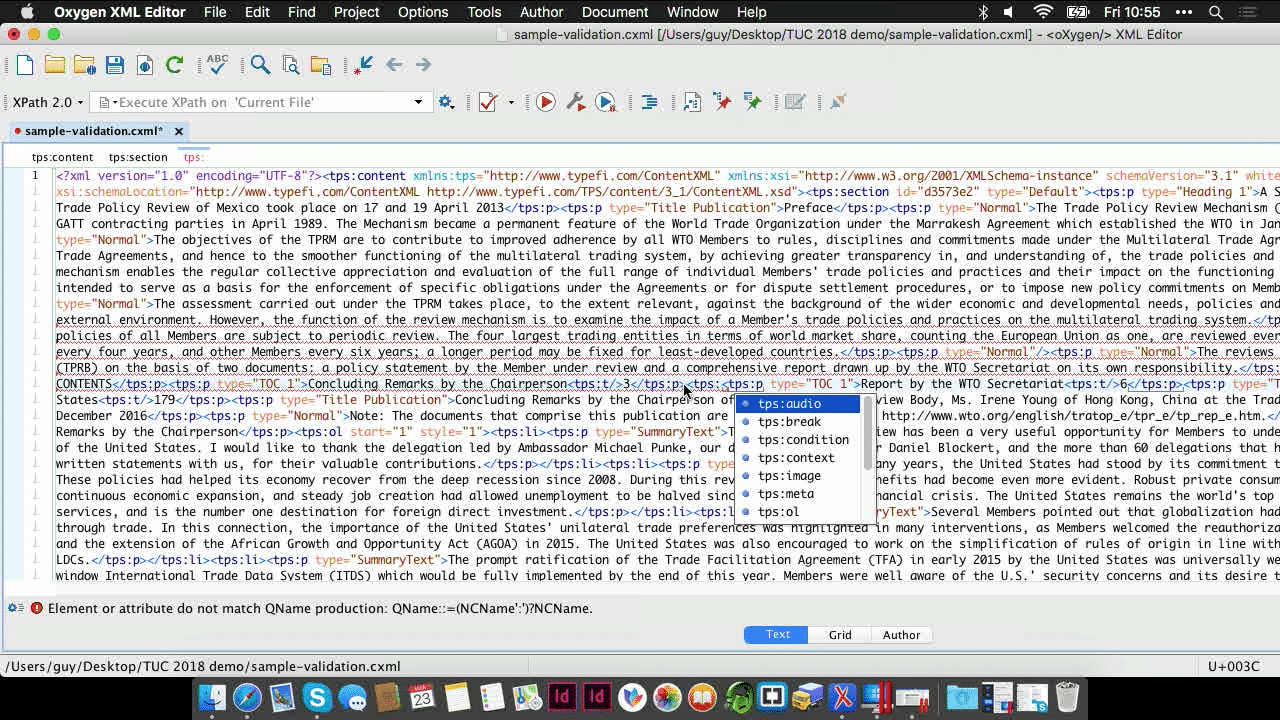
The list that pops up, in this case in Oxygen, is what would I be allowed to insert in this area, which is controlled by the DTD. So I am going to insert an ordered list at this point, which is a bulleted and numbered list.
<tps:ol><tps and another pop-up menu opens with fewer items than the previous one.]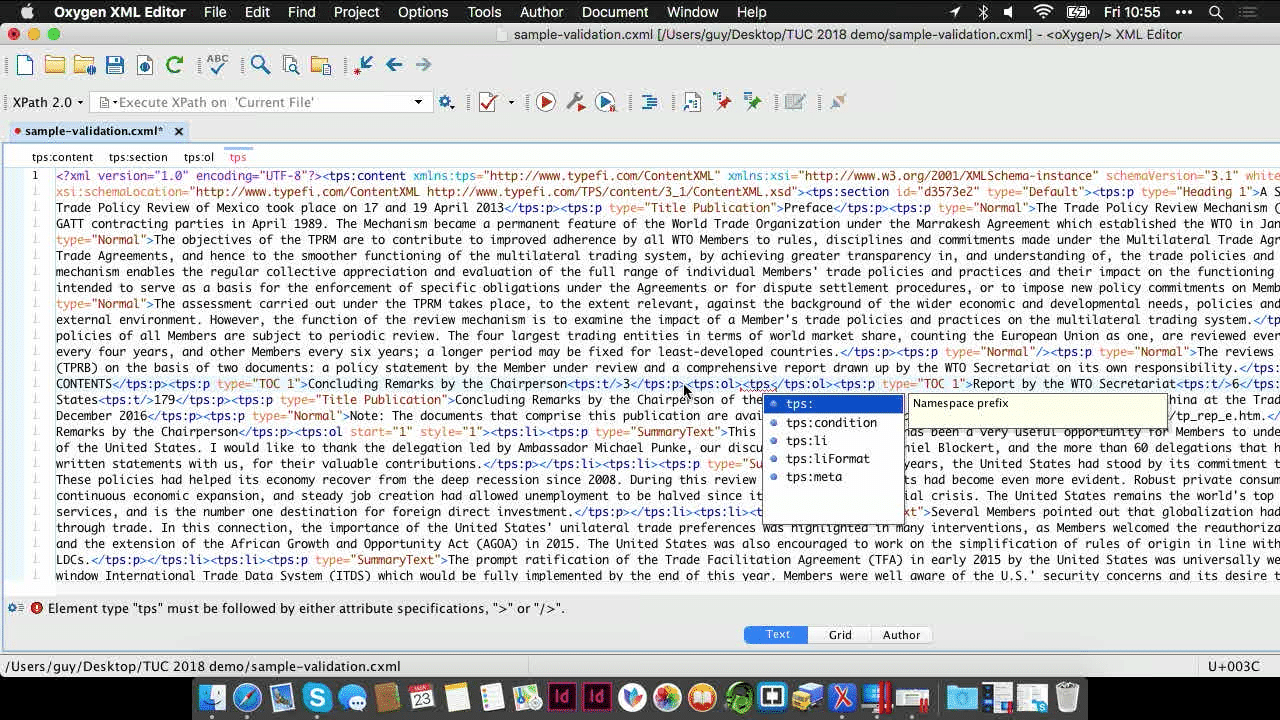
And then I’m going to continue typing, and now you can see, all of a sudden, I have a lot less tags I can insert. The DTD is driving Oxygen so that it makes sure that I’m only able to insert the tags that are defined by the DTD in that particular area.
But sometimes there can be a challenge. So if I remove this…
<tps:p>.]I just inserted a tps:p and now of course, my CXML is completely invalid because I forgot to delete the closing ol tag, so let me do that.
So now it’s all valid again.
In this particular case, this is one of the challenges of a DTD, or one of the things where additional tools like Schematron can be very useful, because I now inserted a tps:p, which is a paragraph.
But if I want to use this in Word or in InDesign, then it needs to have a ‘what kind of paragraph is this?’ Because Word and InDesign, you have to have a Normal, or you have to have some kind of paragraph.
In the DTD, I can have a paragraph style, a paragraph without a type attribute, so no paragraph style, but in Word and InDesign, I cannot.
So this is fully valid, let me show you—if I click here…
Ooh! “Document is valid.” That’s always a good moment. This document is fully valid.
But if I now were to go into InDesign or into Word, they would say, “Well, there’s no paragraph style associated with this, so what are you allowed to do?”
I just asked Caleb why am I allowed to have a tps:p with no type attribute, and it’s because when you’re using them in cells, with the Excel table workflow, then the paragraph is defined in the cell, so it doesn’t necessarily need… anyway, that goes maybe a little bit too much detail.
But this is a fully valid CXML, and if you guys are working with XML, then you’re used to various validation tools.
If you’re used to working with Word and Typefi Writer, then it’s a different story—you don’t necessarily deal with XML validation that often.
I’m very happy it exists, because as you saw, I make mistakes in just four letters of XML code.
Ensuring that Typefi project fields are filled in
So let’s talk about some other kinds of validation, because right now, we’ve just been talking about the act of validating XML using, in this case, Oxygen. But validation obviously goes beyond that.
Like I said, if you’re using Typefi Writer, then maybe you’re not doing validation of XML, but we’re still allowing you to validate your content.
So, I also have my fake story—I blatantly copied Sherlock Holmes from the Gutenberg Project, which I’m allowed to do by copyright, and I created, I turned it into something else.
So, what we have here is a document, it has Typefi tags, you’ve seen all of that before, and I’m going to print this document.
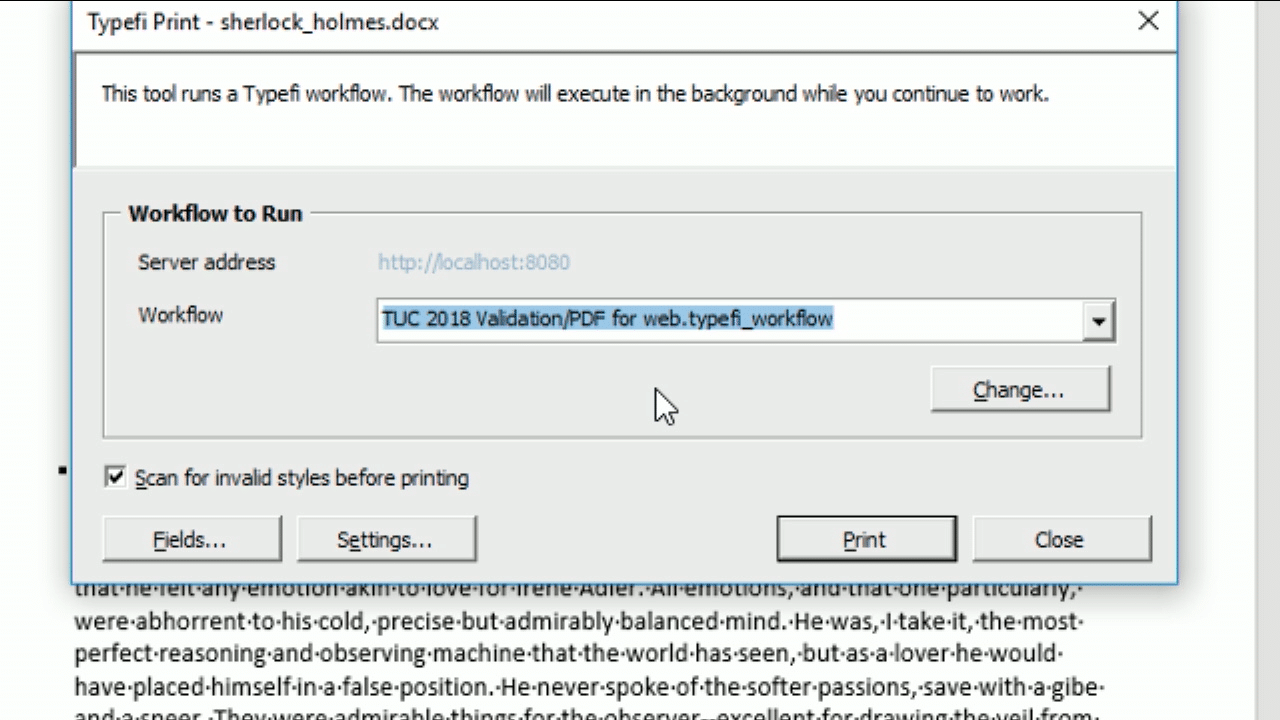
So I’m going to click on Publish, and it has a workflow, and one of the very first things that I want you to be aware of is that this document has project fields—project fields like document title, author in this particular case—but project fields in our customer workflows are used quite frequently because they are used as input files for scripts.
So, multilingual publishing workflows, the author needs to define what language this content is in so that we set the appropriate settings in InDesign. Or multicolour workflows, like sometimes customers want different colours, depending on the kind of publication. So project fields are important.
But right now, what we observe with customers is that they forget to fill out the project fields. So you see here that there is a button that says Fields, but authors forget to fill out the fields, so wouldn’t it be nice that there was an option that allowed you to ensure that your Writer users are filling out this field before it goes?
And there is such an option, if you go to the Options menu and go to Workflow options > Ask for Typefi project fields.
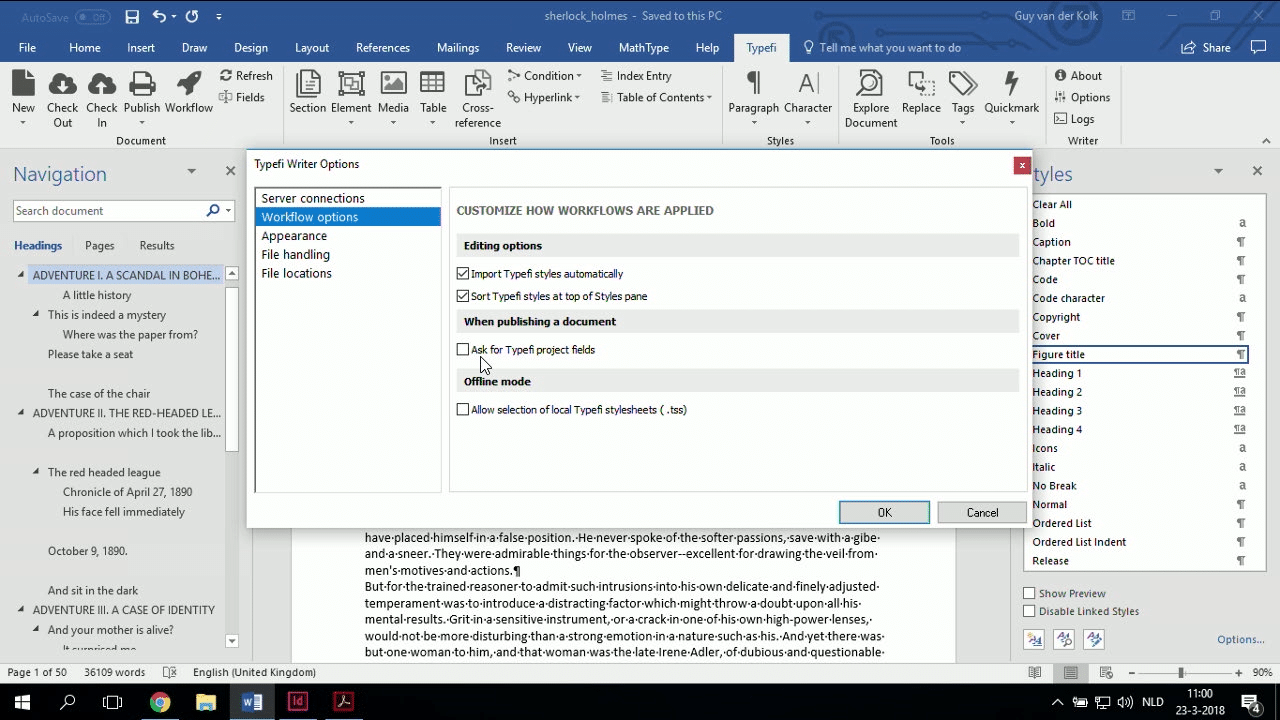
So if I check this option, now when I click on print, or when I click on Publish, sorry, I first get a document, I first get a popup, that allows me to verify the project fields as part of this document, so it’s a way in which we can ensure that project fields are actually filled by putting them in your face.
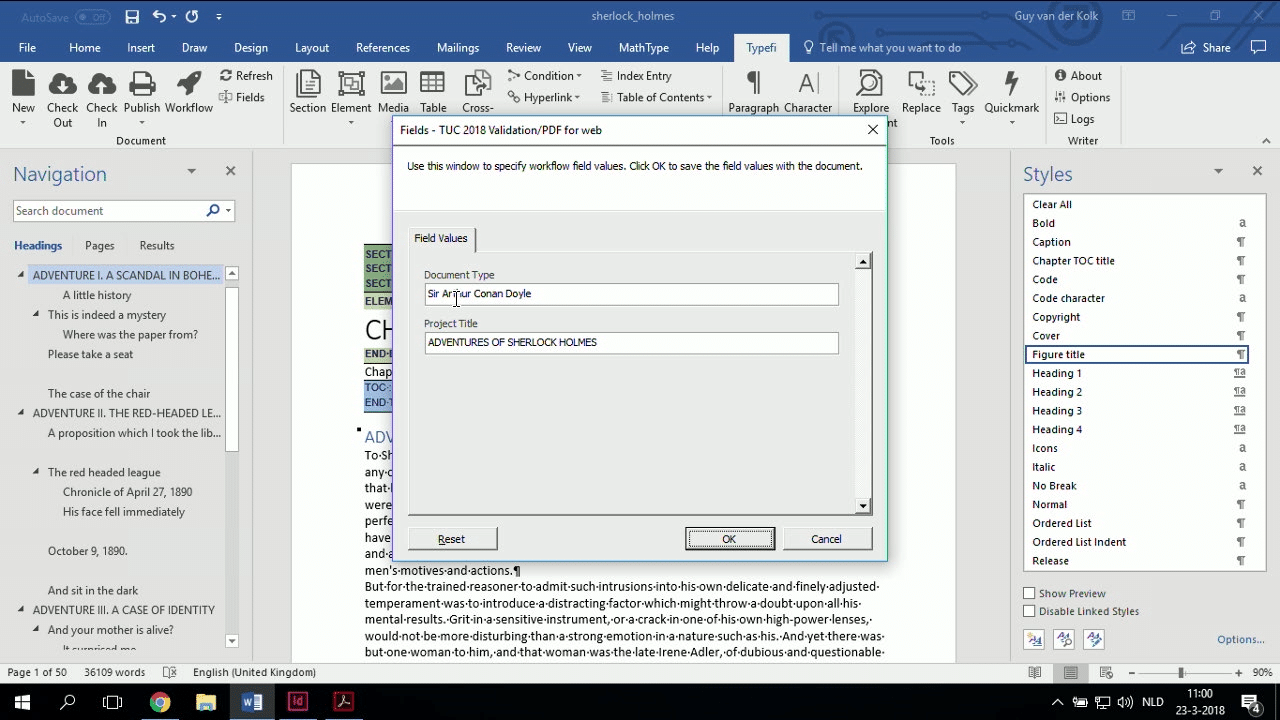
Now, this is an option because not all of our customers use project fields, so if you were to enable it by default, then everybody would get it and maybe not use it.
So this is something you can set in Typefi Writer, where it will show you the project fields before you fill it, which means that you won’t forget to set the language or won’t change the colour or change the copyright year, which is still from the last time you ran the document in 2015, and so on and so forth.
That’s one kind of way in which we can ensure conformity and validation in Typefi Writer for a very essential part of the information.
Scanning for invalid styles before printing in Typefi Writer
The other part is something that I find many customers actually, for some reason, disable. You see here, Scan for invalid styles before printing.
If we’re talking about ensuring conformity and validation, then we want to make sure that this option is checked before we print from Typefi Writer, because this will warn us, as I click on Print—and I know it will warn us because I made it so—it tells us that this document has warnings and cannot be printed, or it may not be printed as expected.
“Do you want to see the warnings?”
Yes, I do, please.
So it now opens the Document Explorer and it is telling me that I’ve done a pretty good job of tagging this, but there are some paragraph styles that have a question mark. It doesn’t mean there are nine errors; there’s nine paragraph styles and some of them may have errors.
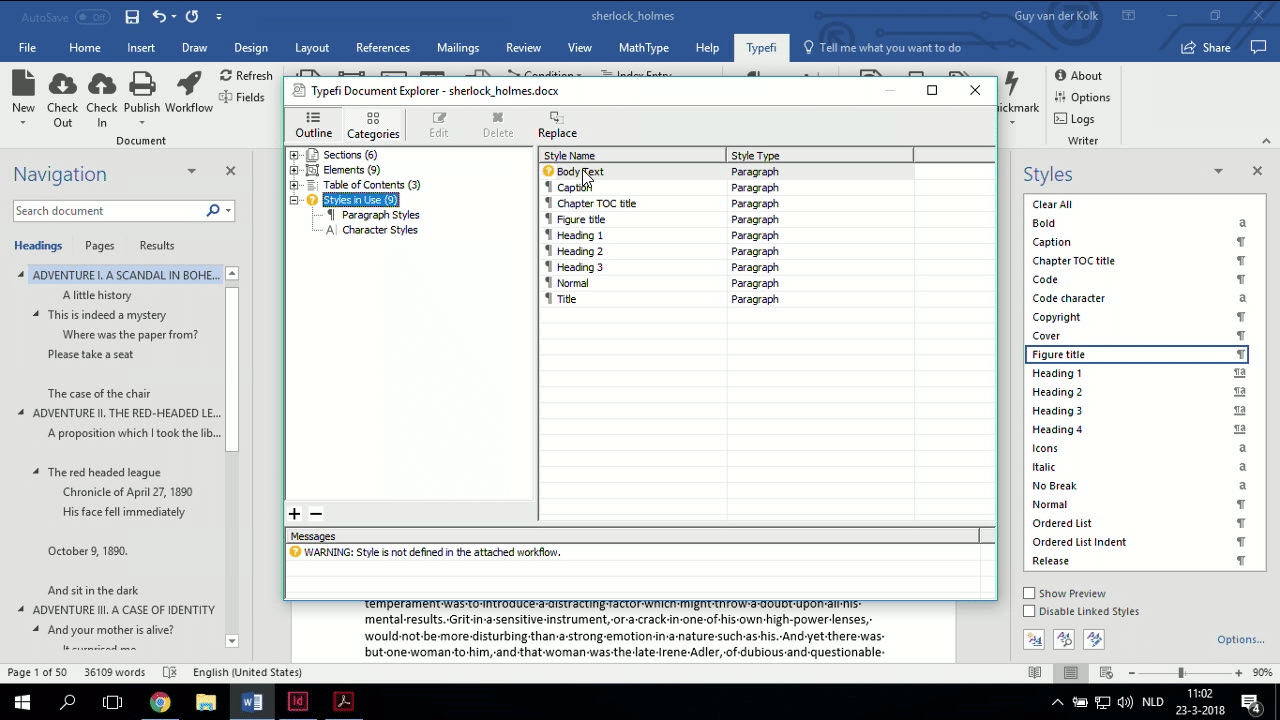
So here we can see that a Body Text is applied somewhere in this document, but Body Text is not defined in my InDesign template. So right now, my Word file is not conforming to the definitions in my template.
I am using a paragraph style that is not approved, so to speak, so I need to change that.
Well, there’s two things I can do. I can go back to the template and say, “OK, we create Body Text,” but in this case, Body Text should not be used—we’re just using Normal, because Normal is the regular paragraph style in almost every Word document that anybody ever gets.
So what I’m going to do is I’m going to click on Replace, and I’m going to say ‘in Body Text, replace it with Normal’.
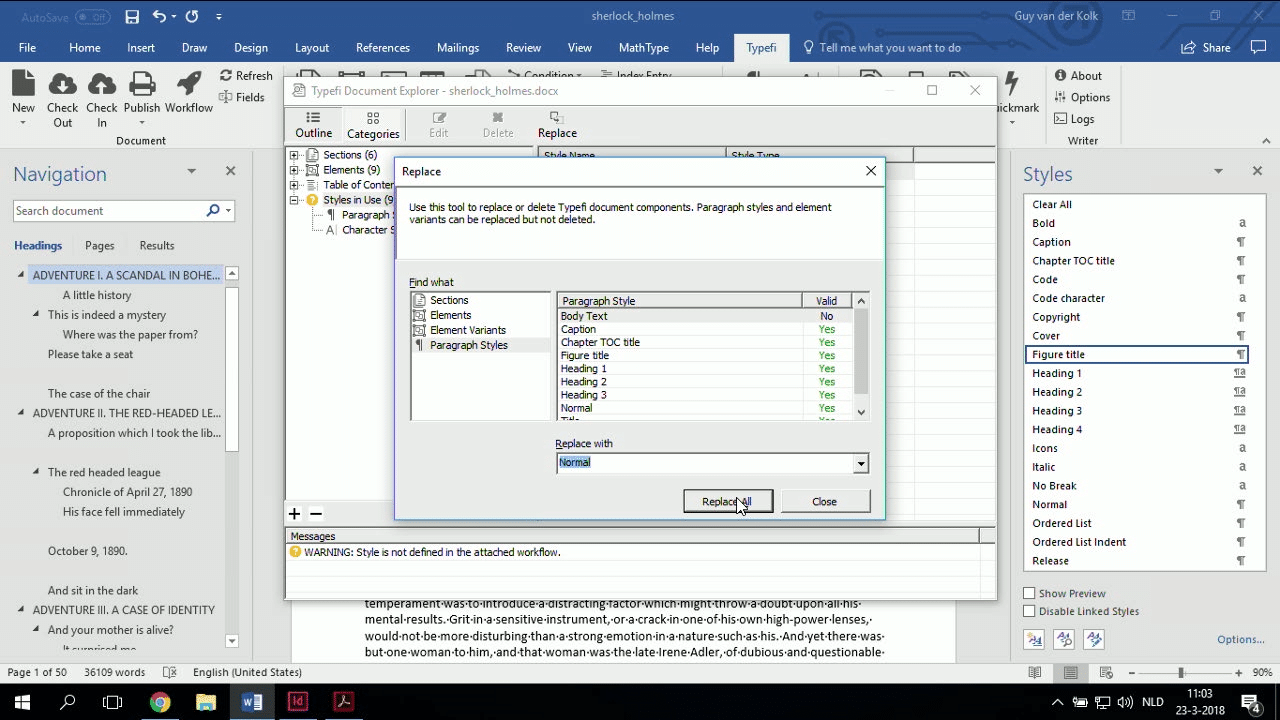
Now, in this case, I know I’ve prepared it, there’s one paragraph style, I prepared it specifically. Of course, before you go on replacing entire paragraphs, you want to make sure that actually—like numbered lists or things—you want to make sure that everything is the same.
But in this case, I know because there is only one of them, so I’m going to replace it.
And now Word, Typefi Writer, has helped us make sure that our content is valid and working and we fixed the problem.
I could have ignored this problem, and I’ll show you in a moment how that would have looked.
So I’m now going to print this file.
By changing an option in Word, I’m now ensuring that the authors are properly filling out the project fields, and we’ve identified a problem where the incorrect paragraph style was being used.
This Word file is being created. Now, while this is running, I ran a job earlier this morning where I purposely ignored the style warning in Word, so I labelled it “invalid paragraph style”.
What you can see here is that if we look at the Create InDesign document log, we can see that the paragraph style Body Text was not found in the template.
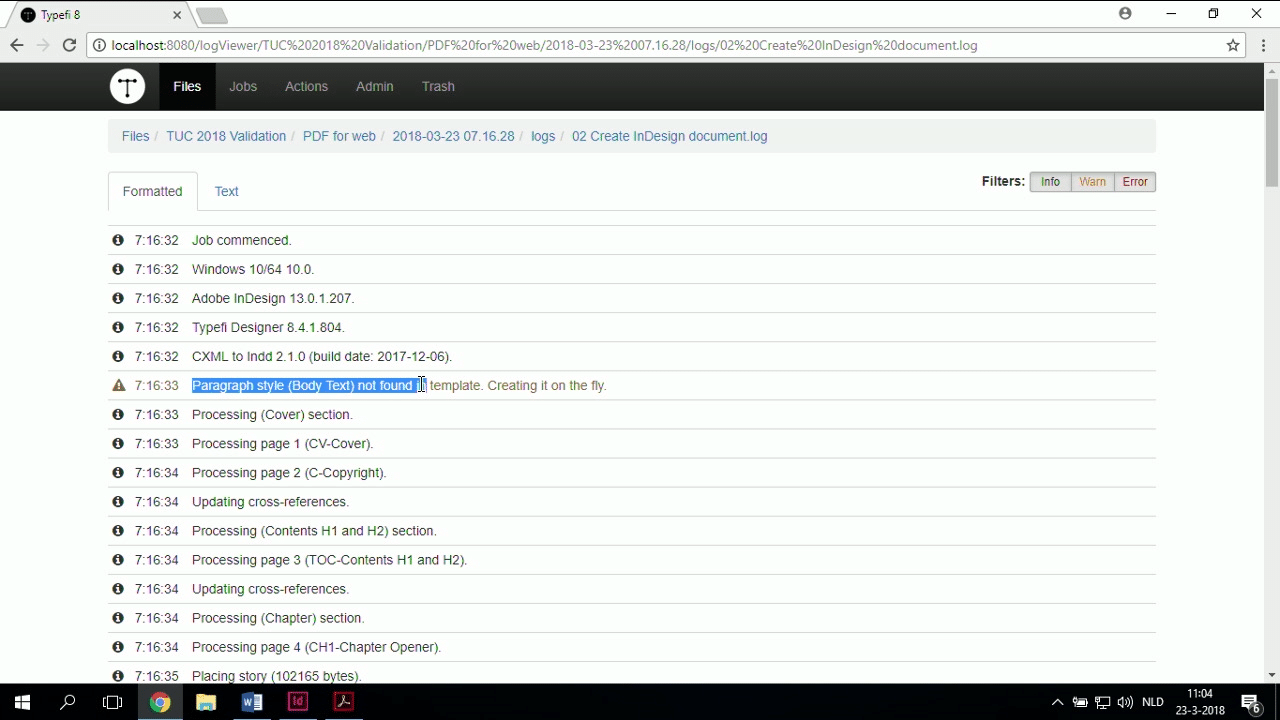
So when you choose to ignore a warning in Word, then we’re not going to scream and put everything to a stop, we’re just going to silently create it for you.
But what we find is that most of our customers don’t actually read the log. I don’t know why that is, I love reading logs, they’re so useful. But you guys somehow don’t seem to think that.
So, it’s a part of our things that we’ve been discussing, like how can we improve that for you, and this is one of the ways in which you can do that.
Using XSLT to ensure conformity (and save time and effort)
Now, if I look at the InDesign template, or if I download this file so that we can look at what’s happening, then one of the observations that we make—I’m actually going to download the last-generated file.
So I’m gonna download the InDesign file, because there’s some problems with the PDF. I mean, I’m always amazed when I see the thing running and then out pops a PDF—it’s still magical to me, even after five years. But there are some small issues with this file.
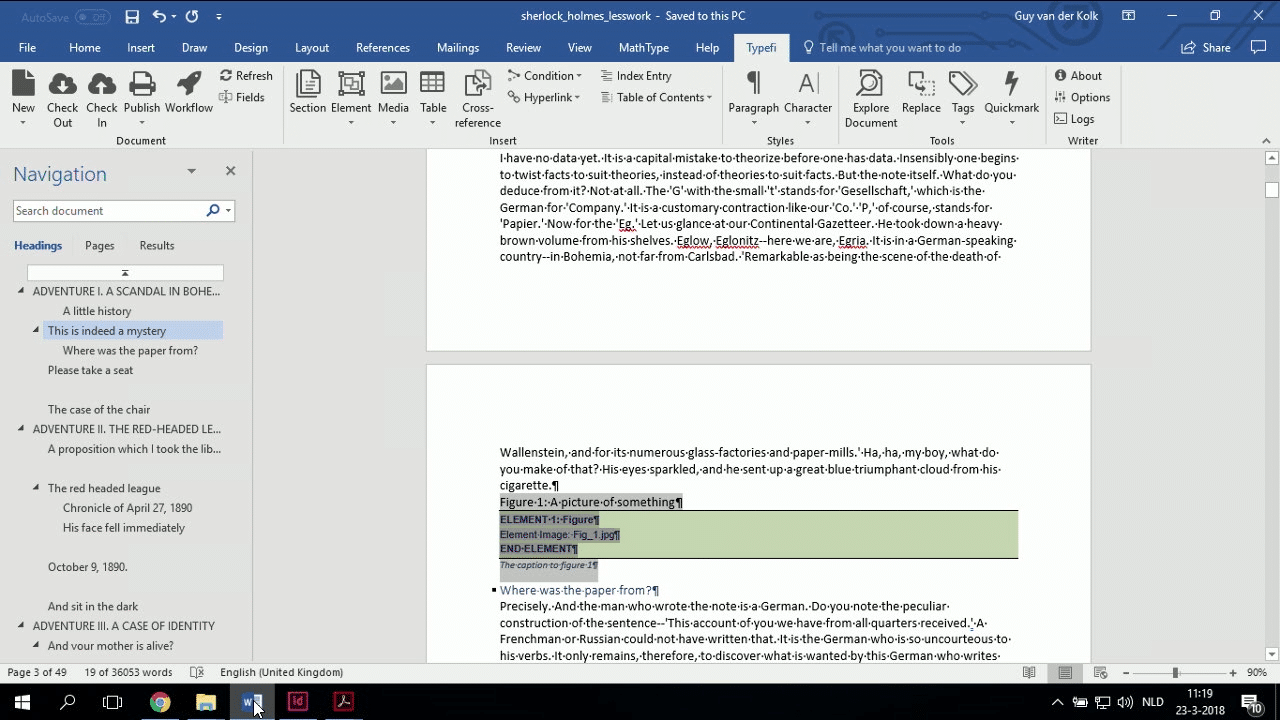
So one of the things is that we do have a chapter, table of contents—what Caleb was talking about earlier—but there’s some hard returns in here.
So authors do what authors do, they don’t understand ‘space before and after’, they just put hard returns, because that’s what everybody does.
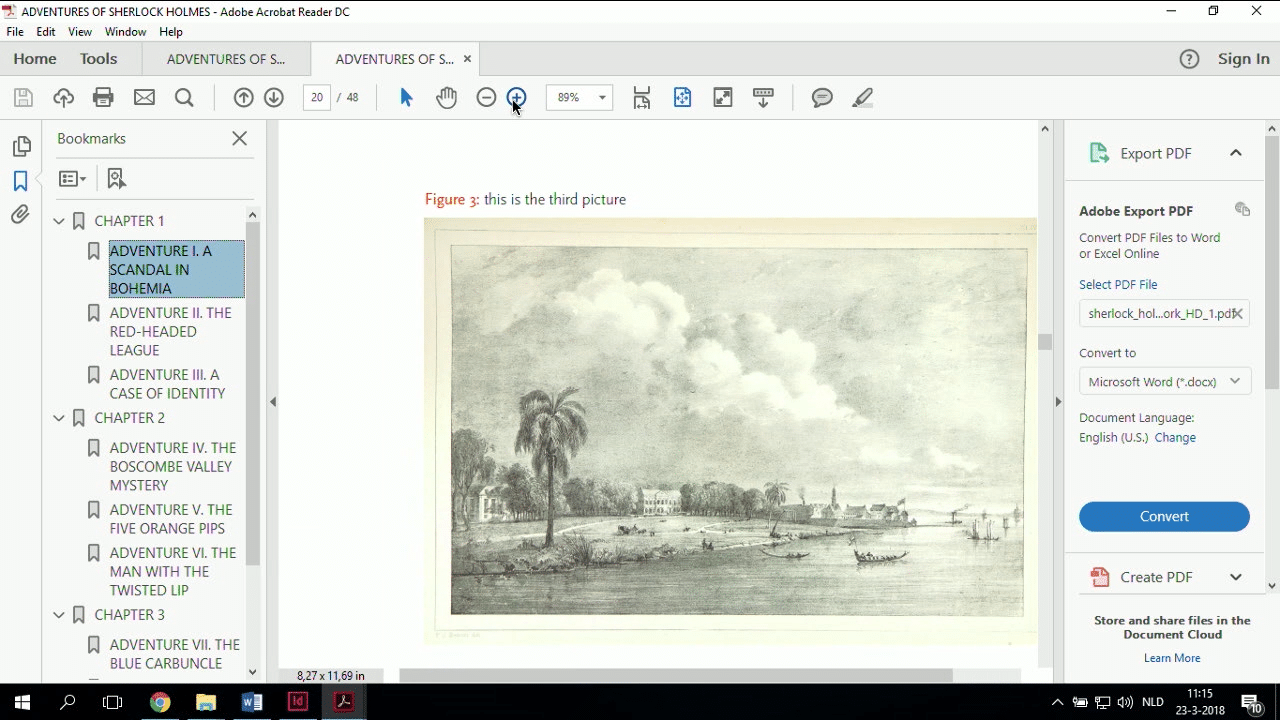
They haven’t been very consistent in making sure that figures are placed in elements, so right here, all figures should be either at the top or the bottom, but here in Word, the author forgot to put it into an element to make sure that it appears at the bottom.
They made another small mistake—if I zoom in here—they made another small mistake where the instructions are that a figure should always have a colon after the number because the InDesign style makes that nice and bold. But in this case, that was forgotten.
And somewhere also at the chapters, I think in Chapter 2, there were some issues. Like here, the title should be above the line, so it wasn’t inserted in the proper area in Word.
These are all kinds of situations where we’re not having proper conformity. And there’s two reasons for it.
For one, like the paragraph styles, people just forget. And two, if you’re tagging a big document in Microsoft, in Typefi Writer, it’s so easy to forget to select some stuff and put it into an element.
Now, I personally think that it’s always good to go back to the source content and fix stuff, because you want your source content to be nice and good and clean. But we can use XSLT on your behalf.
So if you are finding as you’re using Microsoft Word or even with your XML content perhaps, if you are finding that people are making consistently the same mistakes, yes you can go ahead and do search and replaces in your Word file to delete empty paragraphs.
Yes, you can go in and fix the fact that your chapter title is not in the proper element, all of that is possible.
But you could also have us automate it for you. And in this case, we’re going to do that using an XSLT.
What we have identified in this document, if we’re looking at the Word file, is that customers are forgetting the section cover and the section contents, H1 and H2 need to be inserted, but they’re essentially blank because they’re populated by InDesign and by the project fields.
We’re forgetting to insert the covers. We’re forgetting to put the chapter within a title. And at some point, I know that somewhere we forgot to put the chapter contents and the table of contents was not inserted, so this is how the new chapter level table of contents looks in Microsoft Word. Really brilliant, I love it.
We can fix that for you. The extra paragraph returns, we can fix that for you. And by doing it consistently it means that whether your output goes to InDesign, or to EPUB or to PDF, it’s always going to be fixed on your behalf.
So what we’re going to do is I’m going to close this Word file, and I’m going to go to my workflow, and I am going to add an XSLT action to this workflow.
So Add Action, and I’m going to go to the XSLT Apply XSL Stylesheet(s).
Now, one of the things that we introduced very recently is that now when you click on the Reorder button, you can actually drag—that is so cool.
Anyway, at least I think it’s cool.
So I have an XSL Stylesheet, so what I’m going to do is I’m going to copy and paste the input, yes, that should be automatically picked up, you’re absolutely correct. And I’m going to call this one ‘transformed’.
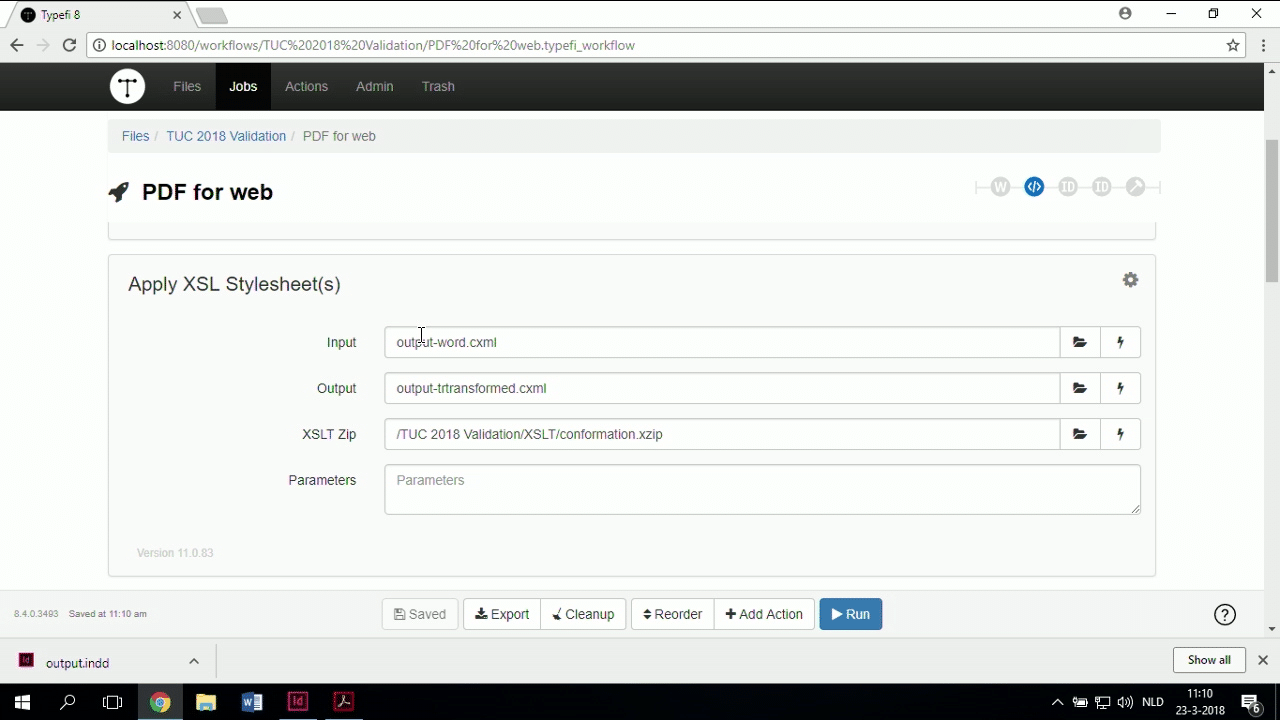
We’ve written an XSLT—well actually our XSLT engineers did, based on my instructions—that removes empty hard returns, that puts all of the chapter titles into a chapter title element based on the fact that they’re tagged as a chapter title paragraph style, that goes in and cleans extra tabs because people put extra tabs to align stuff, it’s just what people do, that goes in and automatically inserts the chapter-based table of contents so that the author can’t forget it.
So, with literally two hours of XSLT work, now we have full consistency in output. And of course, this is a very simple example, but this can be made much more complicated with pretty much whatever you want.
So now I’m actually going to go to a Word file, I’m going to open a different one that I had, that I’ve previously created.
This one is called ‘lesswork’, because we all like doing less work. And what you can see here is yes, I do have to insert the chapter, because I need to know where the chapters are going to be—that is a human decision in this particular case.
But other than that, you can see the front is not in there, the cover’s not in there, the table of contents is not in there, there’s no wrappers around it, the graphics needed to be put into a Typefi Element as well. All that we now have here.
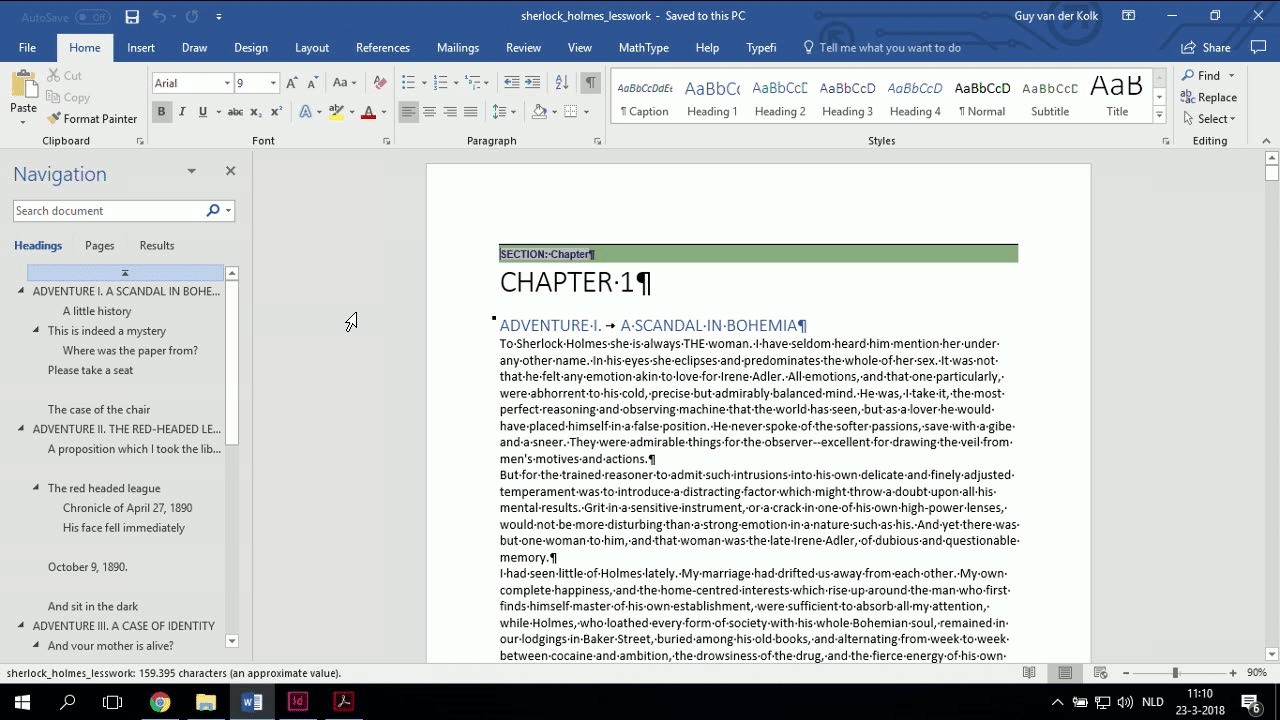
We still have the empty hard returns, we still have multiple tabs somewhere. But the figures, yes, we do need to insert the figure itself, and it does need to have a caption, and things like that, but we can save you time.
So what I want to invite you is, if you are seeing—especially in Typefi Writer—that your Typefi Writer users are making the same kind of mistake over and over again, then please by all means, reach out to us because with a small investment in an XSLT transformation, you can ensure a lot more conformity for the XML to CXML.
That may be more on the side of who authors your XML where you can do these kinds of things, but it’s a really big deal.
So I’m going to run the same job and it still comes up with the project fields. Now this file, I’ve already cleaned up so there shouldn’t be any invalid style issues. And we’re going to run the job.
We’ve had to do less work in tagging, which is always brilliant. And because we’re doing it at the XSLT level, in this case, the discussion of, ‘should my source content should be as clean as possible’? Yes, absolutely, but sometimes it’s a fight that you just can’t win.
And this way, at least the CXML that is then used to produce your other formats is going to be consistent. So it is a huge advantage.
So now we’ve actually, let me go here and open the last one, ’cause I don’t remember which one is the last one.
I think I made a mistake ’cause it doesn’t look like this got cleaned up.
So let me see, oh I know what I forgot to do. So what I forgot to do when I inserted the action is that I forgot to change the CXML that the InDesign document is using. So let me delete this one, and pick it from the list from the previous, nobody told me that, just wanted me to fail.
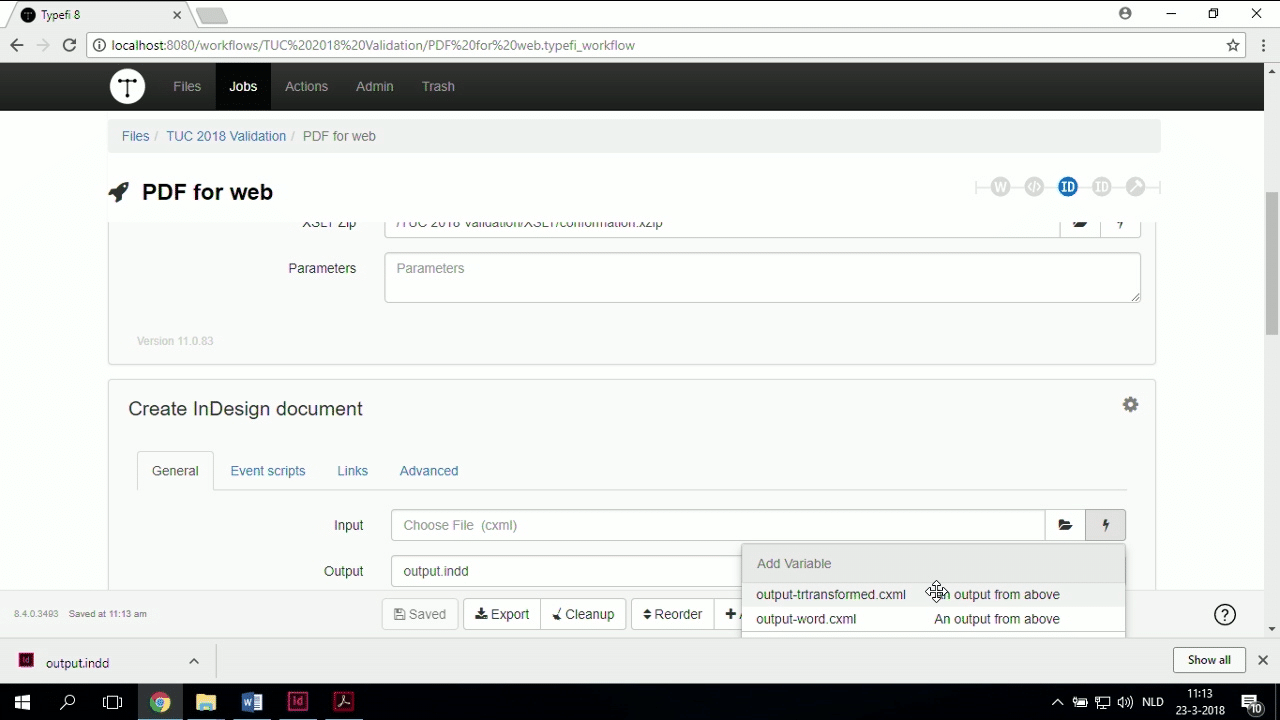
So output-transformed, oh and I made some typos as well, but that doesn’t matter.
So I’m going to run the job again, and this time it will actually do what I told you it would do. That’s what I always tell all my colleagues, attention to detail is important in our job.
Anyway, so you get the idea that you can use CXML, to for the one hand, get rid of some tedious tasks that you may be doing over and over again, but more specifically, ensure conformity and ensure that you’re following the rules of your publication, all right. And I think that’s a very powerful tool.
So now, the job is almost done.
Ah, perfect, so we’ve got our chapter level tables of contents, everything is put into a title.
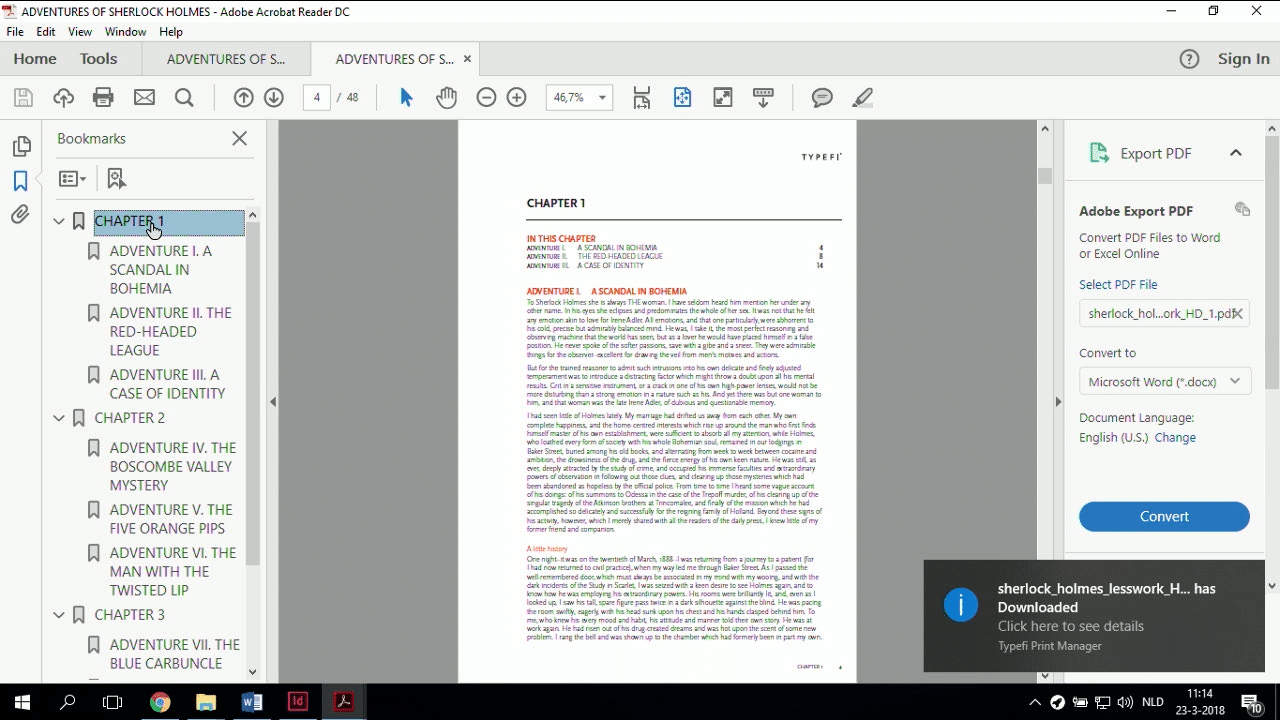
The figures are properly placed, let’s see if we can find that Figure 3 where we now decided to, that was Figure 2, so we’ve cleaned up the fact that the Figure 3…
I should have put in a list of tables and figures as a table of contents style instead of the chapter openers.
But now we can see that Figure 3 has, we put in the colon, the author forgot it, but we need it for consistency, so we put it in. OK, authors are forgetting to put in the colon, we’re doing it as part of the CXML.
So this has now been sorted.
Setting your InDesign output to open at the correct page
Now, one of the things that Caleb was talking about earlier today was the fact that you can validate your templates.
There will be more and more tools for validating your InDesign templates in the near future. There’s already some work being done in that, but more will come in the future.
And one of the things we can do with validation is, I’m actually going to download one of the generated InDesign files, because sometimes when you’re troubleshooting, we need to download the InDesign file ’cause the PDF doesn’t always tell you why something is happening.
So if I download the InDesign file and I open it, then what you’ll see is this InDesign file generated is opening to, oh, is opening to, I didn’t save it properly.
What I was going to show you was that very often what happens when you’re building a template is that you save it, you do your work on the last master page, and then when you open the generated InDesign file when you’re troubleshooting it, then that blank page is what it opens up to.
Then people are like, “Oh where’s my content, something’s wrong with my InDesign file, stupid Typefi!” Anyway, I don’t know if you all do that, but I could imagine sometimes you’d do that.
So one of the things that I came up with as I was asked to demonstrate how you can perhaps validate your template is, OK, we just want to make sure that the last thing you do before you save your template is that you go to the first page of the generated file.
Because that will ensure, like this document, that when you open up your InDesign file, it actually opens up to your content, and not a blank master page.
So there is, in the preferences for InDesign, a Typefi area.
And when you look at the FileManager, you can see that you have Enable Typefi Preflight, so this is like the first iteration of the preflight functionality.
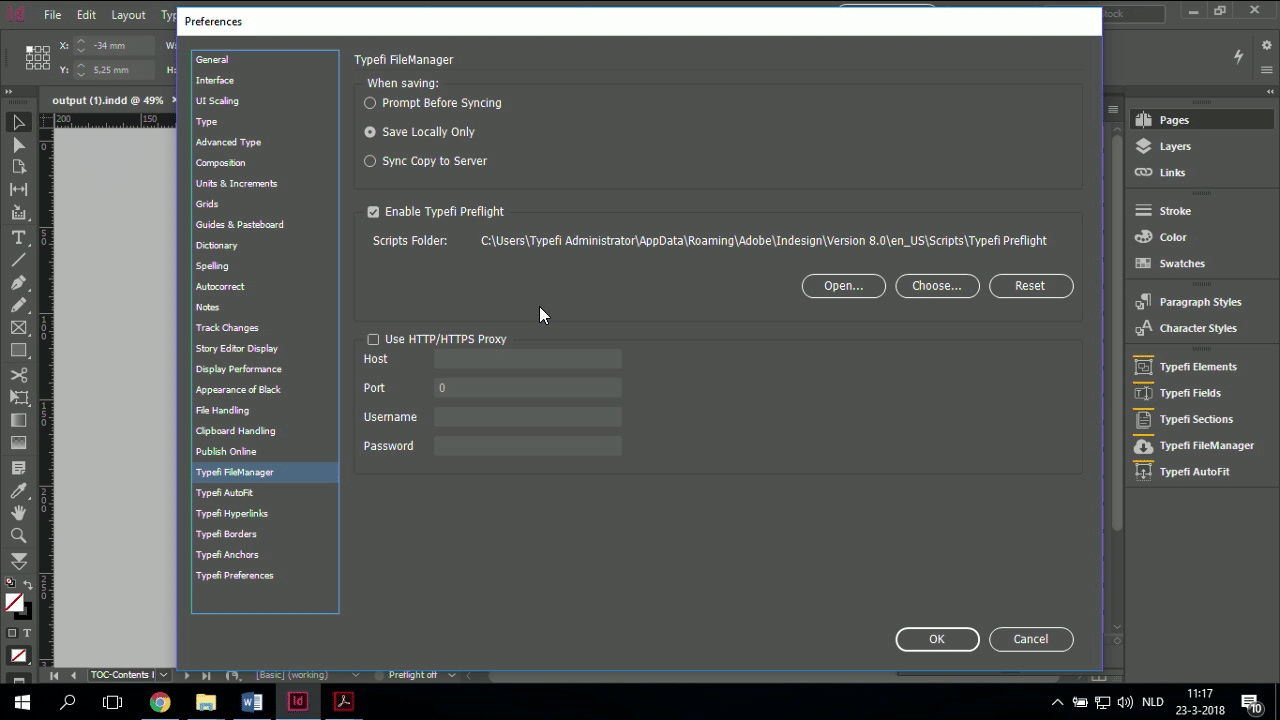
And you can, in this case, there is a script here that says check active page.
I can’t demonstrate right here because I have a problem with the hotel Wi-Fi, but what would happen is, you’d check your document in Typefi FileManager, and it would check whether you’ve done the step of saving your template on the first page. And it would pop up a little warning.
I’m going to show you that as a script, because Peter gave it to me just as a script I can run by double clicking, to give you an impression of how that will work.
Scripts…
So here I have CheckActivePage, just as an InDesign script, so I would double click that, and you get up this panel.

So it would happen, you checking your file, and this panel would open and say, “Hey do you want to move this to the first page instead of wherever it is?”
You can say yes, and then it would continue with checking it in.
So, like with the CXML, we have the tool. This is a tool that you can use, and it will get even better when we have the preflight panel or whatever we’re going to call it.
These tools exist, but they need you to make sure that you get the best out of the fact that this thing exists. You know what kind of things your Designer users are forgetting to do all the time, and it’s different for every customer. It depends on who’s using it.
So the tools exist—ask us how you can make it work for your departments.
Schematron (coming soon!)
Now, we’ve talked about how we can use XSLT to change things and to validate things. Or to ensure that there’s conformity.
But there’s Schematron. We were talking about Schematron in my introductory presentation.
So one of the issues is actually that in this document, we want to ensure that the headings are properly styled.
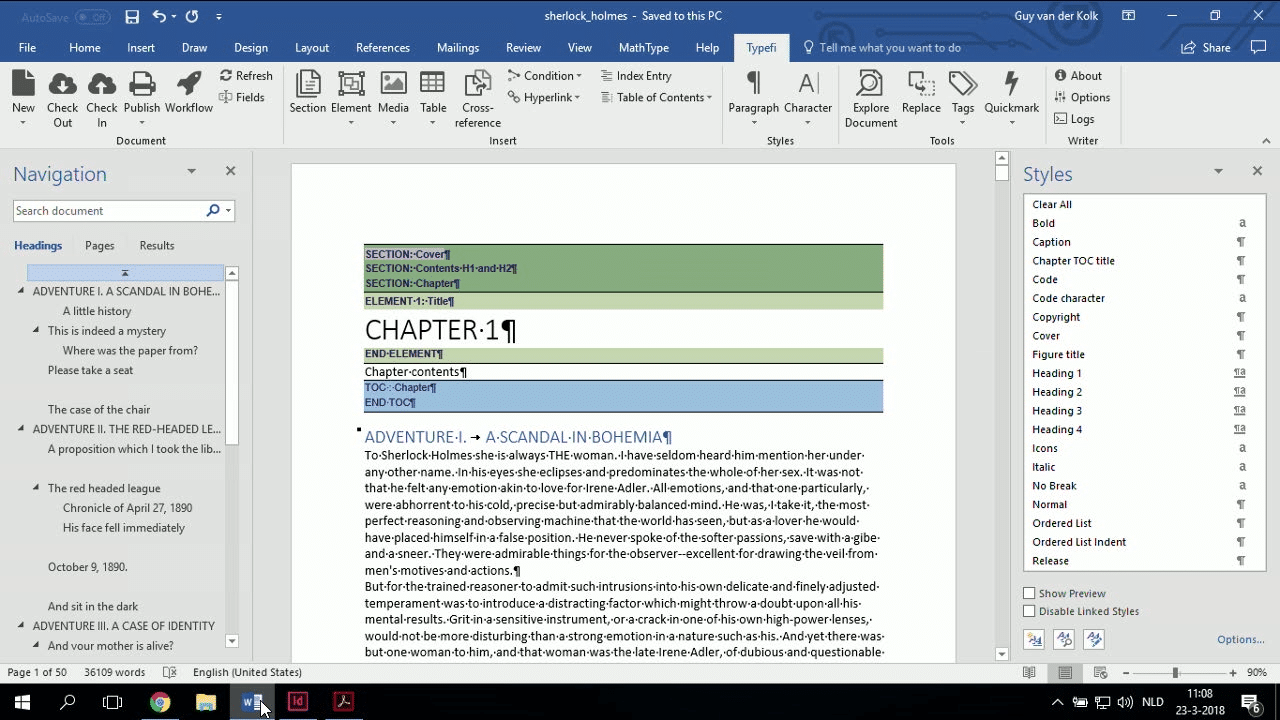
And yes, you could do that by going in to the Navigation panel in Word, which you see the panel here on the left, which I love working with when I’m working in Word, because as the name implies, it shows you all of your headings in a nice, useful structure.
I could go in here and click on every single one, and then have the Styles panel open and let it go through it and see if a Heading 1 is not followed by something else.
But Schematron is much cooler. ‘Cause with Schematron, you can have rules written, or if you’re good at XSLT, you can write your own rules, and you can have it check and validate the document for you.
So what I’m going to do is I’m going to go back to my workflow, and I’m now going to add a Schematron action to this workflow.
So we started with a basic file so far, took Typefi Writer, ran it, and ran into some issues that we could have gone back and had the authors fix manually, but we used an XSLT to clean up some of the problems.
But this time, because the heading structure is something that I want you, as a customer to take responsibility for,we’re not going to automatically fix the headings. We’re gonna tell you that you’re not doing it, or that there’s a mistake, so you can go back and fix it.
So I’m going to add an action again. And I am going to add a Schematron action.
Just to be clear, everything I’ve shown you so far is available in Typefi right now, presuming you’re on 8.4 at least.
Schematron is a ‘it’s gonna be there soon’ sort of action. ‘
So I’m adding Schematron and I’m reordering, because I want this to appear before the Create InDesign document.
So we had a Schematron—well, I had a Schematron rule written because I can’t write XPath to save my life—and that Schematron rule checks for two things.
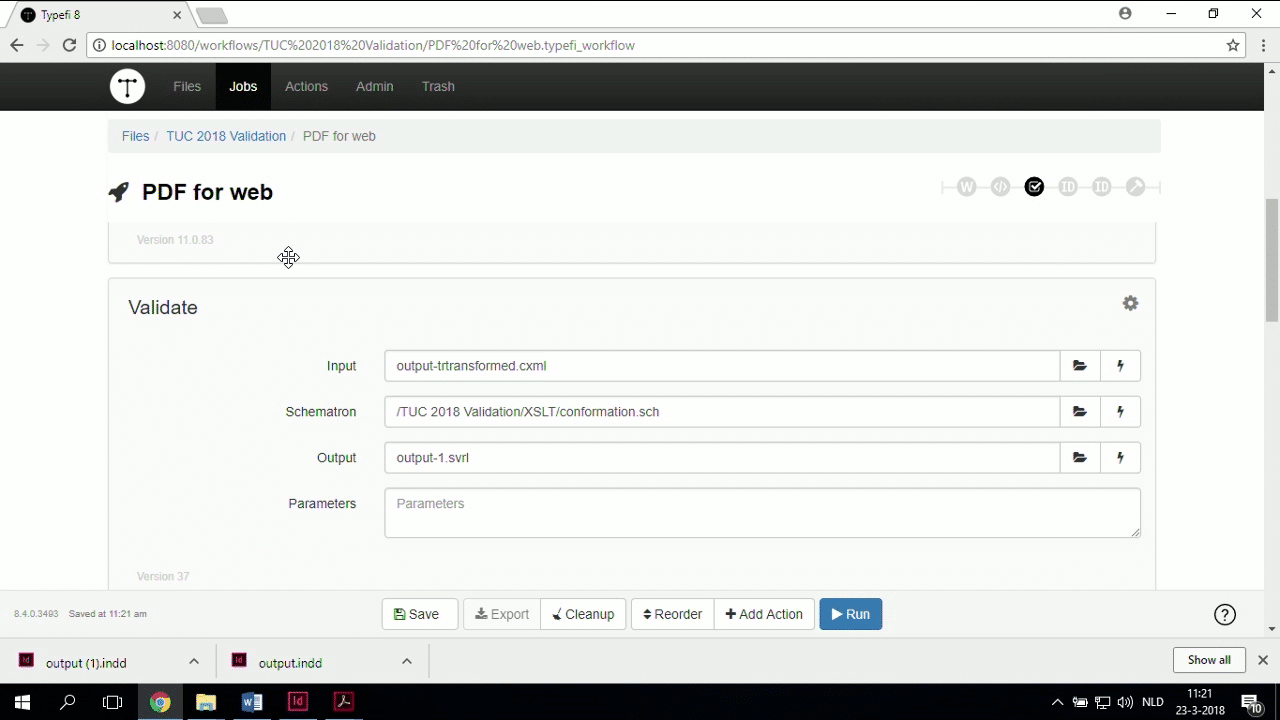
One of the things it does is it checks whether a Heading 1 is not followed by a Heading 3, and so on and so forth. So it checks proper heading structure and gives us a warning.
The other thing it does is, my style guide dictates that a figure must have a figure title, a figure, and a caption. I cannot check that in a DTD. So, that’s the other thing that this Schematron specifically does.
So I’ve added it here, let me make sure that the input and output are still correct so I don’t make that mistake, and I’m going to go back to Word and click on Publish again.
So we’re almost done. And now I’m not seeing InDesign start up. So there must be something wrong. Now that’s why I’m saying, this is a first, Schematron is still being worked on.
In this case, I would like a pop-up in Word saying Schematron has failed, that’s something that we’ll be working on in the future, but I don’t think that’s going to be part of the first release, we’ll have to see.
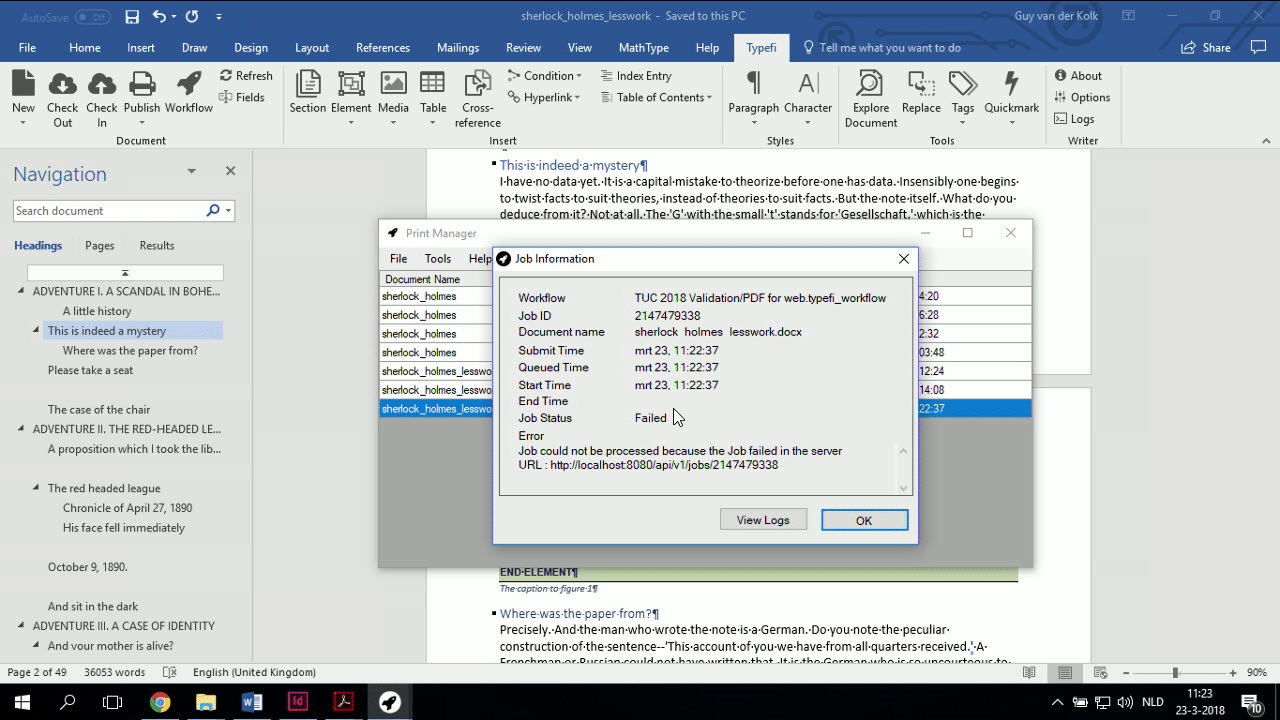
But if I look at my Print Manager, my Print Manager will definitely have an error message that it’s failed, and if I look at my failed message, it will definitely say that something happened, so let me just go back to the server and see.
And here we can see, well it definitely failed. And if I look at my logs, it failed at the validate step, and if I look at the validate log, then it tells me that, like I said earlier, it tells me that there is a problem with my heading structure.
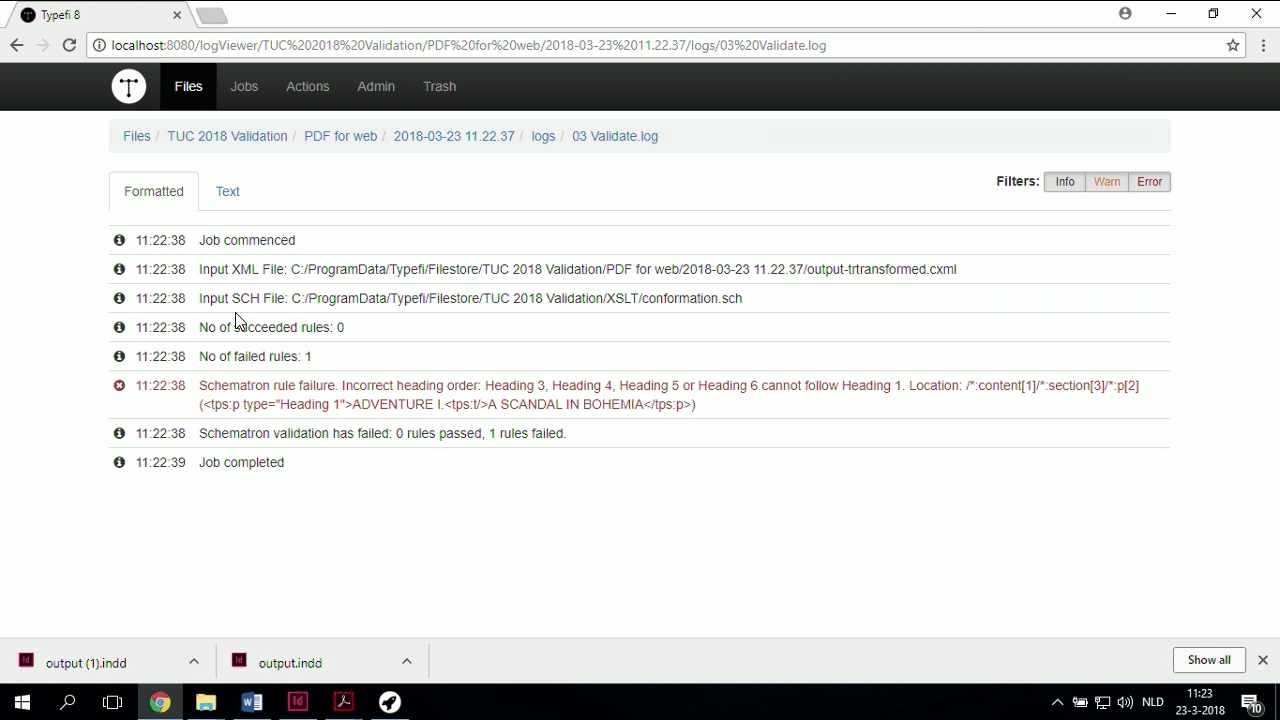
So it tells me and it gives me a very helpful hint that after my Heading 1, ‘Adventure 1 Scandal in Bohemia’, there is an incorrect heading following it.
So it now allows me to go back to my Word file and I can find that heading in my heading structure, look at the next one, and yes indeed, if I look at my Style Inspector, yes indeed, that is a Heading 3.
So I’m going to make that a Heading 2, and print again.
So now I have, thanks to Schematron and the rule that we wrote in there, we have now identified an issue where the heading structure is not correct, and you’re able to correct it in your source Word file and make sure that your content is accessible.
And the other rule was, of course, that figures and captions, so apparently I’ve done a good job, all my figures have captions.
URL checker (coming soon!)
Now, Schematron is something that’s gonna come quite soon. The next one that I’m going to show you is a little bit further away, but we really liked it in terms of again, helping you ensure that you are warned when something goes wrong.
Like i said, you don’t like reading logs, so we’ve gotta find different ways to make sure that you’re able to get the best out of the product.
So what we’re going to do is I’m going to add one more action, and then we’re going to open it up for any questions you may have.
One of the things, like this is a simple document. It’s like, what was it, maybe it’s 48 pages and it has four graphics, there’s not a big deal to it.
But I know that some of you produce 500-page documents with hundreds of graphics. And yes, the log does tell you if you go into it, you have missing graphics, all right.
But wouldn’t it be cool if you get warned about that a little bit earlier?
So there is a new action that we’re working on that is like in early stages, but I still wanted to show it to you as a proof of concept.
So what I’m going to do is I’m going to go to my Actions, and I’m going to say, I’m going to add another one, and this one is called Validate, URL checker. Reorder it, and I want this to be before my InDesign document, because obviously.
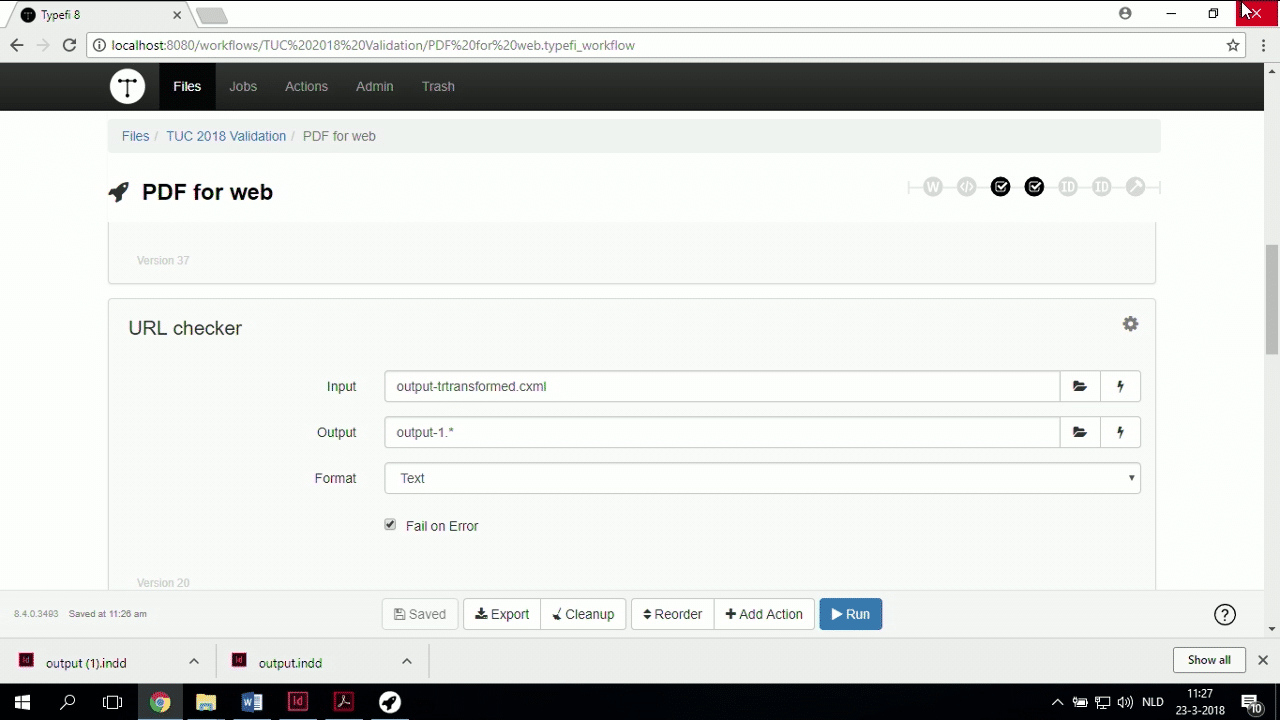
OK, so this one, all it does is check the universal resource locators. At this point, with this very early version, it’s only doing the images, but once this one gets released, we’ll also have it actually check your HTML links.
So when you’re producing your document, I know that your links are very often old links or broken links, or websites that have changed.
This action will allow you to check all of your links before you go to publish, and it will warn you that you’re missing images, and that some of your links might be outdated. Which I think is brilliant.
Anyway, so let me run that, let me actually cheat of course, or not cheat. I am going to go into my Assets folder and actually move one of the graphics out of there, ’cause right now they’re pointing, and I’m going to click on Publish again.
So this tool, as part of your workflow, will stop your job from running before 500 pages have been produced, and then you find out that two or three graphics are missing.
I know that Caleb likes talking about the fact that all of this is coming from you. You told us you wanted this feature, so we’re working on it. And on top of that, I really like the fact that it will check your HTML links.
Anyway, so the job failed. In the server, if I view the logs then, if I go back here, it will have failed because the—like I said, this really beta, so the log is not properly filled—it failed because that image was missing, let’s put it that way.
So that’s it for me, I hope that gave you some impression of some of the tools that we can use.
Like I’ve said a couple of times so far, these tools exist, we’ve built them for you, but they’re also relying on you to tell us what you want.
So make sure that you speak to us after the session, and tell us, OK, now that you’ve shown me that this is possible or that you used this, how can we use it in your organisation.
‘Cause I think, especially something like the XSLT, the Schematron, yes it’s a small investment, but it’s a small investment that can pay back in droves when you have to do less work, or your work is more consistent.
Q&A
Thank you so much, and do you have any questions for me?
ATTENDEE: Hi, at the moment, we’re able to use Typefi using our invalid XML. Will we be able to sort of add a message or something when we’re able to get output with invalid XML?
GUY: So, let me make sure that I understood that question correctly. you’re saying you’re currently able to run invalid XML through Typefi?
ATTENDEE: Yes.
GUY: And would you be able to get a message? Yes, in this case, I would say that if you’re using XML and you want to—now when you say invalid do you mean invalid as in it fails DTD checking? Or invalid as in it passes validation of the core XML file, but there are certain rules that are not fulfilled when you’re running it to InDesign?
ATTENDEE: It’s possible that it doesn’t conform to the DTD or STS DTD.
GUY: OK, so, there’s two answers to that. For one, if you’re using XML as an input, then I would say that it’s absolutely important that you make sure that you validate the XML using whatever authoring tools that you do before you run it through Typefi, because of course it needs to run valid XML.
But, on top of that, I would absolutely say that once you’ve run the XML through, I know, for example, that you guys have a lot of transformations that depend on certain values being present in your input XML.
So in that case, Schematron could be used as an extension of your DTD validation to make sure that everything is in the proper order to be transformed to CXML, and then out to InDesign.
I don’t know if that answers your question completely, but I do believe that—I don’t know how Caleb feels about it—but I do believe that it is important that your input XML is properly validated before you run it through.
We don’t currently have a tool to validate your input XML before it goes through Typefi, but maybe it’s something we could build.
CALEB CLAUSET: If you have Schematron as your first action, then you can validate the rules on that side of things.
If you’re submitting XML that failed validation and it’s running through Typefi, that XML is being made valid in a transform at some point in the workflow.
In essence the transform, as it’s converting from STS to Content XML, is saying, “Well, I don’t care about this piece that’s invalid, I’m going to produce well-formed, fully valid CXML out of it.” So you would need to do any validation earlier on in your STS to make sure that conforms the way you want it to.
But you can run this stuff at any given step in the workflow. There’s no requirement that you must run the Schematron at this point—you could run it as its own action, you could just have a validation workflow. But it’s up to you how you want to organise these sorts of things.
GUY: Any other questions? If not, then thanks for your attention. And I would say, I believe it’s time for lunch.

Guy van der Kolk
Senior Solutions Consultant | Typefi
Guy first got hooked on publishing while attending an international school in Ivory Coast, where he used Pagemaker, Photoshop and an Apple Quicktake 100 camera to help create the yearbook. After many hours of hard work, while holding the final printed product, he knew this was an industry he wanted to be a part of.
Having spent the first 17 years of his life in West Africa, Guy is fluent in three languages and has a multicultural background that has served him well in his career. As an IT consultant and trainer for an Apple Premium reseller and now as a Senior Solutions Consultant for Typefi, he has spent the last 15 years training thousands of people to get the most out of their software.